NanoDet训练
github:RangiLyu/nanodet: NanoDet-Plus⚡Super fast and lightweight anchor-free object detection model. 🔥Only 980 KB(int8) / 1.8MB (fp16) and run 97FPS on cellphone🔥
CPU:guo-pu/NanoDet-PyTorch-CPU: 此代码用于目标检测,模型小,检测速度快速,适合没GPU显卡的嵌入式设备运行,比如“树莓派”、ARM开发板、嵌入式开发板。
hpc203/nanodet-plus-opencv: 分别使用OpenCV、ONNXRuntime部署NanoDet-Plus,包含C++和Python两个版本的程序
目标检测——使用nanodet训练自己制作的数据集并测试模型,通俗易懂(详细图文教程)_nanodet训练自己的模型-CSDN博客
第一模块:深度学习轻量级模型nanodet-CSDN博客
轻量级目标检测模型NanoDet-Plus微调、部署(保姆级教学)-CSDN博客
数据集:
使用Labelimg制作VOC格式数据集或yolo格式数据集(详细图文教程)_yolov5训练集-CSDN博客
conda
安装最新版最详细Anaconda新手安装+配置+环境创建教程_anaconda配置-CSDN博客
添加环境变量
1
2
3
4
..\anaconda3 ..\anaconda3\Scripts ..\anaconda3\Library\bin ..\anaconda3\Library\mingw-w64\bin
查看安装情况
创建/删除 环境
1 conda create -n env_name python=3.8
在conda环境下,输入以下命令查看当前存在的环境:
删除环境
1
2
conda remove -n env_name --all conda env remove -n env_name
重命名环境(将 --clone 后面的环境重命名成 -n 后面的名字)
1 conda create -n torch --clone py3 # 将 py3 重命名为 torch
创建完成环境之后,系统会提示如何 进入和退出环境,如下
1
2
conda activate env_name # 进入环境 conda deactivate # 退出环境
pytorch
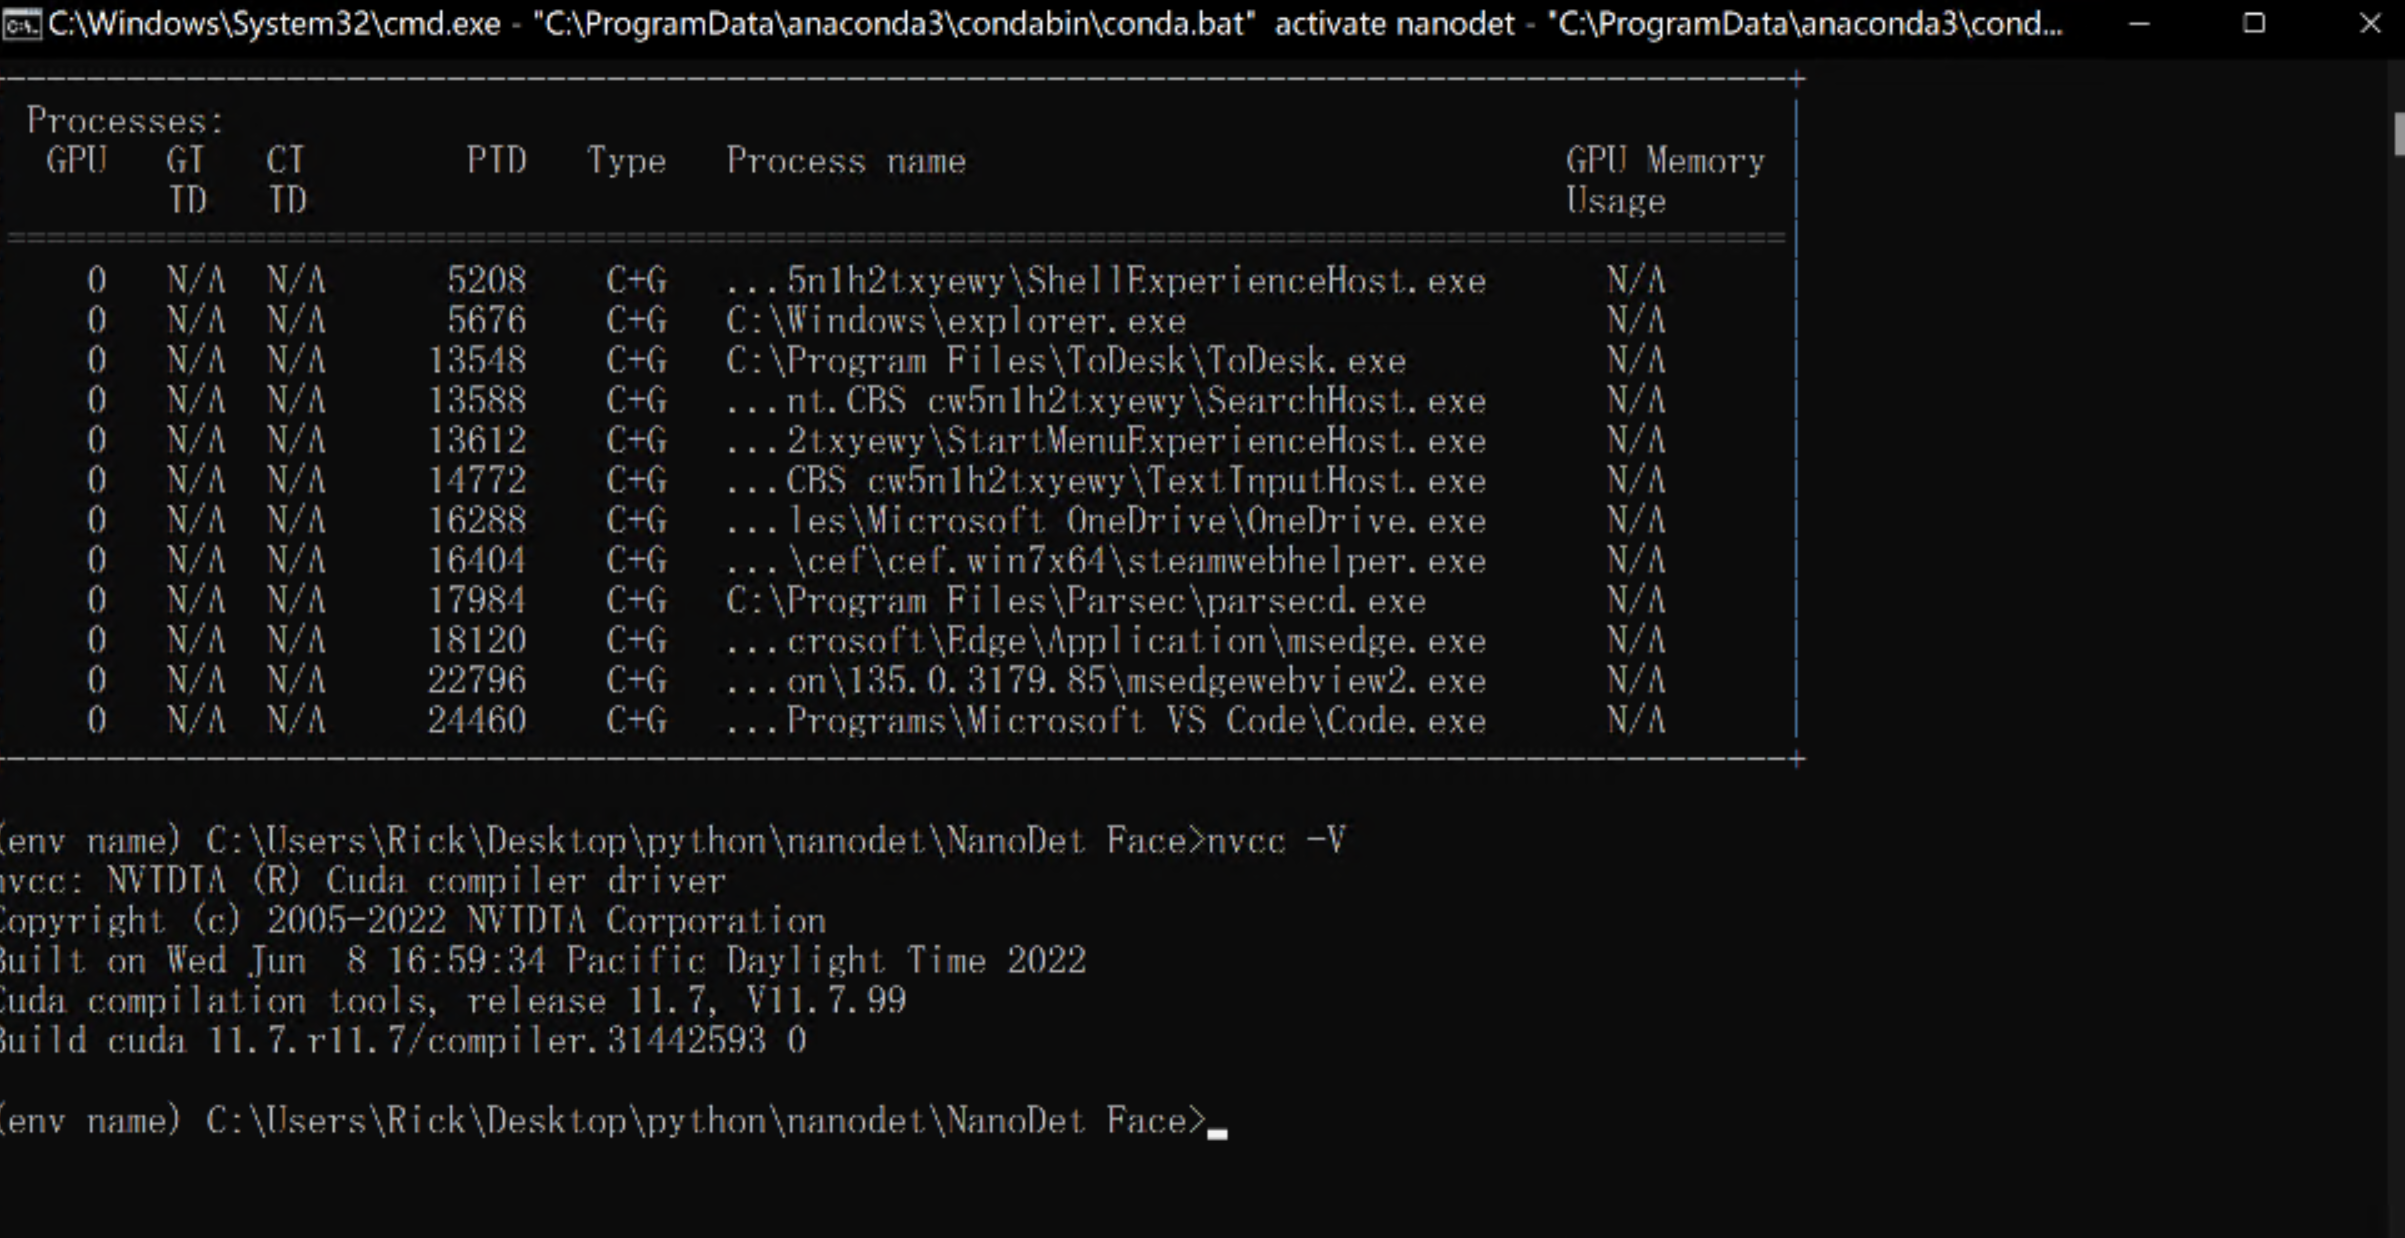
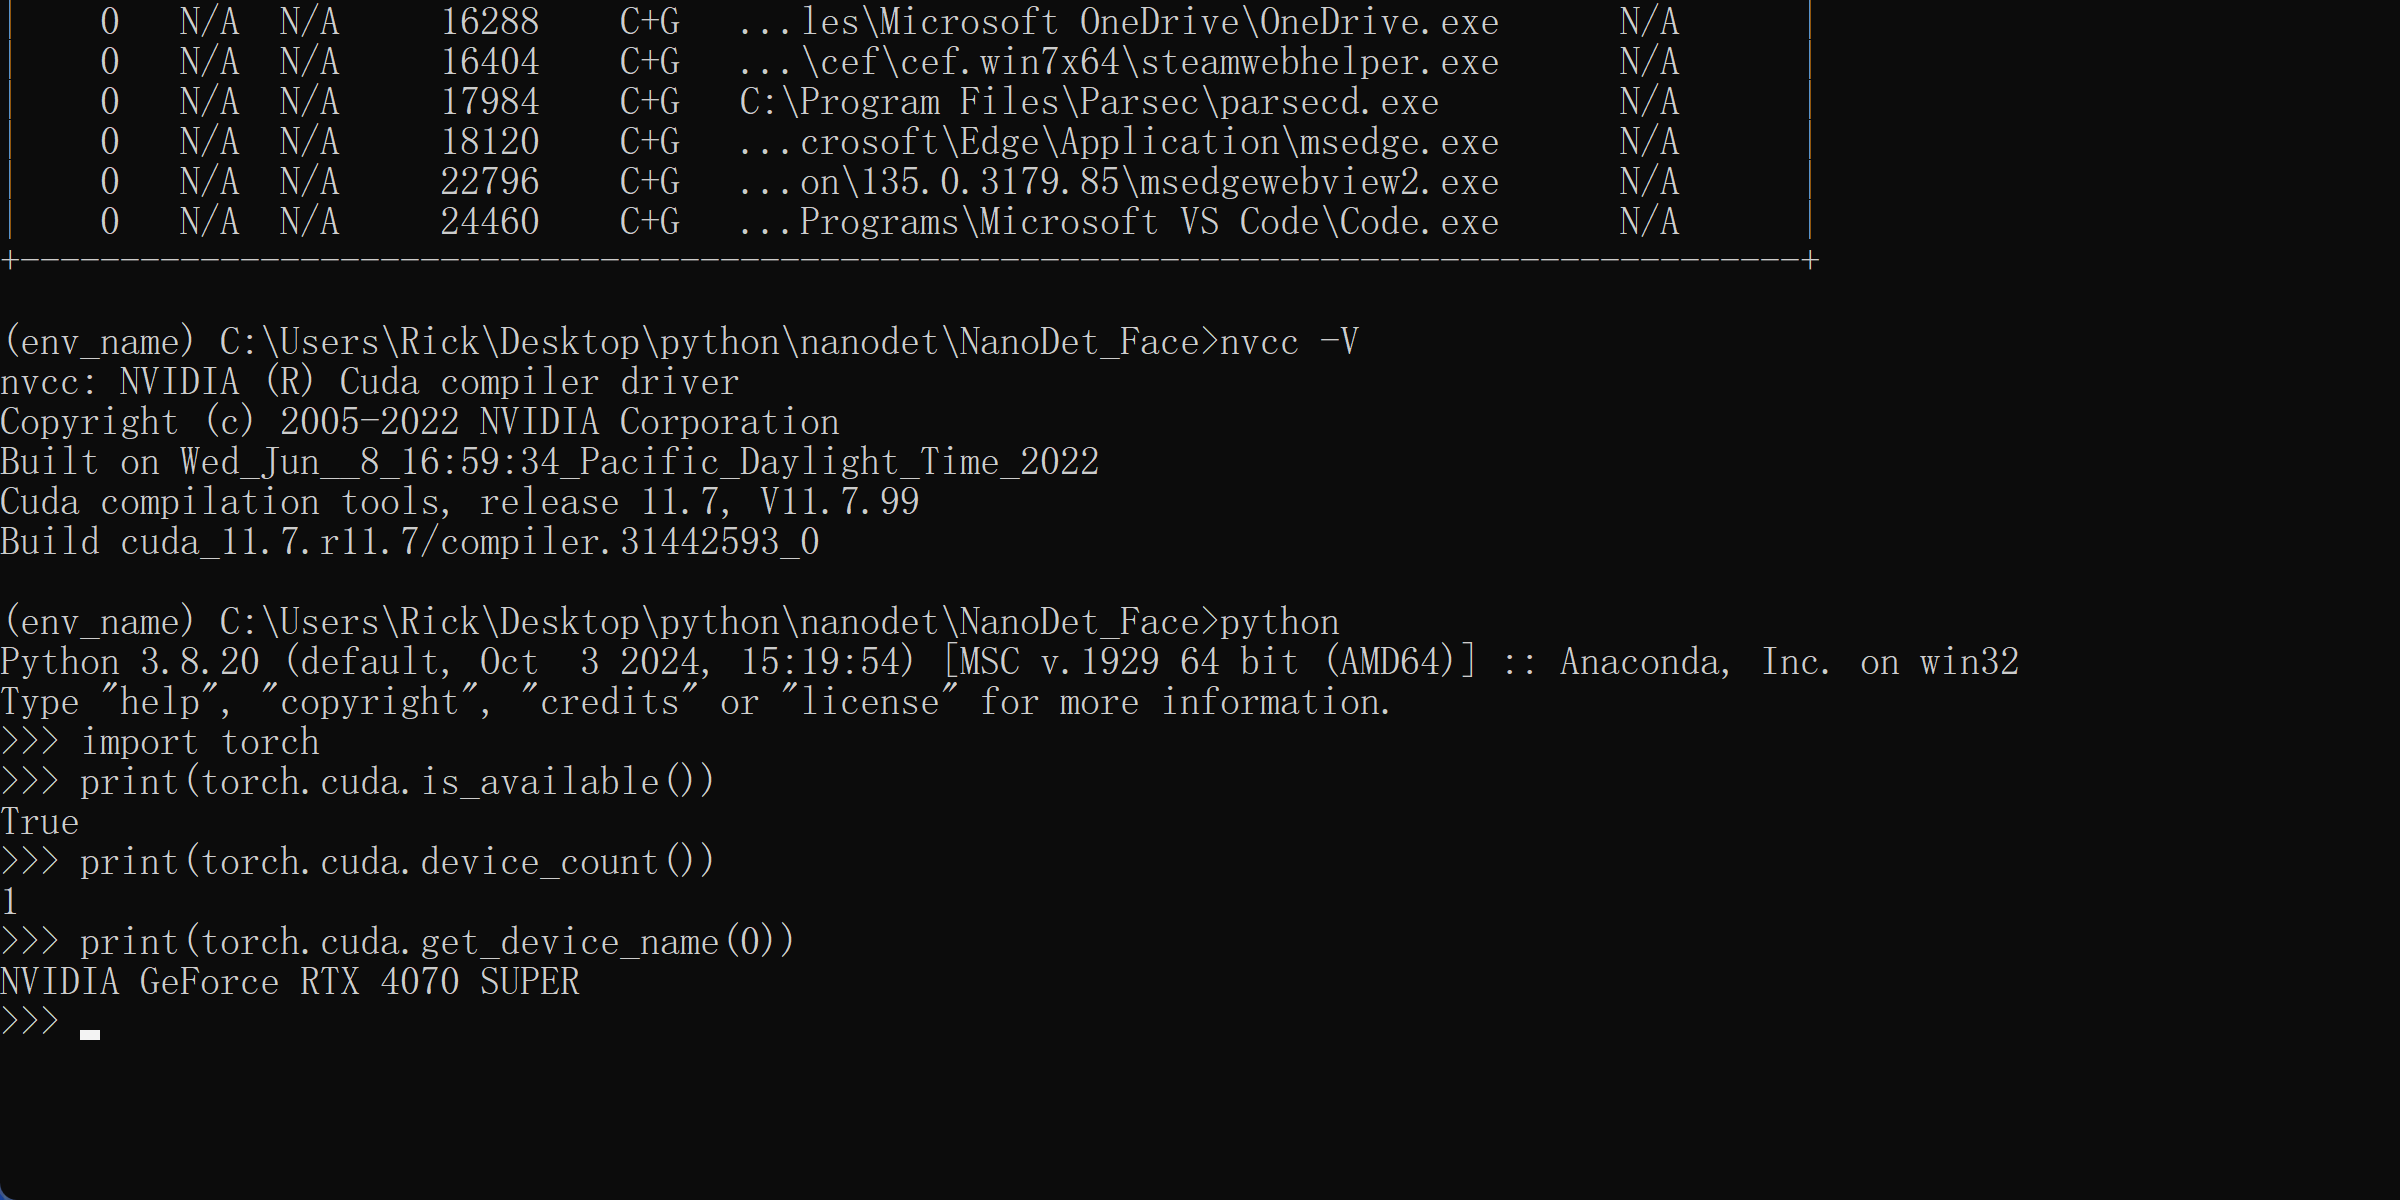
查看CUDA版本nvidia-smi nvcc -V
Previous PyTorch Versions | PyTorch
NanoDet项目需要使用不高于2.00版本的Pytorch,而Pytorch低版本安装需要降低CUDA版本,需要重新安装CUDA 11.7
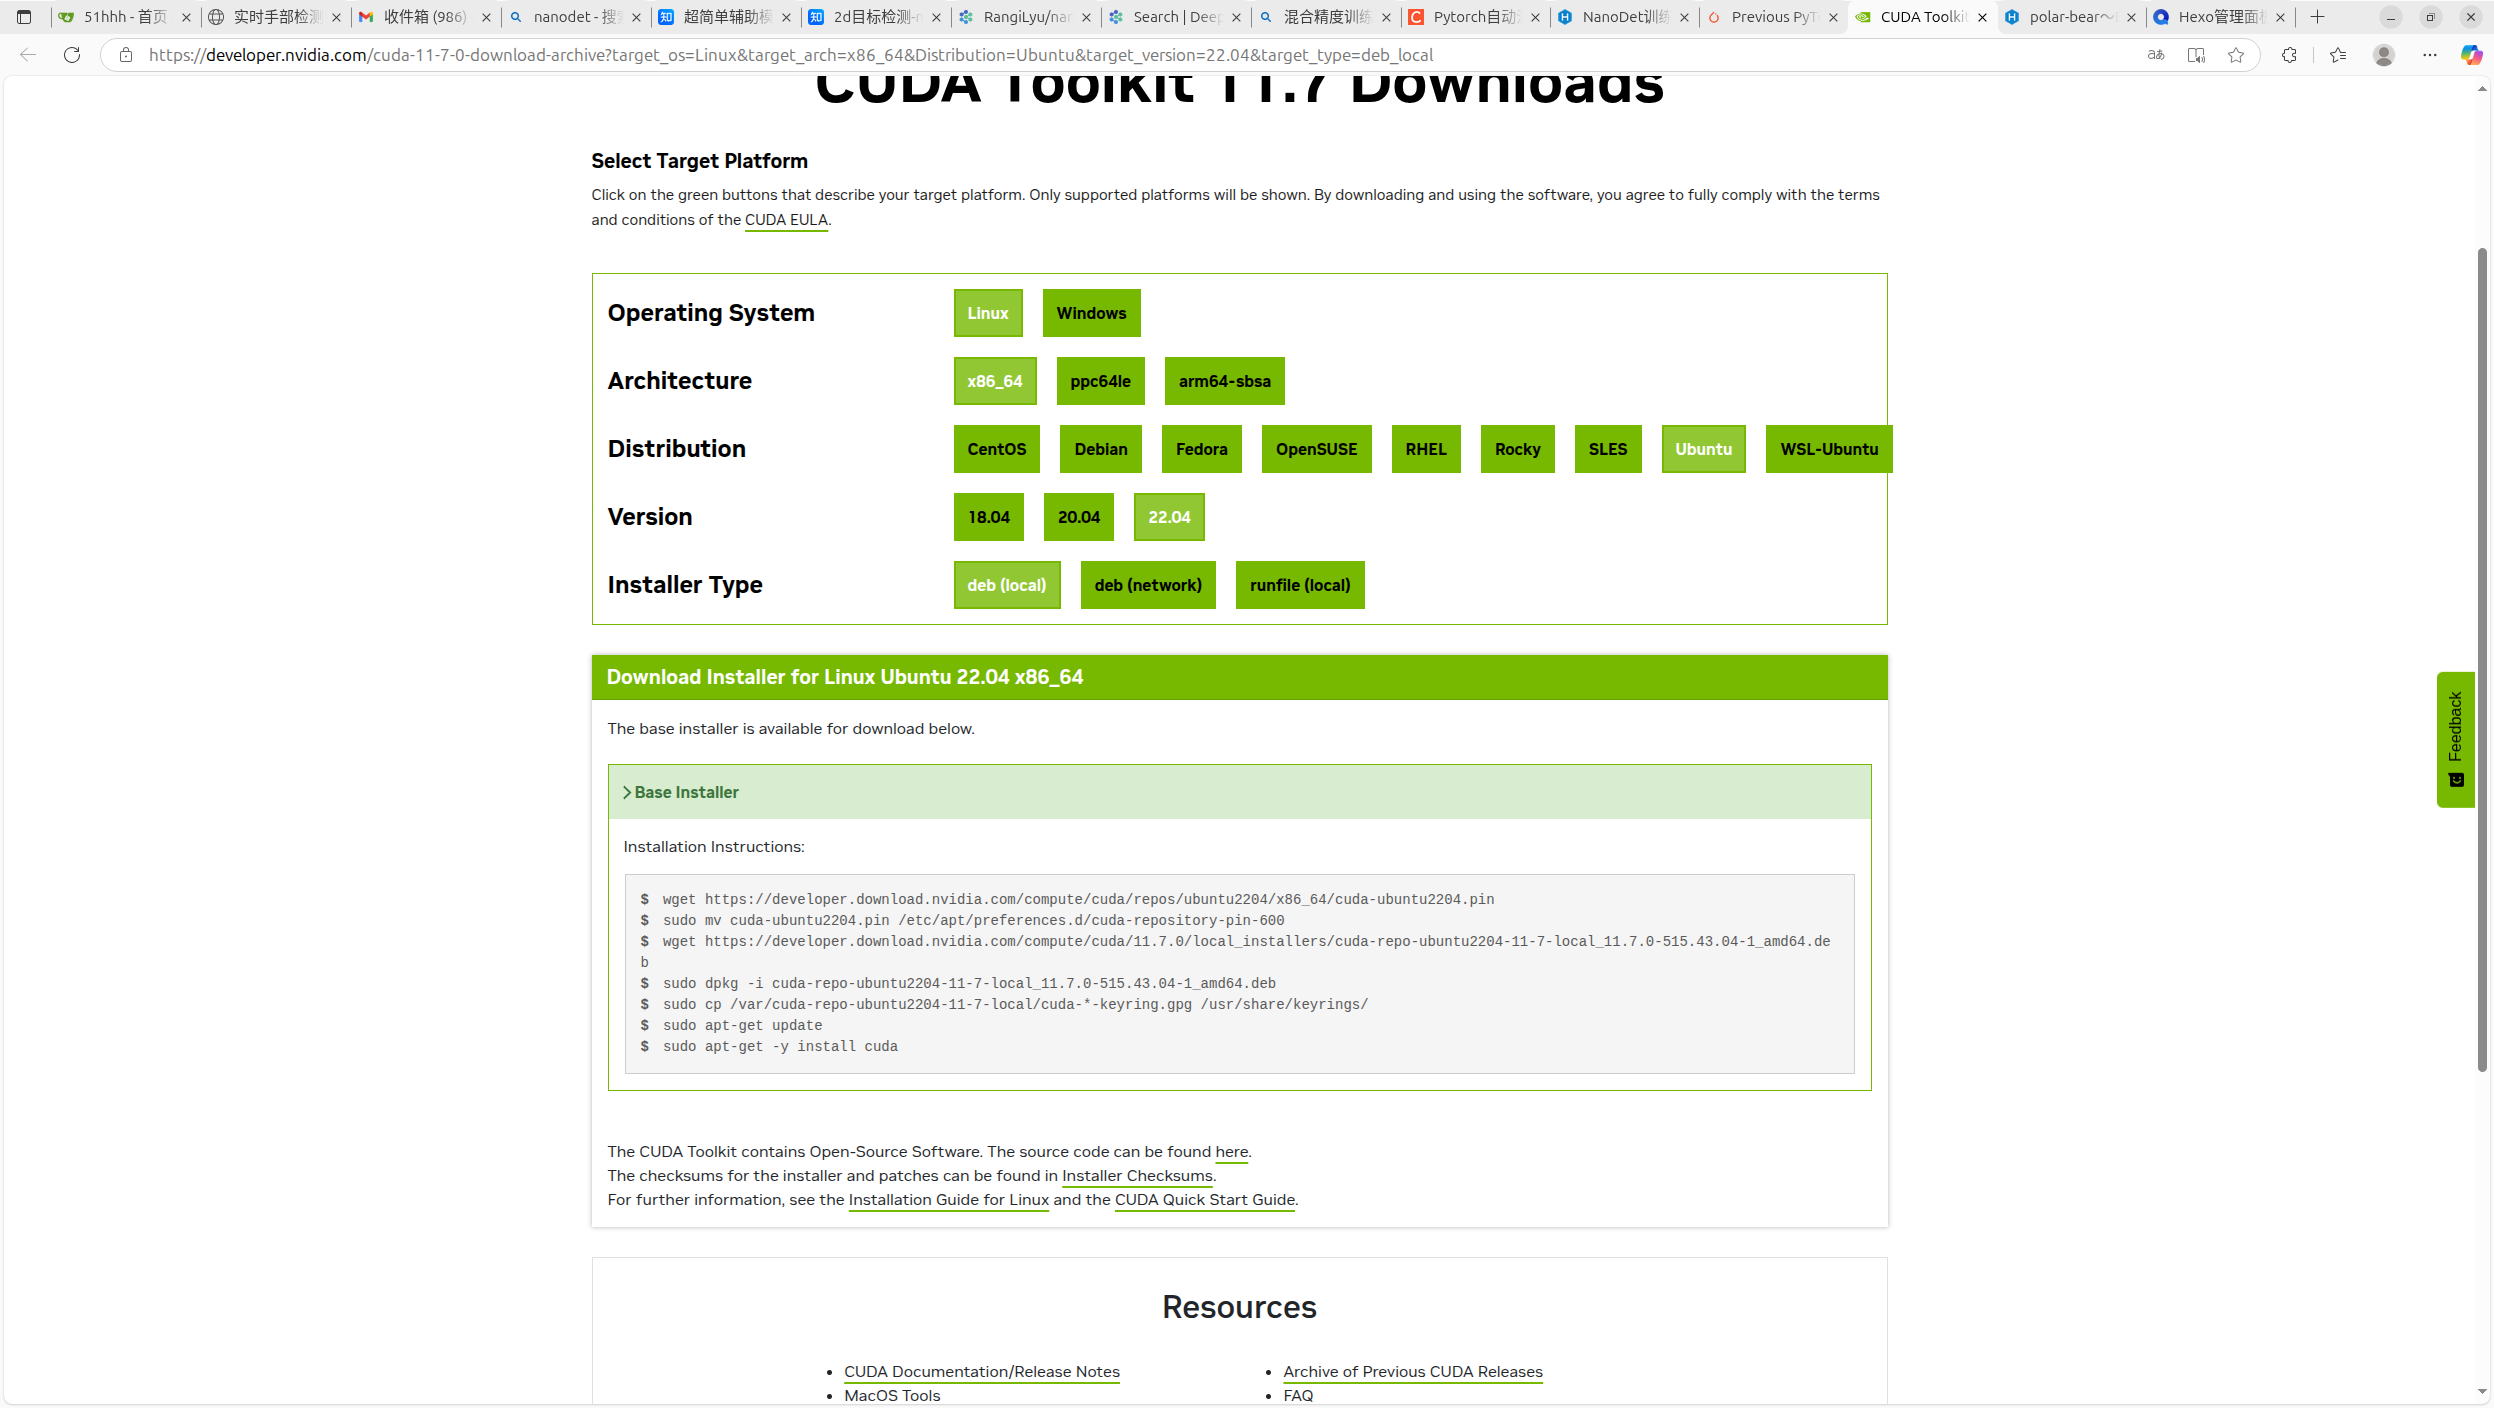
CUDA旧版存档:CUDA Toolkit Archive | NVIDIA Developer
在下载安装过程中,将https://developer.download.nvidia.com改为https://developer.download.nvidia.cn可以解决下载速度过慢的问题。
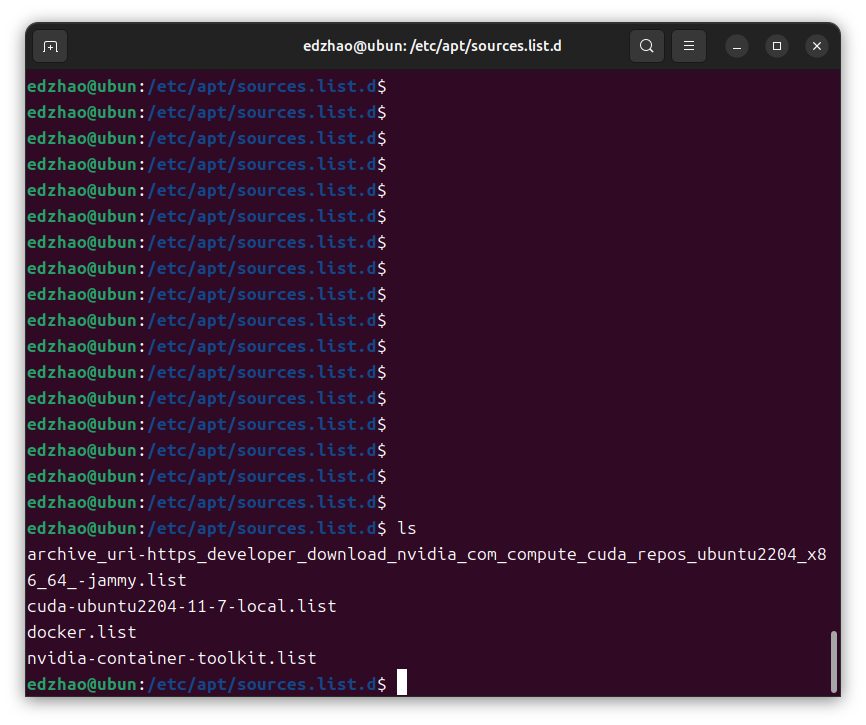
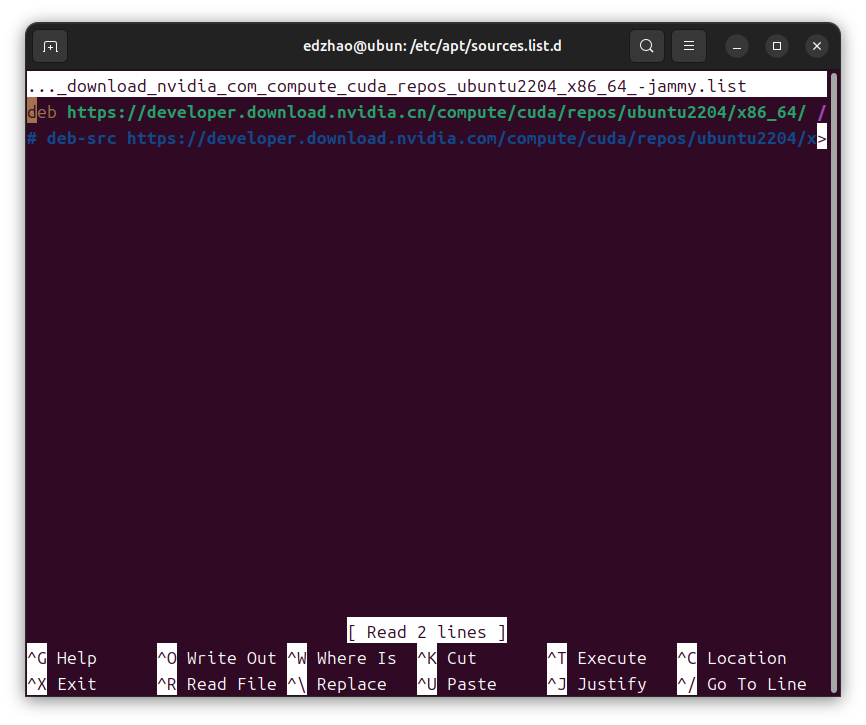
最后安装sudo apt-get -y install cuda的过程中,也可以在/etc/apt/sources.list.d修改
1 sudo nano archive_uri-https_developer_download_nvidia_com_compute_cuda_repos_ubuntu2204_x86_64_-jammy.list
成功解决:AssertionError: Torch not compiled with CUDA enabled - 知乎
创建conda环境
1 conda create -n env_name python=3.8
查看环境
进入环境
安装pytorch
1 conda install pytorch==1.13.1 torchvision==0.14.1 torchaudio==0.13.1 pytorch-cuda=11.7 -c pytorch -c nvidia
测试torch环境
1
2
3
4
import torch print(torch.cuda.is_available()) print(torch.cuda.device_count()) print(torch.cuda.get_device_name(0))
NanoDet
此处使用目标检测——使用nanodet训练自己制作的数据集并测试模型,通俗易懂(详细图文教程)_nanodet训练自己的模型-CSDN博客
整合文件链接:https://pan.baidu.com/s/1H_qB7OZKJodtbEImKN_TeQ 提取码:dcj7
NanoDet项目较早需要使用不高于2.00版本的Pytorch,高版本Pytorch去除了部分NanoDet所用方法
1 conda install pytorch==1.13.1 torchvision==0.14.1 torchaudio==0.13.1 pytorch-cuda=11.7 -c pytorch -c nvidia
注意pytorch与torchvision版本对应
pytorch/vision:特定于计算机视觉的数据集、转换和模型
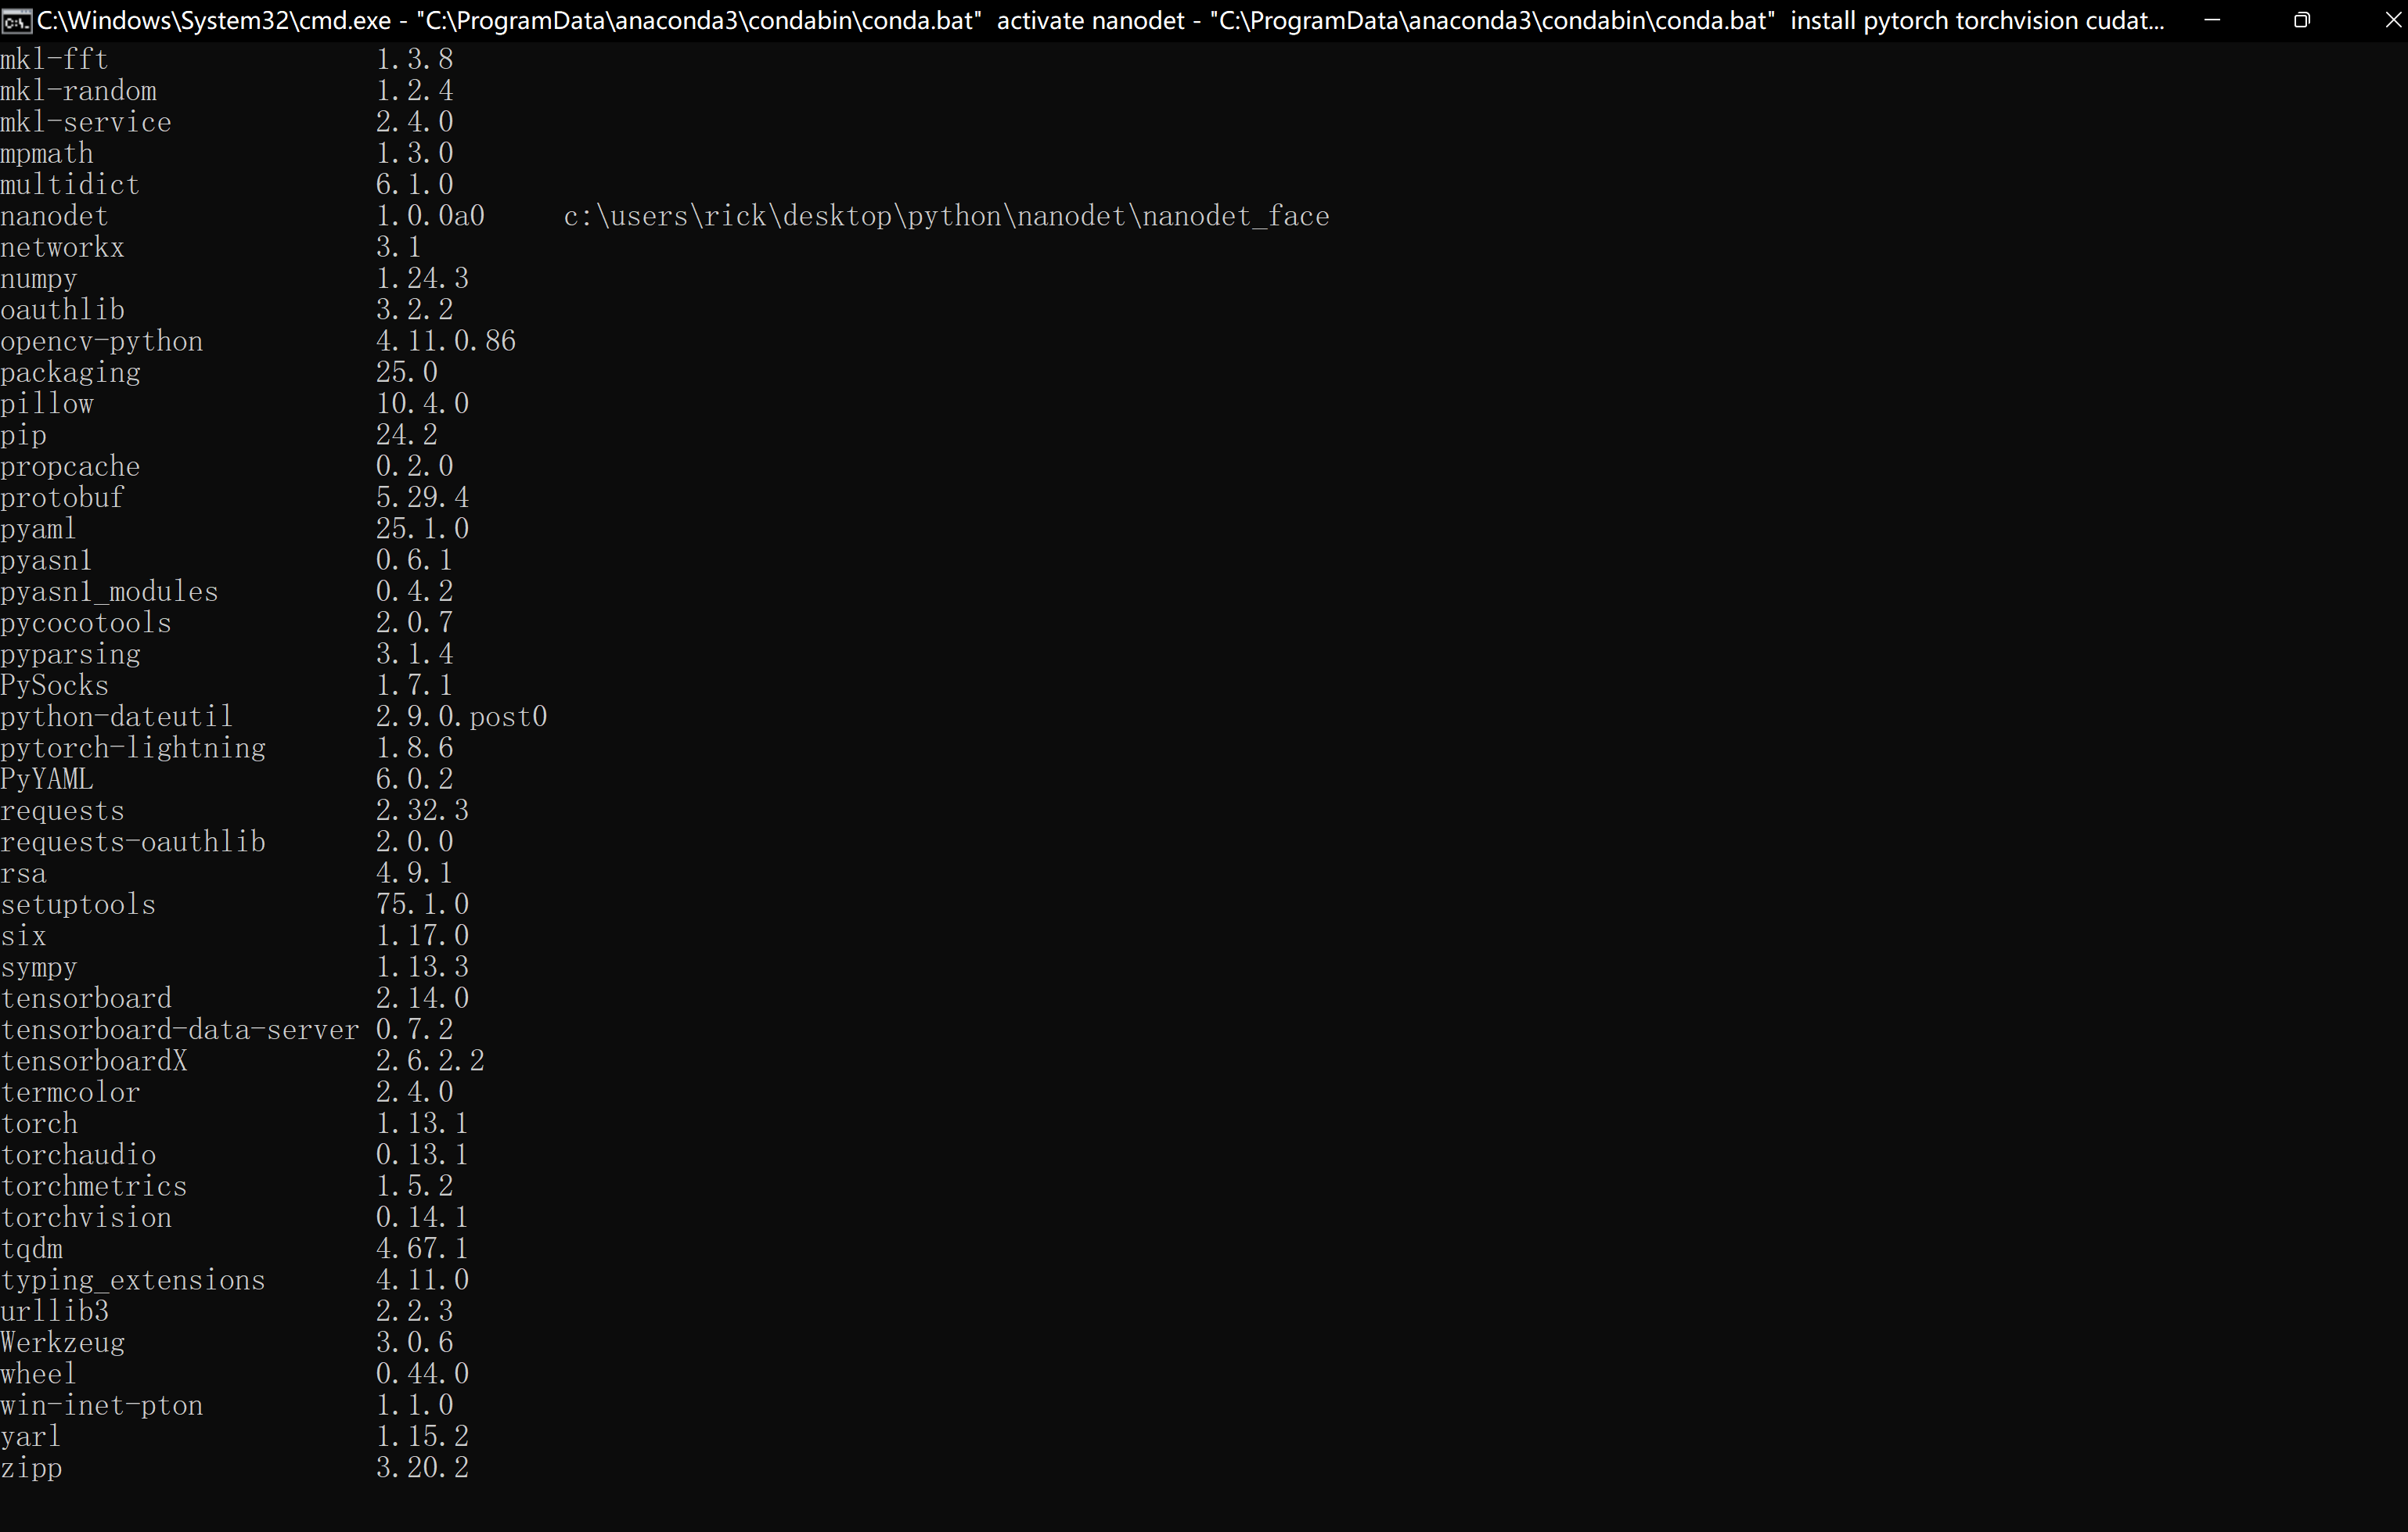
截至现在25/04/22,由于requirements.txt中未对依赖库做版本限制,会导致安装最新稳定版本,导致NanoDet缺少方法,建议以下库指定版本安装
pytorch-lightning = 1.1.8
(图中版本还是过高,在后期train中无法正常允许,需使用1.1.8版本)
修改requirements.txt
1
2
3
4
5
6
7
8
9
10
11
12
13
14
15
Cython matplotlib numpy omegaconf>=2.0.1 onnx onnx-simplifier opencv-python pyaml pycocotools pytorch-lightning==1.1.8 tabulate tensorboard termcolor tqdm
安装
1 pip install -r requirements.txt
在项目根目录安装nanodet
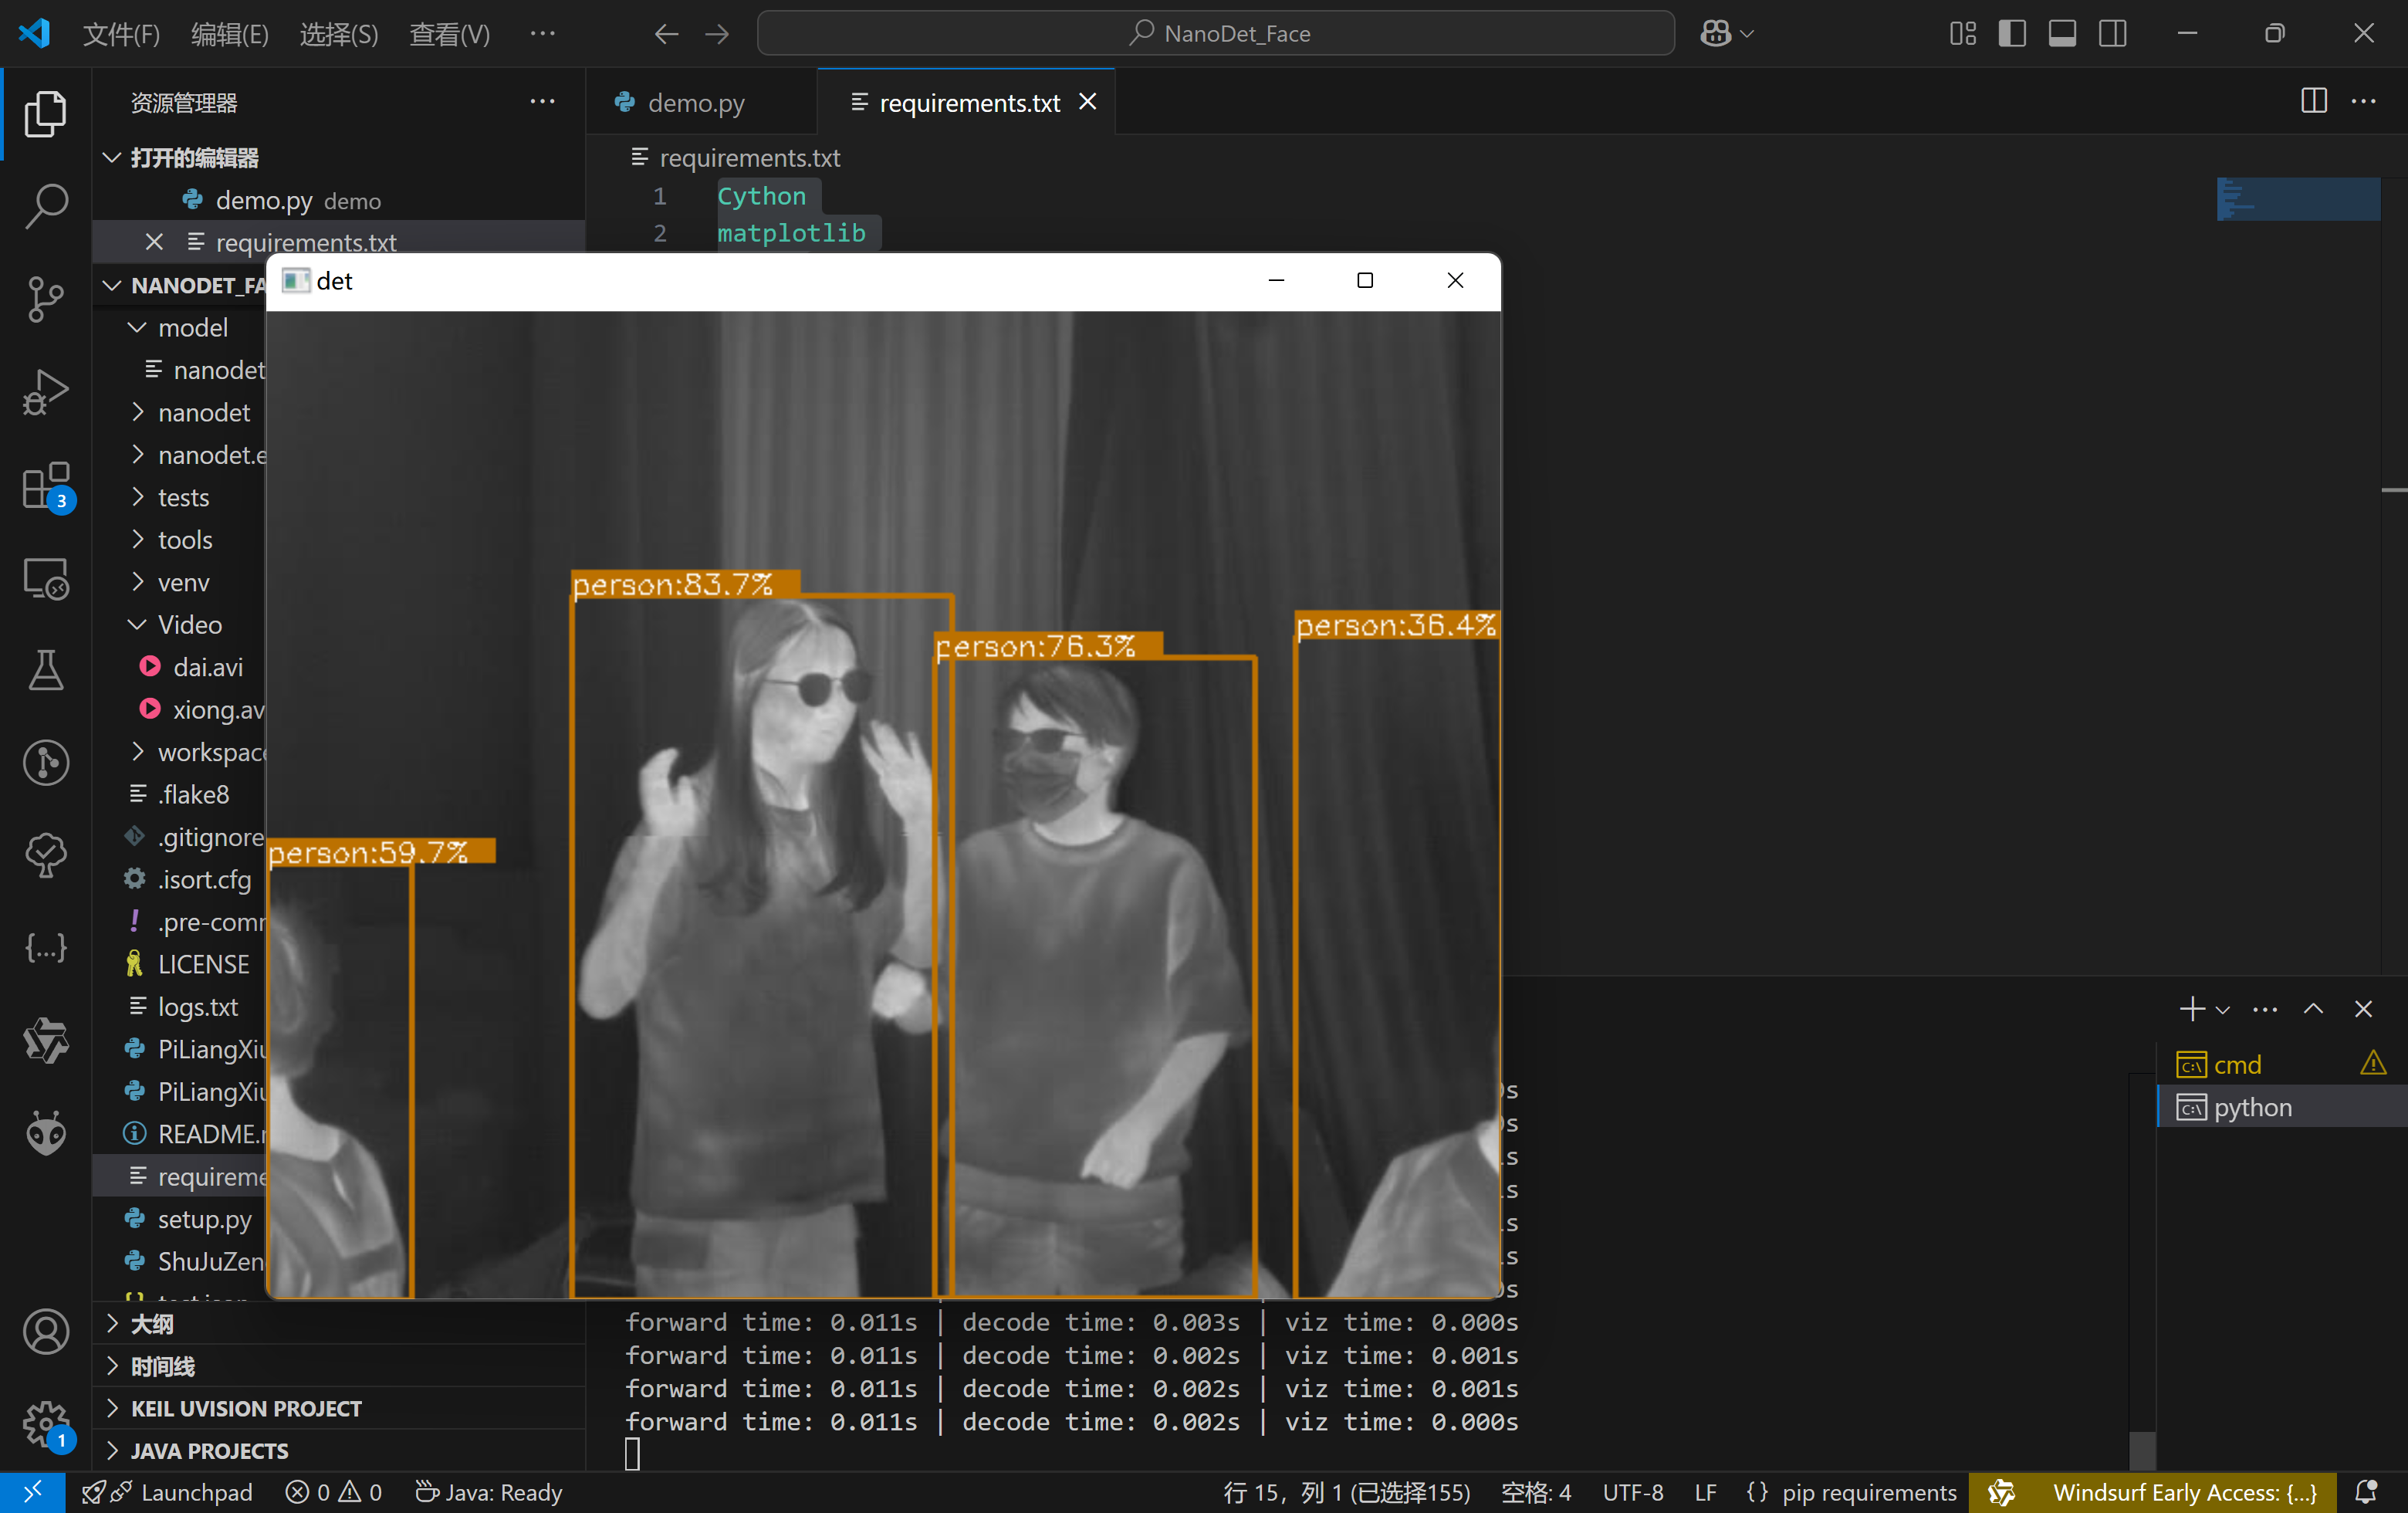
下载模型,测试NanoDet
1 python demo/demo.py video --config ./config/nanodet-plus-m-1.5x_320.yml --model ./model/nanodet-plus-m-1.5x_320.pth --path ./Video/dai.avi
到此环境完成配置
自训练模型
数据集准备
数据标注工具
labelme:
Releases · wkentaro/labelme
深度学习图像标签标注软件labelme超详细教程 - 知乎
labelimg:
使用Labelimg制作VOC格式数据集或yolo格式数据集(详细图文教程)_yolov5训练集-CSDN博客
【教程】标注工具Labelimg的安装与使用 - 知乎
深度学习工具|LabelImg(标注工具)的安装与使用教程_labelimg软件-CSDN博客
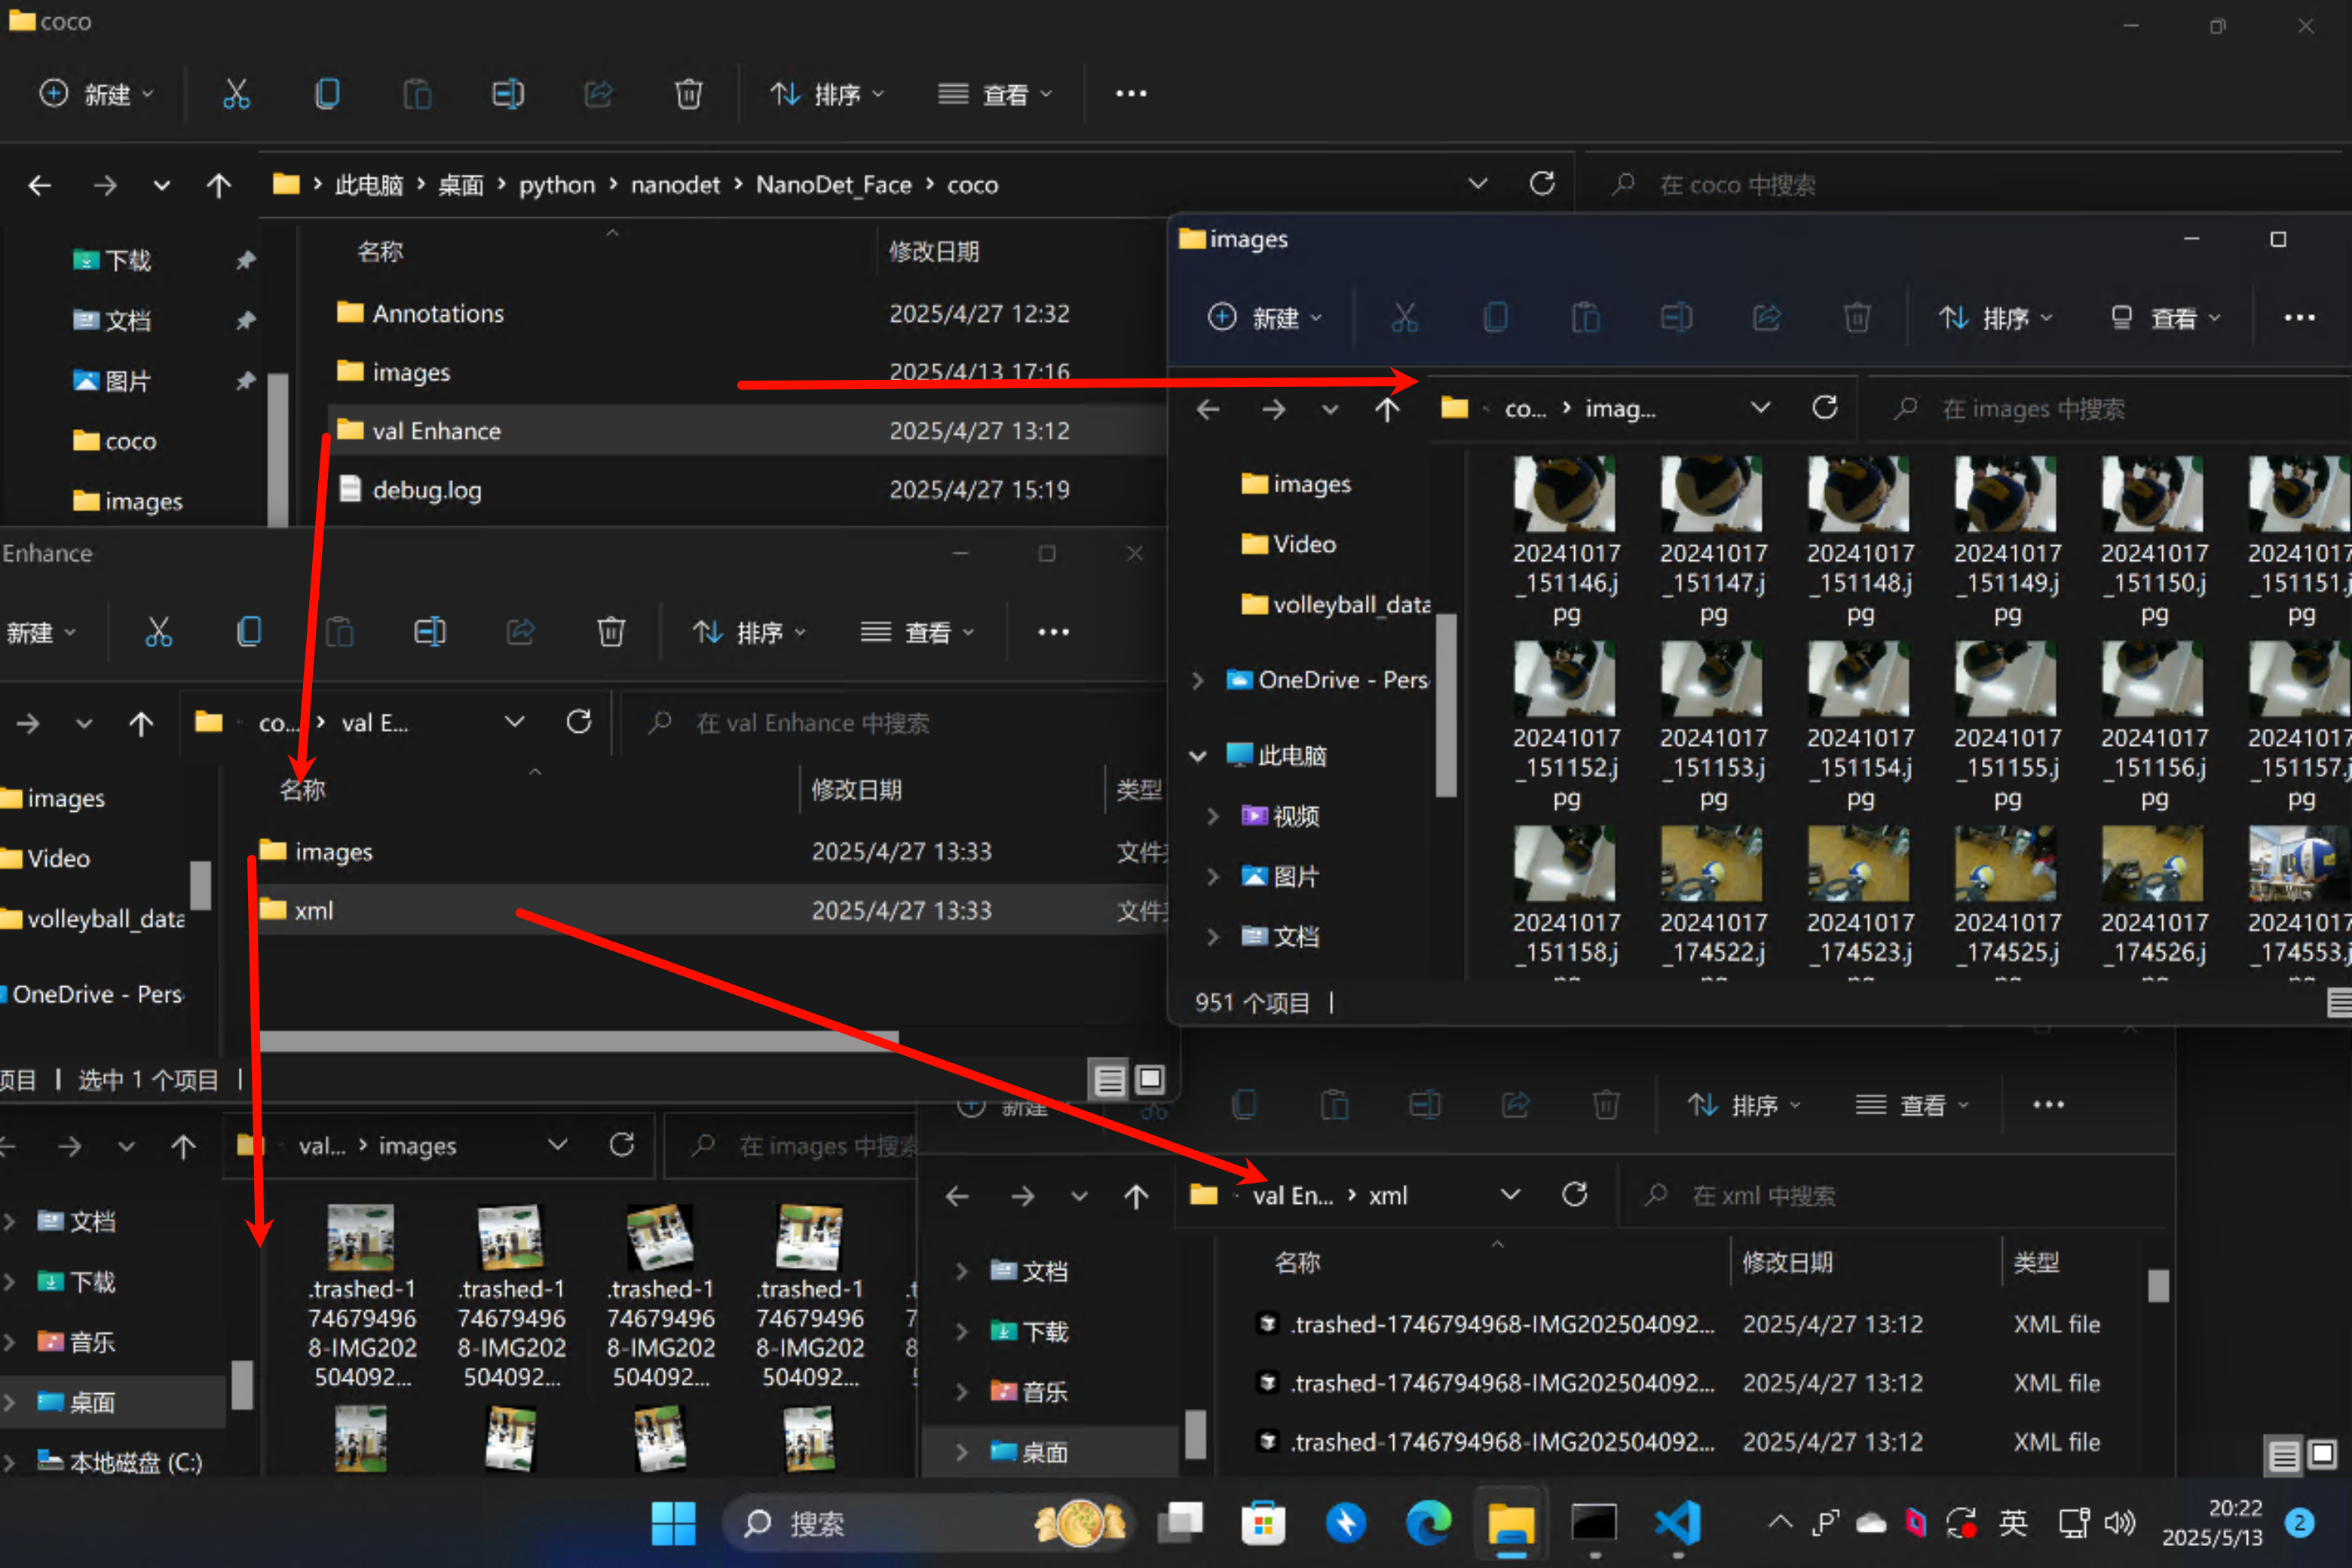
先用labelimg或者labelme标注出数据集,数据量过少可以用数据增强生成增加数据量,按照脚本可得到数据增强后的images和xml,分别为图片和目标位置信息。
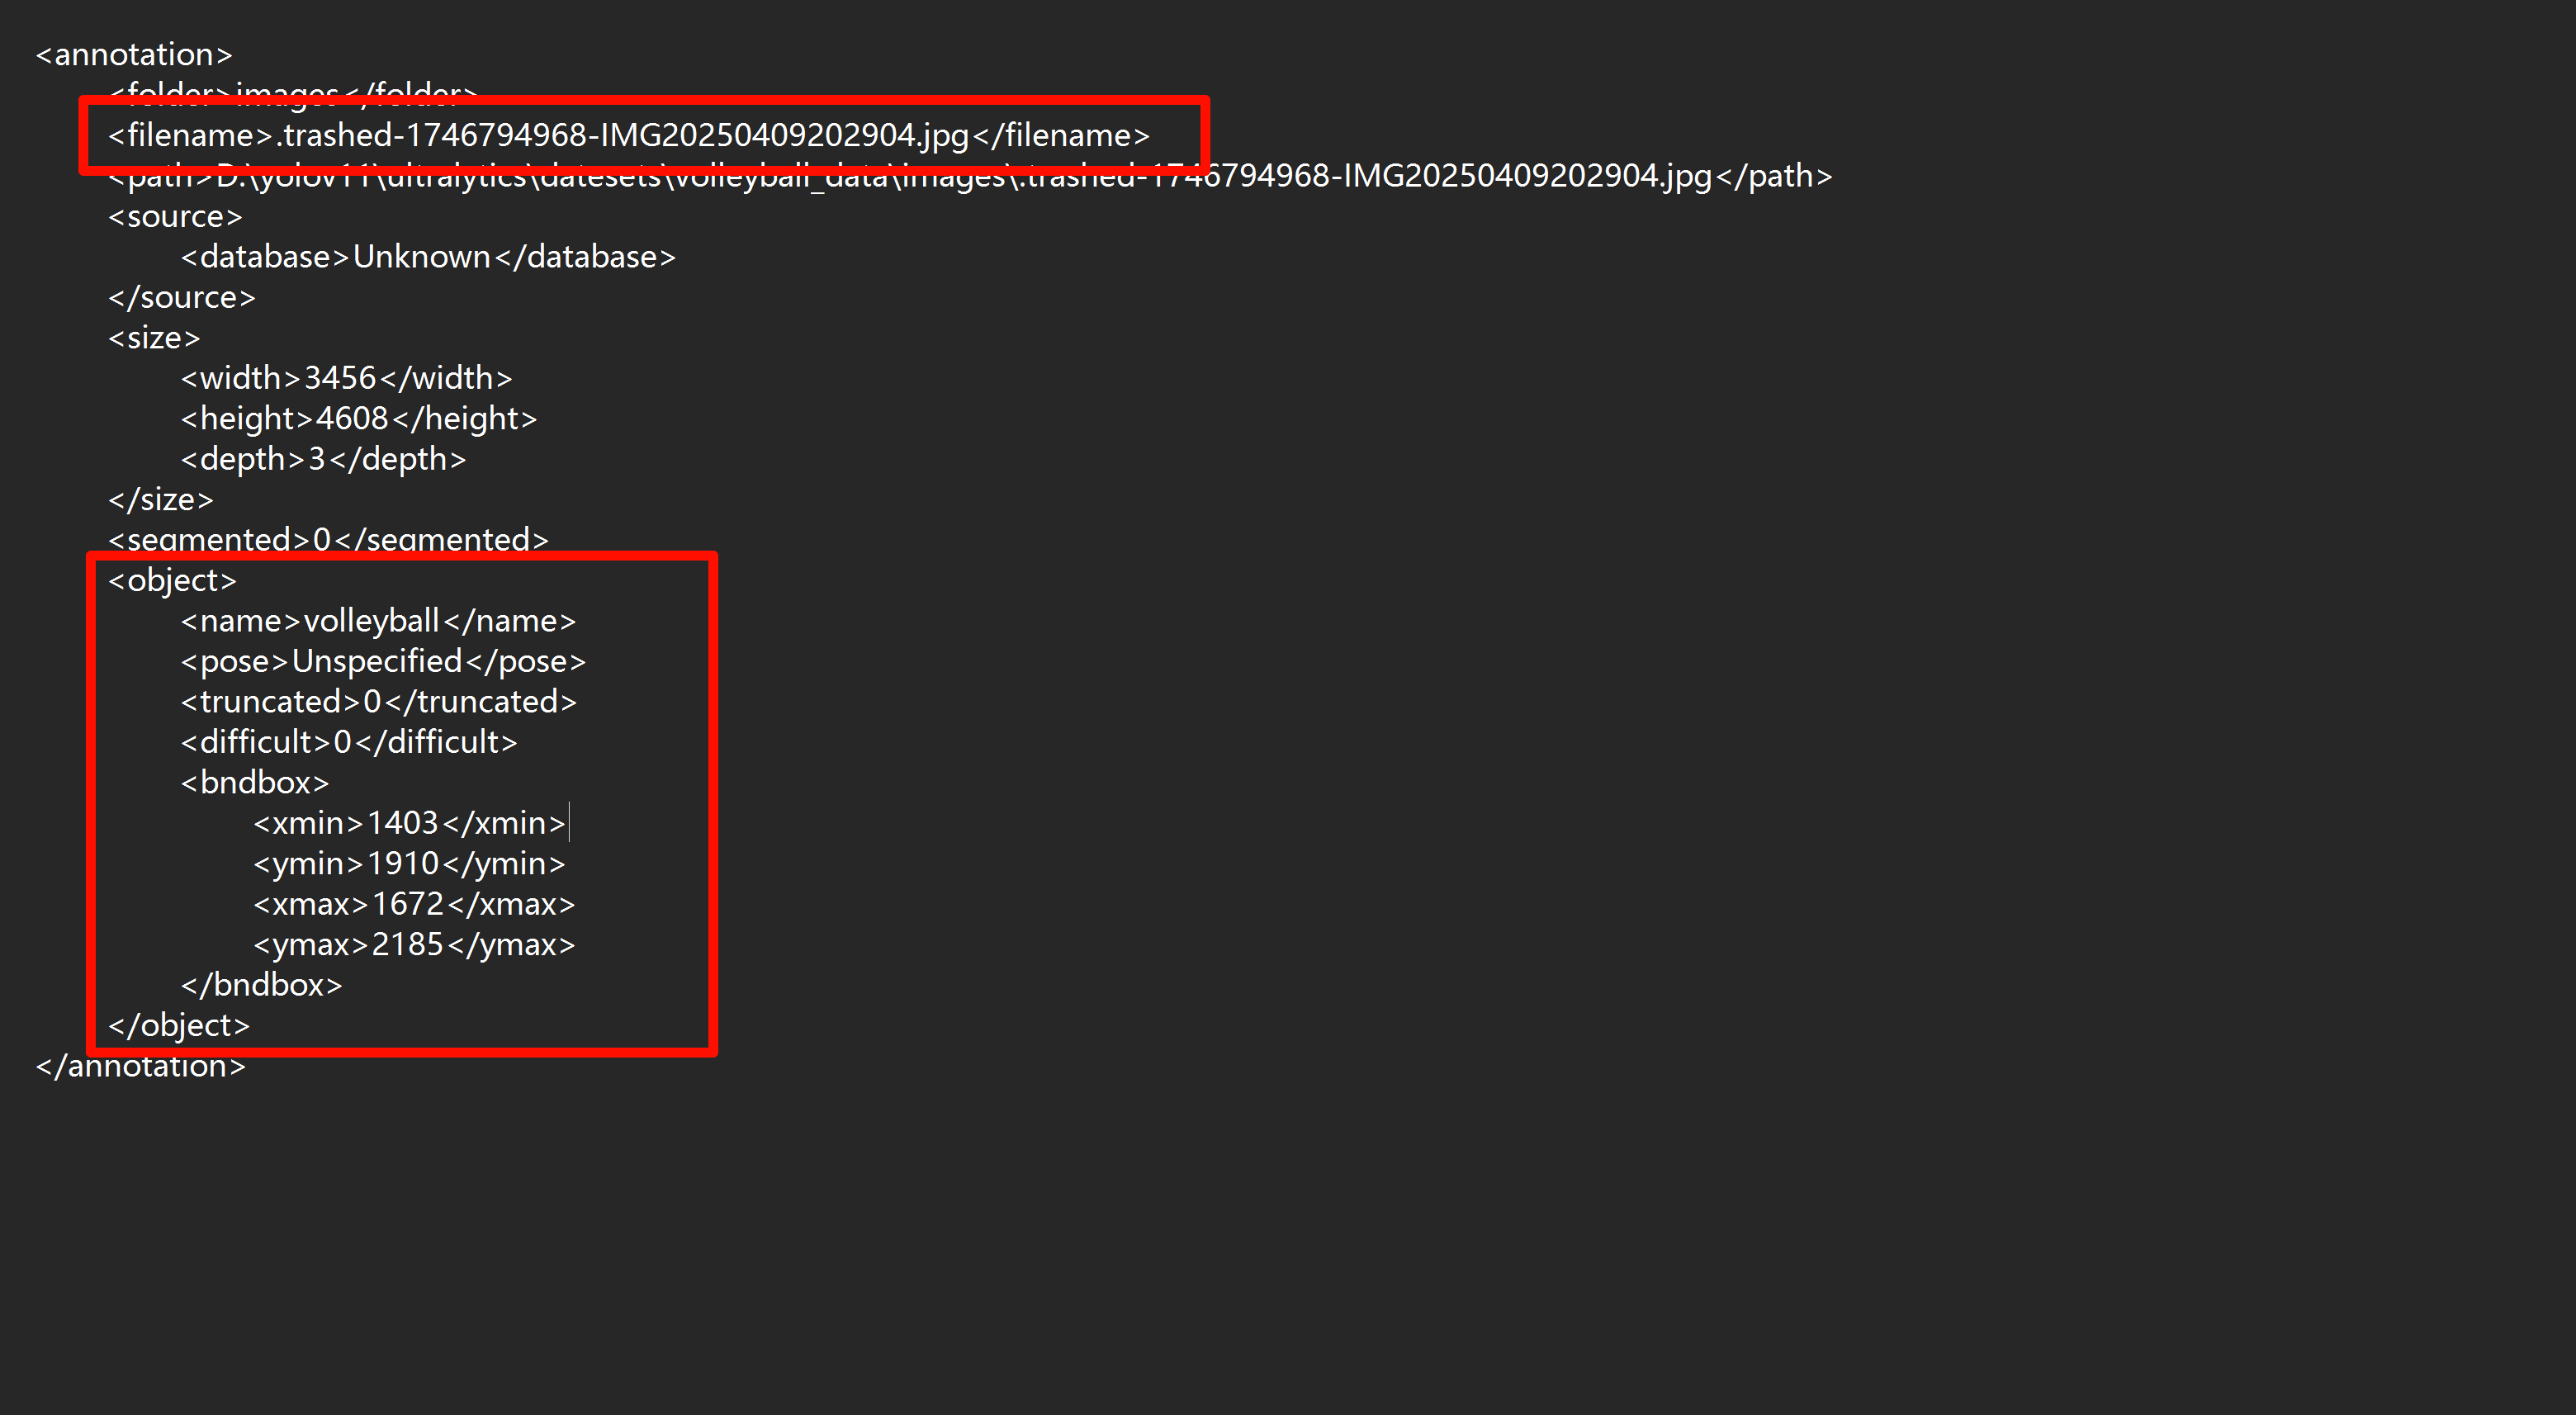
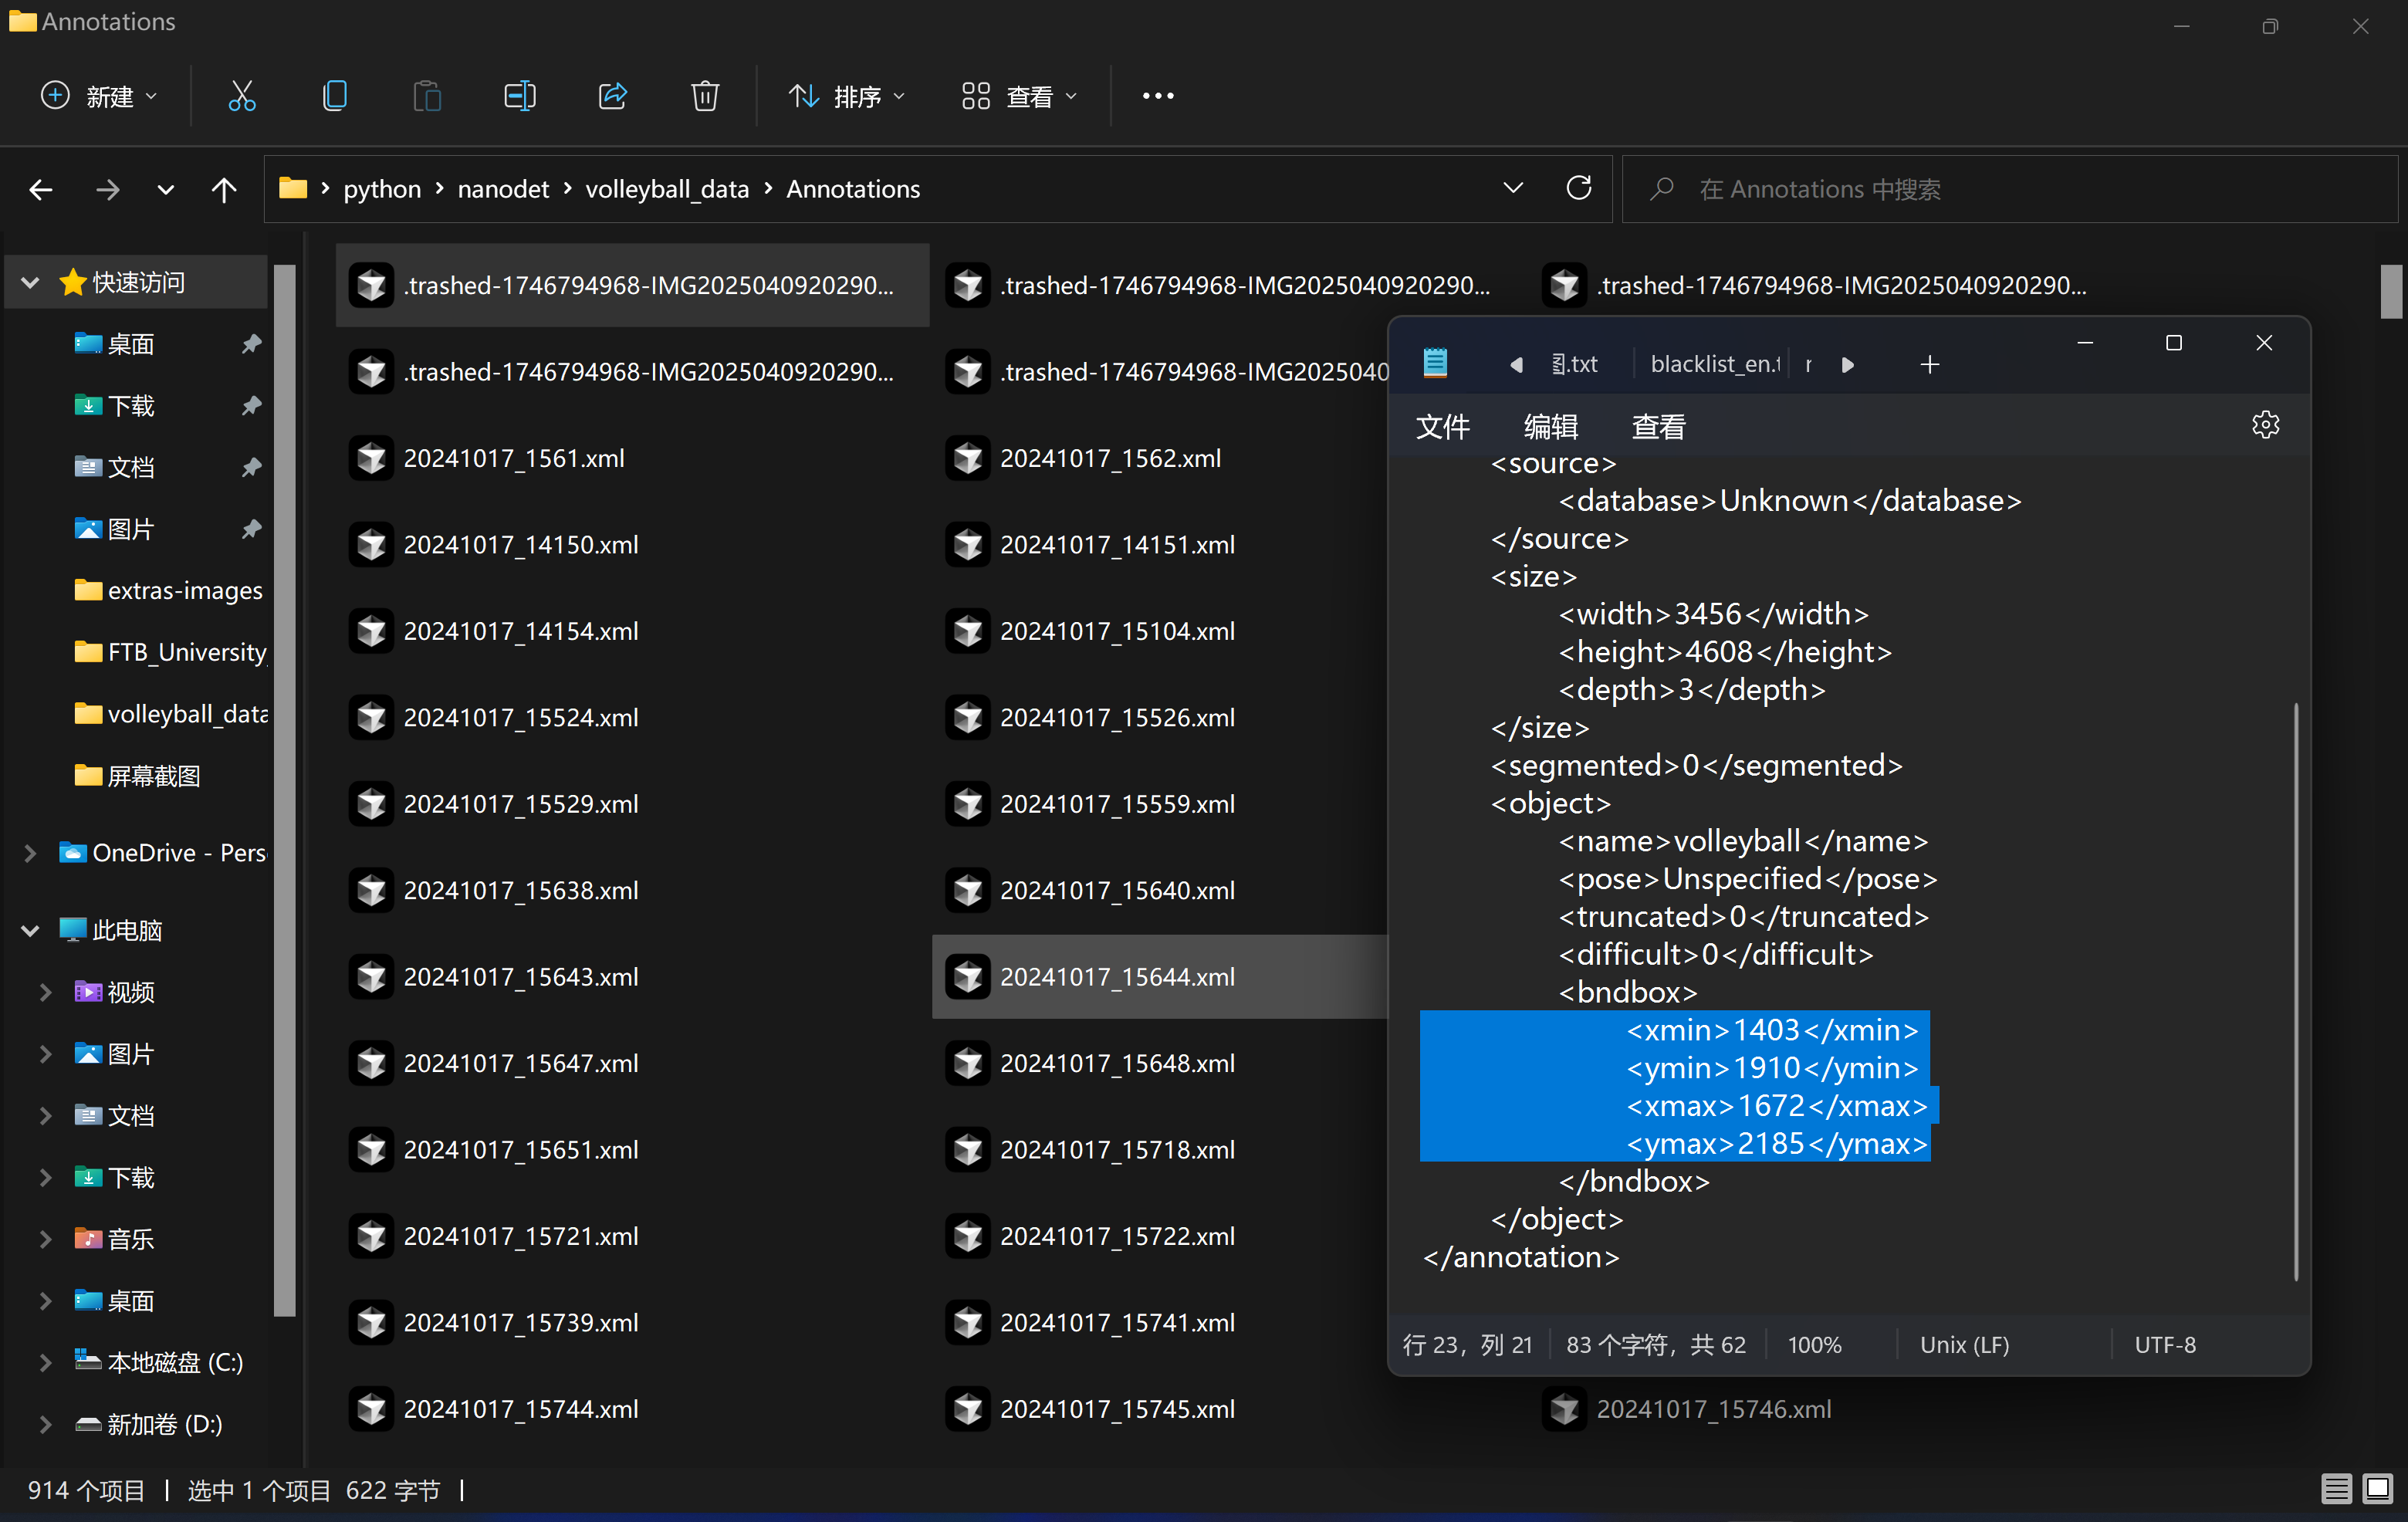
xml文件记录了图片名称和标注目标名称及在图片中的位置。
可以使用下面代码转化labelme到labelimg的xml格式
1 2 3 4 5 6 7 8 9 10 11 12 13 14 15 16 17 18 19 20 21 22 23 24 25 26 27 28 29 30 31 32 33 34 35 36 37 38 39 40 41 42 43 44 45 46 47 48 49 50 51 52 53 54 55 56 57 58 59 60 61 62 63 64 65 66 67 68 69 70 71 72 73 74 75 76 77 78 79 80 81 82 83 84 85 86 87 88 89 90 91 92 93 94 95 96 97 98 99 100 101 102 103 104 105 106 107 108 109 110 111 112 113 114 import osimport jsonimport xml.etree.ElementTree as ETfrom xml.dom import minidomdef json_to_xml (json_path, xml_dir ): with open (json_path, 'r' , encoding='utf-8' ) as f: data = json.load(f) annotation = ET.Element('annotation' ) folder = ET.SubElement(annotation, 'folder' ) folder.text = 'images' filename = ET.SubElement(annotation, 'filename' ) filename.text = data['imagePath' ] path = ET.SubElement(annotation, 'path' ) path.text = os.path.abspath(os.path.join(xml_dir, data['imagePath' ])) source = ET.SubElement(annotation, 'source' ) database = ET.SubElement(source, 'database' ) database.text = 'Unknown' size = ET.SubElement(annotation, 'size' ) width = ET.SubElement(size, 'width' ) width.text = str (data['imageWidth' ]) height = ET.SubElement(size, 'height' ) height.text = str (data['imageHeight' ]) depth = ET.SubElement(size, 'depth' ) depth.text = '3' segmented = ET.SubElement(annotation, 'segmented' ) segmented.text = '0' for shape in data['shapes' ]: obj = ET.SubElement(annotation, 'object' ) name = ET.SubElement(obj, 'name' ) name.text = shape['label' ] pose = ET.SubElement(obj, 'pose' ) pose.text = 'Unspecified' truncated = ET.SubElement(obj, 'truncated' ) truncated.text = '0' difficult = ET.SubElement(obj, 'difficult' ) difficult.text = '0' bndbox = ET.SubElement(obj, 'bndbox' ) points = shape['points' ] xmin = ET.SubElement(bndbox, 'xmin' ) xmin.text = str (int (min (p[0 ] for p in points))) ymin = ET.SubElement(bndbox, 'ymin' ) ymin.text = str (int (min (p[1 ] for p in points))) xmax = ET.SubElement(bndbox, 'xmax' ) xmax.text = str (int (max (p[0 ] for p in points))) ymax = ET.SubElement(bndbox, 'ymax' ) ymax.text = str (int (max (p[1 ] for p in points))) tree = ET.ElementTree(annotation) xml_filename = os.path.splitext(data['imagePath' ])[0 ] + '.xml' xml_path = os.path.join(xml_dir, xml_filename) ET.indent(tree, space=" " ) tree.write(xml_path, encoding='utf-8' , xml_declaration=False ) def convert_all_json (json_dir, xml_dir ): os.makedirs(xml_dir, exist_ok=True ) for filename in os.listdir(json_dir): if filename.endswith('.json' ): json_path = os.path.join(json_dir, filename) try : json_to_xml(json_path, xml_dir) print (f'Converted {filename} successfully' ) except Exception as e: print (f'Failed to convert {filename} : {str (e)} ' ) if __name__ == '__main__' : input_dir = 'json' output_dir = 'xml' convert_all_json(input_dir, output_dir)
以下是具体流程。
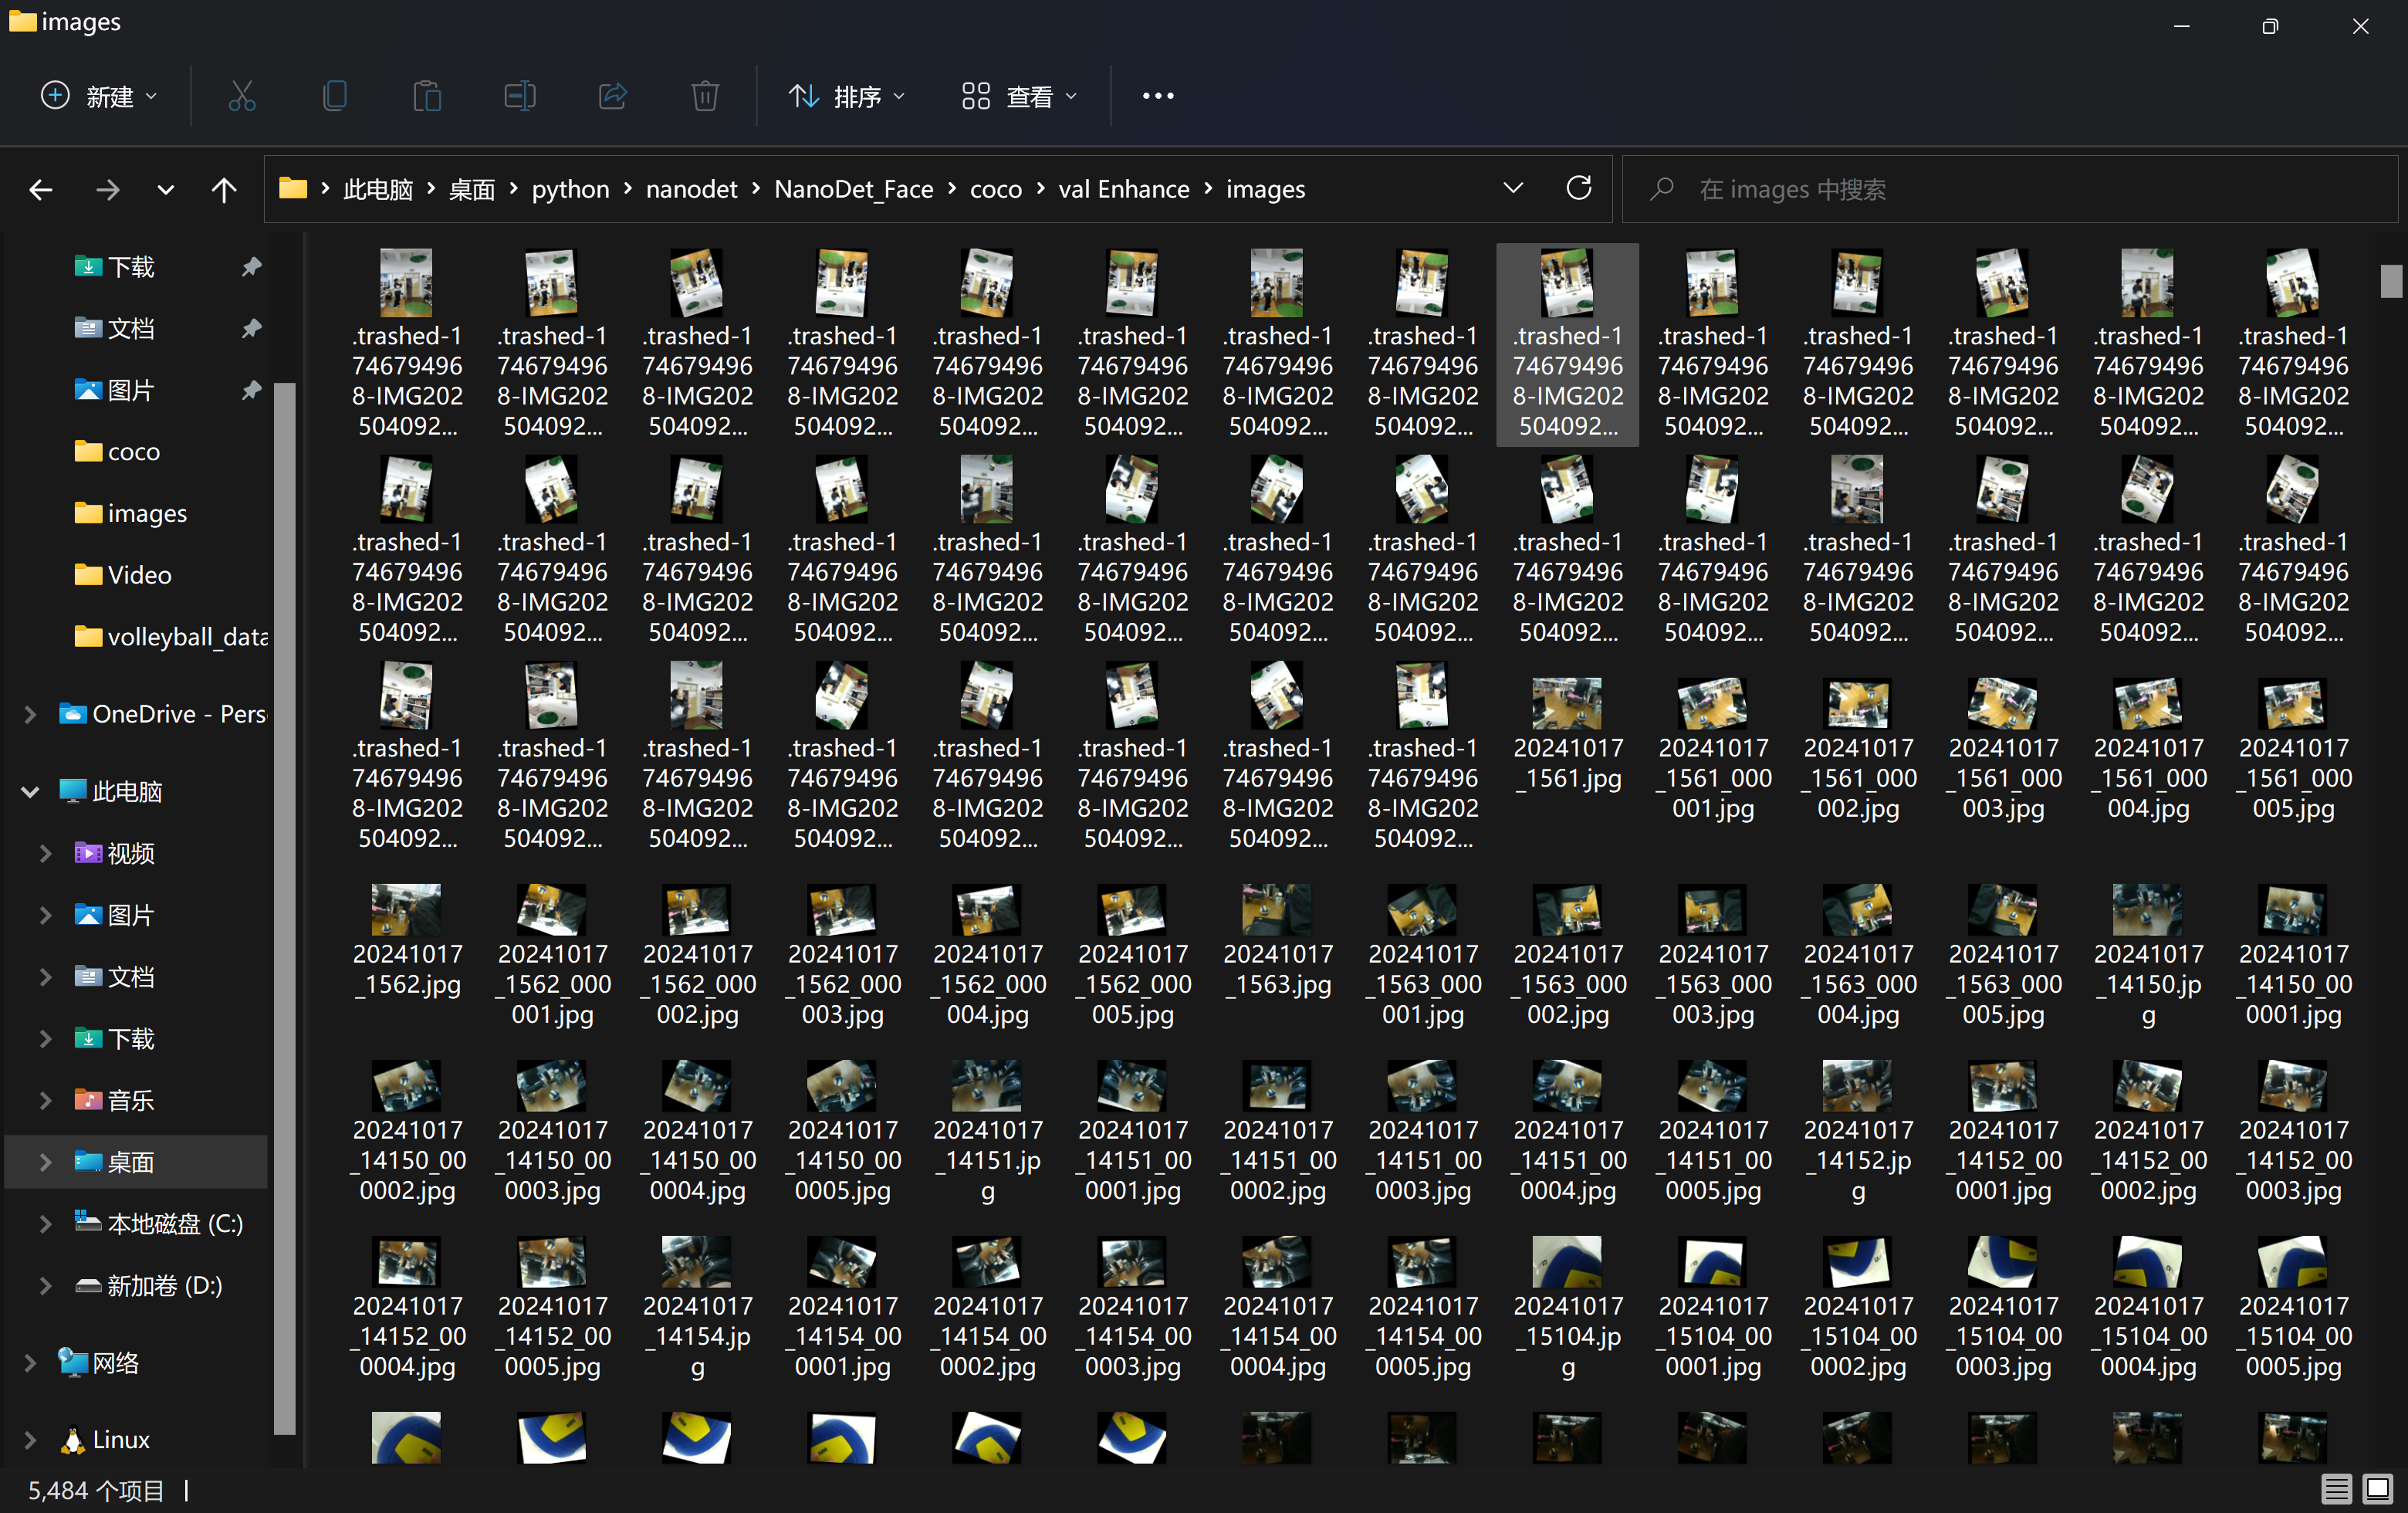
数据增强,旋转,翻转,裁剪,噪声,提高模型泛化能力,防止过拟合,添加训练数据量
1 2 3 4 5 6 7 8 9 10 11 12 13 14 15 16 17 18 19 20 21 22 23 24 25 26 27 28 29 30 31 32 33 34 35 36 37 38 39 40 41 42 43 44 45 46 47 48 49 50 51 52 53 54 55 56 57 58 59 60 61 62 63 64 65 66 67 68 69 70 71 72 73 74 75 76 77 78 79 80 81 82 83 84 85 86 87 88 89 90 91 92 93 94 95 96 97 98 99 100 101 102 103 104 105 106 107 108 109 110 111 112 113 114 115 116 117 118 119 120 121 122 123 124 125 126 127 128 129 130 131 132 133 134 135 136 137 138 139 140 141 142 143 144 145 146 147 148 149 150 151 152 153 154 155 156 157 158 159 160 161 162 163 164 165 166 167 168 169 170 171 172 173 174 175 176 177 178 179 180 181 182 183 184 185 186 187 188 189 190 191 192 193 194 195 196 197 198 199 200 201 202 203 204 205 206 207 208 209 210 211 212 213 214 215 216 217 218 219 220 221 222 223 224 225 226 227 228 import xml.etree.ElementTree as ETimport pickleimport osfrom os import getcwdimport numpy as npfrom PIL import Imageimport shutilimport matplotlib.pyplot as pltimport imgaug as iafrom imgaug import augmenters as iaaia.seed(1 ) def read_xml_annotation (root, image_id ): in_file = open (os.path.join(root, image_id)) tree = ET.parse(in_file) root = tree.getroot() bndboxlist = [] for object in root.findall('object' ): if object is not None : bndbox = object .find('bndbox' ) xmin = int (bndbox.find('xmin' ).text) xmax = int (bndbox.find('xmax' ).text) ymin = int (bndbox.find('ymin' ).text) ymax = int (bndbox.find('ymax' ).text) bndboxlist.append([xmin, ymin, xmax, ymax]) if not bndboxlist: return [] bndbox = root.find('object' ).find('bndbox' ) return bndboxlist def change_xml_annotation (root, image_id, new_target ): new_xmin = new_target[0 ] new_ymin = new_target[1 ] new_xmax = new_target[2 ] new_ymax = new_target[3 ] in_file = open (os.path.join(root, str (image_id) + '.xml' )) tree = ET.parse(in_file) xmlroot = tree.getroot() object = xmlroot.find('object' ) bndbox = object .find('bndbox' ) xmin = bndbox.find('xmin' ) xmin.text = str (new_xmin) ymin = bndbox.find('ymin' ) ymin.text = str (new_ymin) xmax = bndbox.find('xmax' ) xmax.text = str (new_xmax) ymax = bndbox.find('ymax' ) ymax.text = str (new_ymax) tree.write(os.path.join(root, str ("%06d" % (str (id ) + '.xml' )))) def change_xml_list_annotation (root, image_id, new_target, saveroot, id ,img_name ): in_file = open (os.path.join(root, str (image_id) + '.xml' )) tree = ET.parse(in_file) elem = tree.find('filename' ) elem.text = (img_name + str ("_%06d" % int (id )) + '.jpg' ) xmlroot = tree.getroot() index = 0 for object in xmlroot.findall('object' ): bndbox = object .find('bndbox' ) new_xmin = new_target[index][0 ] new_ymin = new_target[index][1 ] new_xmax = new_target[index][2 ] new_ymax = new_target[index][3 ] xmin = bndbox.find('xmin' ) xmin.text = str (new_xmin) ymin = bndbox.find('ymin' ) ymin.text = str (new_ymin) xmax = bndbox.find('xmax' ) xmax.text = str (new_xmax) ymax = bndbox.find('ymax' ) ymax.text = str (new_ymax) index = index + 1 tree.write(os.path.join(saveroot, img_name + str ("_%06d" % int (id )) + '.xml' )) def mkdir (path ): path = path.strip() path = path.rstrip("\\" ) isExists = os.path.exists(path) if not isExists: os.makedirs(path) print (path + ' 创建成功' ) return True else : print (path + ' 目录已存在' ) return False if __name__ == "__main__" : IMG_DIR = "./images" XML_DIR = "./Annotations" AUG_XML_DIR = "./val Enhance/xml" try : shutil.rmtree(AUG_XML_DIR) except FileNotFoundError as e: a = 1 mkdir(AUG_XML_DIR) AUG_IMG_DIR = "./val Enhance/images" try : shutil.rmtree(AUG_IMG_DIR) except FileNotFoundError as e: a = 1 mkdir(AUG_IMG_DIR) AUGLOOP = 5 boxes_img_aug_list = [] new_bndbox = [] new_bndbox_list = [] seq = iaa.Sequential([ iaa.Flipud(0.5 ), iaa.Fliplr(0.5 ), iaa.Multiply((1.2 , 1.5 )), iaa.AddToHueAndSaturation((-20 , 20 )), iaa.LinearContrast((0.8 , 1.2 )), iaa.GaussianBlur(sigma=(0 , 3.0 )), iaa.AdditiveGaussianNoise(scale=(0 , 0.05 *255 )), iaa.Affine( translate_px={"x" : 15 , "y" : 15 }, scale=(0.8 , 0.95 ), rotate=(-30 , 30 ) ) ]) for root, sub_folders, files in os.walk(XML_DIR): for name in files: print (name) bndbox = read_xml_annotation(XML_DIR, name) shutil.copy(os.path.join(XML_DIR, name), AUG_XML_DIR) shutil.copy(os.path.join(IMG_DIR, name[:-4 ] + '.jpg' ), AUG_IMG_DIR) for epoch in range (AUGLOOP): seq_det = seq.to_deterministic() img = Image.open (os.path.join(IMG_DIR, name[:-4 ] + '.jpg' )) img = np.asarray(img) for i in range (len (bndbox)): bbs = ia.BoundingBoxesOnImage([ ia.BoundingBox(x1=bndbox[i][0 ], y1=bndbox[i][1 ], x2=bndbox[i][2 ], y2=bndbox[i][3 ]), ], shape=img.shape) bbs_aug = seq_det.augment_bounding_boxes([bbs])[0 ] boxes_img_aug_list.append(bbs_aug) n_x1 = int (max (1 , min (img.shape[1 ], bbs_aug.bounding_boxes[0 ].x1))) n_y1 = int (max (1 , min (img.shape[0 ], bbs_aug.bounding_boxes[0 ].y1))) n_x2 = int (max (1 , min (img.shape[1 ], bbs_aug.bounding_boxes[0 ].x2))) n_y2 = int (max (1 , min (img.shape[0 ], bbs_aug.bounding_boxes[0 ].y2))) if n_x1 == 1 and n_x1 == n_x2: n_x2 += 1 if n_y1 == 1 and n_y2 == n_y1: n_y2 += 1 if n_x1 >= n_x2 or n_y1 >= n_y2: print ('error' , name) new_bndbox_list.append([n_x1, n_y1, n_x2, n_y2]) image_aug = seq_det.augment_images([img])[0 ] path = os.path.join(AUG_IMG_DIR, name[:-4 ] + str ( "_%06d" % (epoch + 1 )) + '.jpg' ) image_auged = bbs.draw_on_image(image_aug, thickness=0 ) Image.fromarray(image_auged).save(path) change_xml_list_annotation(XML_DIR, name[:-4 ], new_bndbox_list, AUG_XML_DIR, epoch + 1 ,name[:-4 ]) print ( name[:-4 ] + str ( "_%06d" % (epoch + 1 )) + '.jpg' ) new_bndbox_list = []
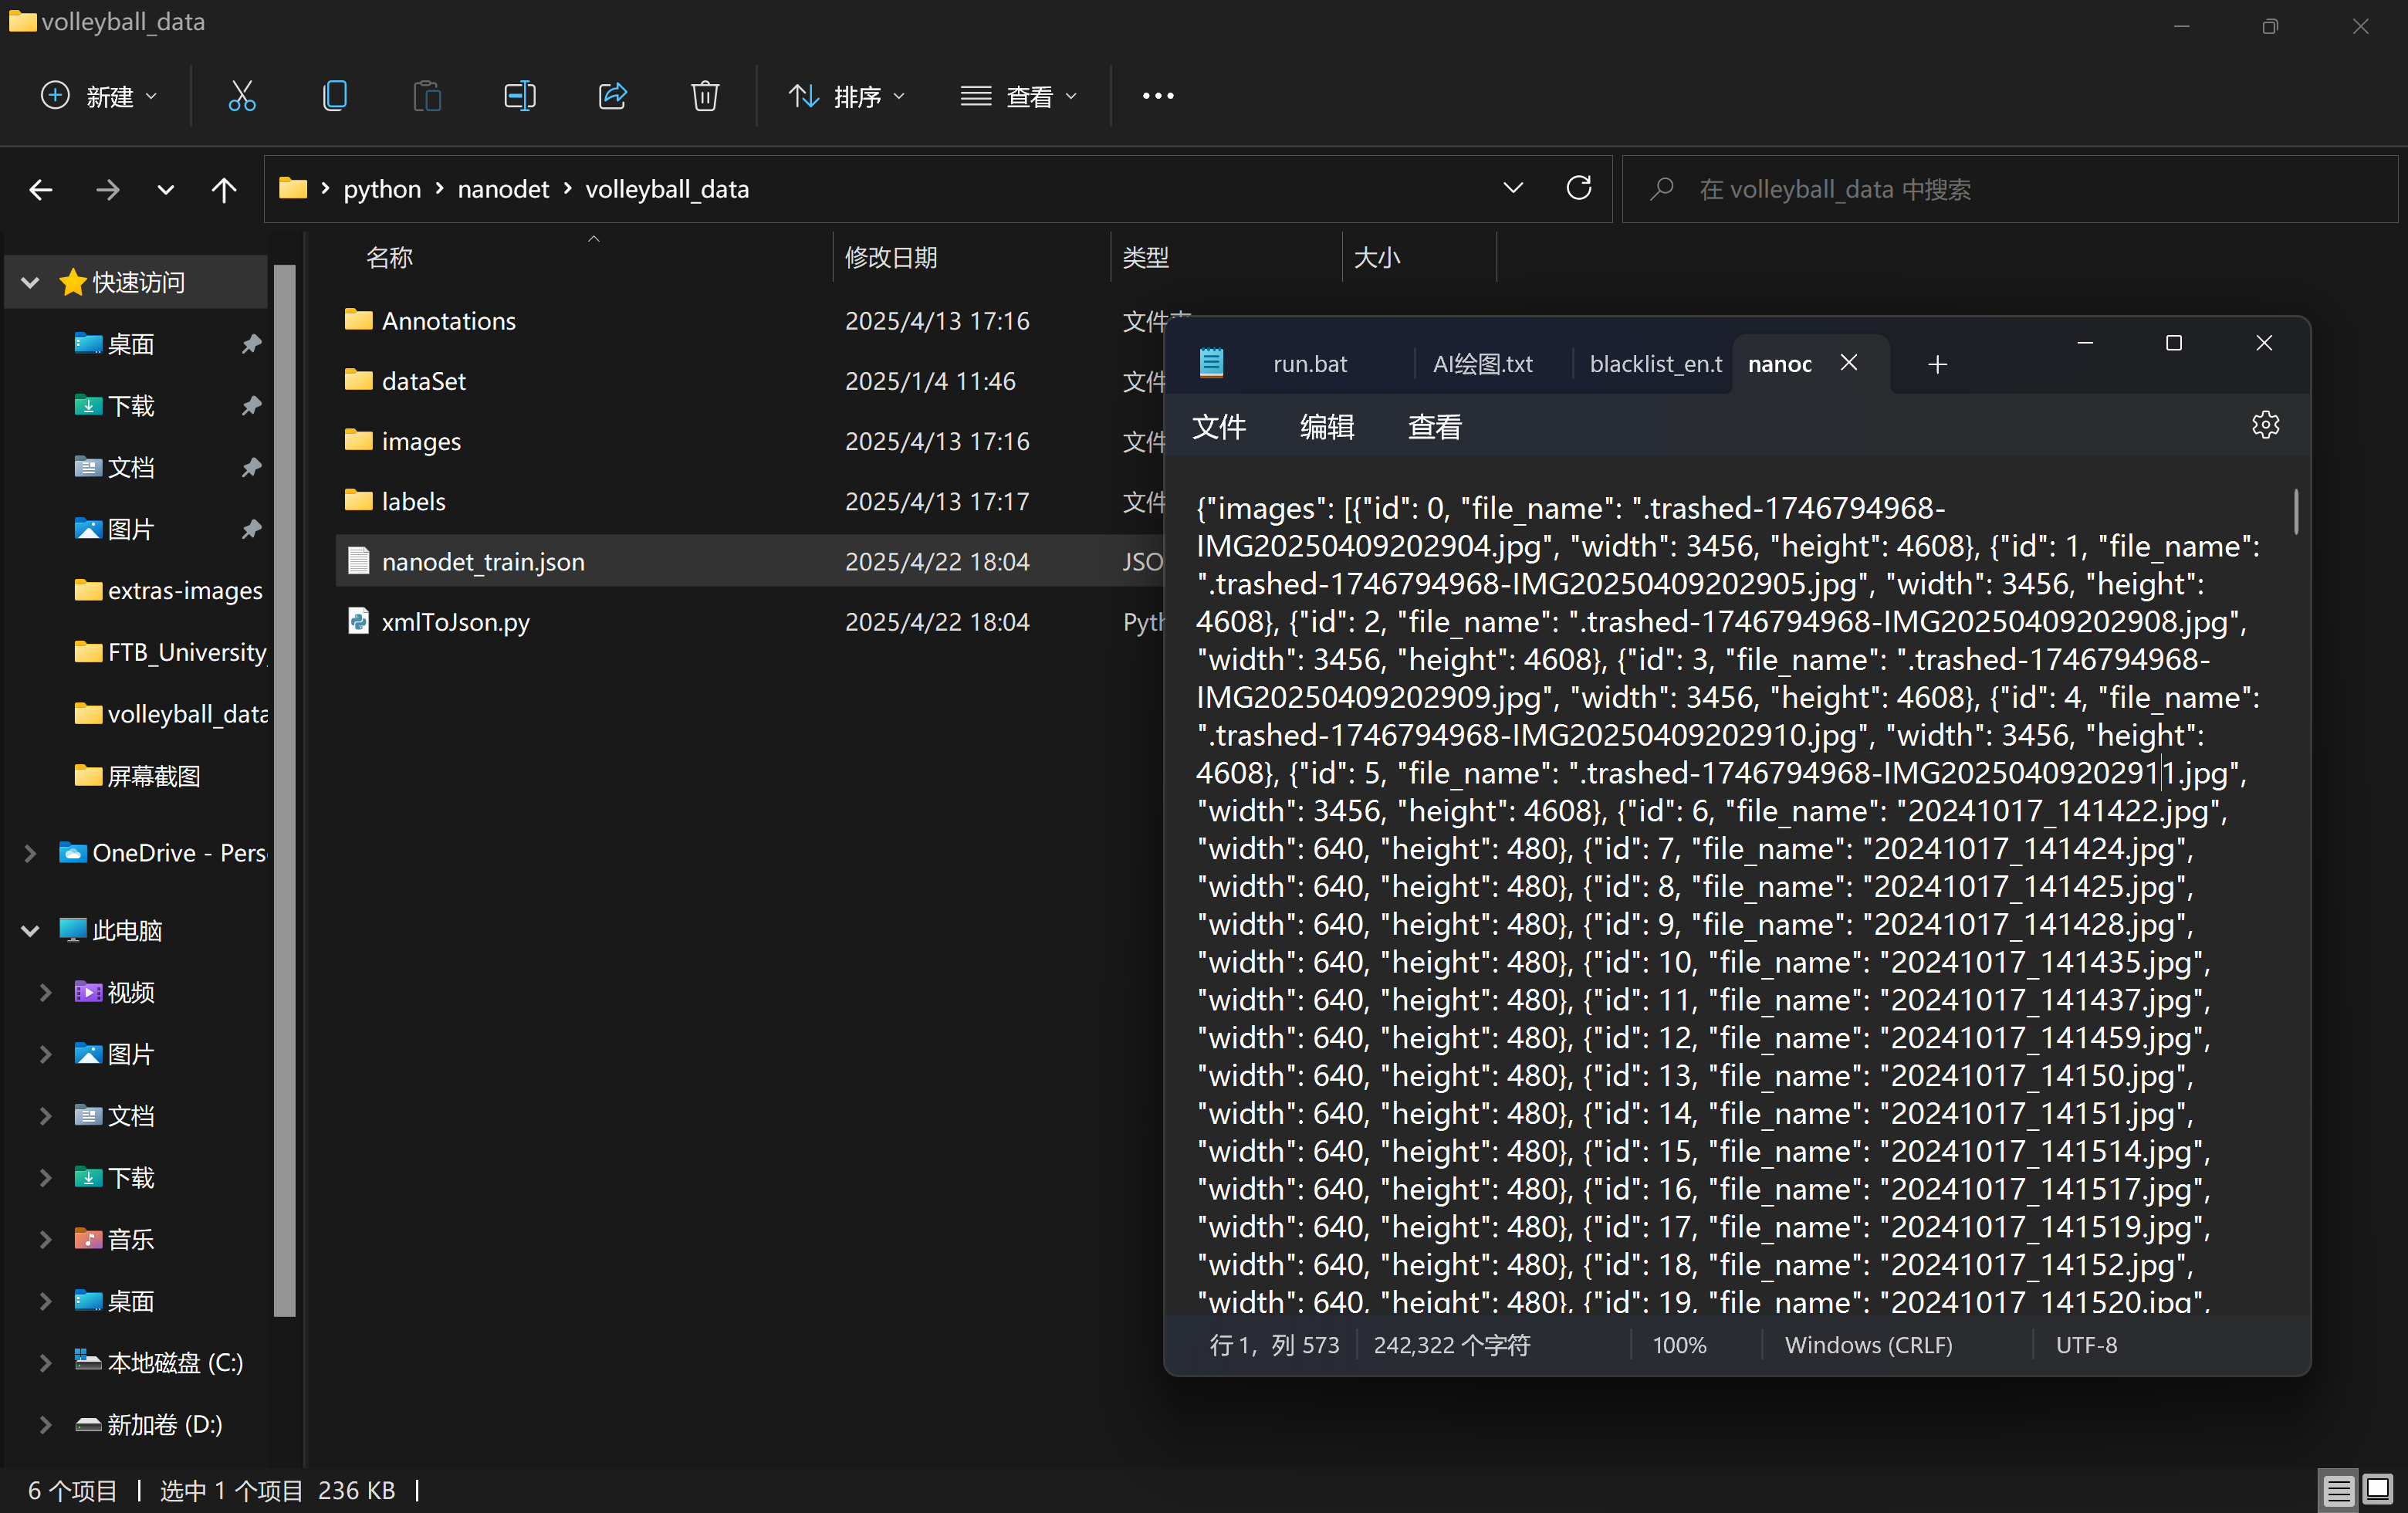
标注得到的VOC格式数据集转为coco数据集
1 2 3 4 5 6 7 8 9 10 11 12 13 14 15 16 17 18 19 20 21 22 23 24 25 26 27 28 29 30 31 32 33 34 35 36 37 38 39 40 41 42 43 44 45 46 47 48 49 50 51 52 53 54 55 56 57 58 59 60 61 62 63 64 65 66 67 68 69 70 71 72 73 74 75 76 77 78 79 80 81 82 83 84 85 86 87 88 89 90 91 92 93 94 95 96 97 98 99 100 101 102 103 104 105 106 107 108 109 110 111 112 113 114 115 116 117 118 119 120 121 122 123 124 125 126 127 128 129 130 131 132 133 134 135 136 137 138 139 140 141 142 143 144 145 146 147 148 149 150 151 152 153 154 155 156 157 158 159 160 161 162 163 164 165 166 167 168 169 170 171 172 173 174 175 176 177 178 179 180 181 182 183 184 185 186 187 188 189 190 191 192 193 194 195 196 197 198 199 200 201 202 import xml.etree.ElementTree as ETimport osimport jsoncoco = dict () coco['images' ] = [] coco['type' ] = 'instances' coco['annotations' ] = [] coco['categories' ] = [] category_set = dict () image_set = set () category_item_id = 0 image_id = 0 id_num = 0 annotation_id = 0 def addCatItem (name ): global category_item_id category_item = dict () category_item['supercategory' ] = 'none' category_item_id += 1 category_item['id' ] = category_item_id category_item['name' ] = name coco['categories' ].append(category_item) category_set[name] = category_item_id return category_item_id def addImgItem (file_name, size ): global image_id, id_num if file_name is None : raise Exception('Could not find filename tag in xml file.' ) if size['width' ] is None : raise Exception('Could not find width tag in xml file.' ) if size['height' ] is None : raise Exception('Could not find height tag in xml file.' ) image_item = dict () temp = int (id_num) image_item['id' ] = temp id_num += 1 image_item['file_name' ] = file_name image_item['width' ] = size['width' ] image_item['height' ] = size['height' ] coco['images' ].append(image_item) image_set.add(file_name) return image_item['id' ] def addAnnoItem (object_name, image_id, category_id, bbox ): global annotation_id annotation_item = dict () annotation_item['segmentation' ] = [] seg = [] seg.append(bbox[0 ]) seg.append(bbox[1 ]) seg.append(bbox[0 ]) seg.append(bbox[1 ] + bbox[3 ]) seg.append(bbox[0 ] + bbox[2 ]) seg.append(bbox[1 ] + bbox[3 ]) seg.append(bbox[0 ] + bbox[2 ]) seg.append(bbox[1 ]) annotation_item['segmentation' ].append(seg) annotation_item['area' ] = bbox[2 ] * bbox[3 ] annotation_item['iscrowd' ] = 0 annotation_item['ignore' ] = 0 annotation_item['image_id' ] = image_id annotation_item['bbox' ] = bbox annotation_item['category_id' ] = category_id annotation_id += 1 annotation_item['id' ] = annotation_id coco['annotations' ].append(annotation_item) def parseXmlFiles (xml_path ): for f in os.listdir(xml_path): if not f.endswith('.xml' ): continue bndbox = dict () size = dict () current_image_id = None current_category_id = None file_name = None size['width' ] = None size['height' ] = None size['depth' ] = None xml_file = os.path.join(xml_path, f) print (xml_file) tree = ET.parse(xml_file) root = tree.getroot() if root.tag != 'annotation' : raise Exception('pascal voc xml root element should be annotation, rather than {}' .format (root.tag)) for elem in root: current_parent = elem.tag current_sub = None object_name = None if elem.tag == 'folder' : continue if elem.tag == 'filename' : file_name = elem.text if file_name in category_set: raise Exception('file_name duplicated' ) elif current_image_id is None and file_name is not None and size['width' ] is not None : if file_name not in image_set: current_image_id = addImgItem(file_name, size) print ('add image with {} and {}' .format (file_name, size)) else : raise Exception('duplicated image: {}' .format (file_name)) for subelem in elem: bndbox['xmin' ] = None bndbox['xmax' ] = None bndbox['ymin' ] = None bndbox['ymax' ] = None current_sub = subelem.tag if current_parent == 'object' and subelem.tag == 'name' : object_name = subelem.text if object_name not in category_set: current_category_id = addCatItem(object_name) else : current_category_id = category_set[object_name] elif current_parent == 'size' : if size[subelem.tag] is not None : raise Exception('xml structure broken at size tag.' ) size[subelem.tag] = int (subelem.text) for option in subelem: if current_sub == 'bndbox' : if bndbox[option.tag] is not None : raise Exception('xml structure corrupted at bndbox tag.' ) bndbox[option.tag] = int (option.text) print (f"读取到 {option.tag} : {bndbox[option.tag]} " ) if current_sub == 'bndbox' : print (f"xmin: {bndbox['xmin' ]} , ymin: {bndbox['ymin' ]} , xmax: {bndbox['xmax' ]} , ymax: {bndbox['ymax' ]} " ) if bndbox['xmin' ] is not None : if object_name is None : raise Exception('xml structure broken at bndbox tag' ) if current_image_id is None : raise Exception('xml structure broken at bndbox tag' ) if current_category_id is None : raise Exception('xml structure broken at bndbox tag' ) bbox = [] bbox.append(bndbox['xmin' ]) bbox.append(bndbox['ymin' ]) width = bndbox['xmax' ] - bndbox['xmin' ] bbox.append(width) height = bndbox['ymax' ] - bndbox['ymin' ] bbox.append(height) print (f"width: {width} , height: {height} " ) print (f"文件名: {file_name} , 对象名称: {object_name} , 计算得到的 bbox: {bbox} " ) print ('add annotation with {},{},{},{}' .format (object_name, current_image_id, current_category_id, bbox)) addAnnoItem(object_name, current_image_id, current_category_id, bbox) if __name__ == '__main__' : xml_path = "./val Enhance/xml" json_file = './nanodet_train_zengqian.json' parseXmlFiles(xml_path) json.dump(coco, open (json_file, 'w' ))
将.xml标签文件转化为一个.json文件,用于coco数据集训练。
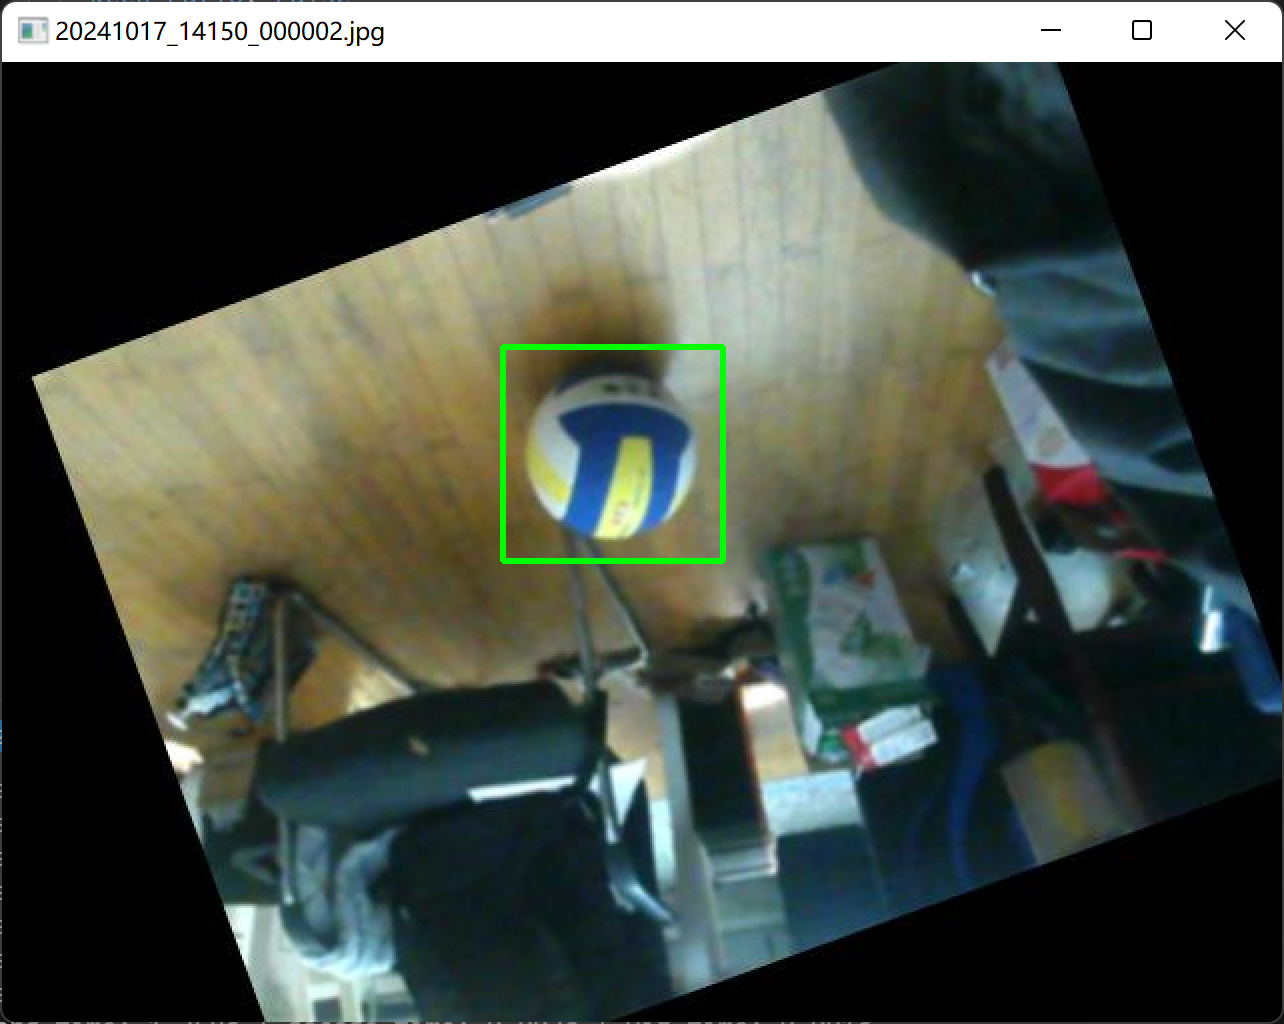
查看标注框是否正确,watch.py将展示json中有bbox属性的图片并标注出bbox,以便可视化检查数据标注质量。
1 2 3 4 5 6 7 8 9 10 11 12 13 14 15 16 17 18 19 20 21 22 23 24 25 26 27 28 29 30 31 32 33 34 35 36 37 38 39 40 41 42 43 44 45 46 47 48 49 50 51 52 import jsonimport cv2import oswith open ('nanodet_train_zengqian.json' , 'r' ) as f: data = json.load(f) img_dir = './val Enhance/images' screen_width = 640 screen_height = 640 for image in data['images' ]: img_file_name = image['file_name' ] img_path = os.path.join(img_dir, img_file_name) img = cv2.imread(img_path) scale = min (screen_width / img.shape[1 ], screen_height / img.shape[0 ]) new_size = (int (img.shape[1 ] * scale), int (img.shape[0 ] * scale)) img = cv2.resize(img, new_size) annotations = [anno for anno in data['annotations' ] if anno['image_id' ] == image['id' ]] for anno in annotations: bbox = anno['bbox' ] x1, y1, w, h = bbox cv2.rectangle(img, (x1, y1), (x1 + w, y1 + h), (0 , 255 , 0 ), 2 ) cv2.imshow(img_file_name, img) cv2.waitKey(0 ) cv2.destroyAllWindows()
查看数据标注是否正确,以及数据增强后标注是否一同缩放旋转正确对应。
分割训练集和测试集,按比例拆分。
1 2 3 4 5 6 7 8 9 10 11 12 13 14 15 16 17 18 19 20 21 22 23 24 25 26 27 28 29 30 31 32 33 34 35 36 37 38 39 40 41 42 43 44 45 46 47 48 49 50 51 52 53 54 55 56 57 58 59 60 61 62 63 64 65 66 67 68 69 70 71 72 73 74 import jsonimport randomdef split_coco_data (coco_file, train_ratio=0.8 , output_train_file="train.json" , output_test_file="test.json" ): """ 将 COCO 标注文件按照指定的比例分割成训练集和测试集。 参数: coco_file (str): COCO 标注 JSON 文件的路径。 train_ratio (float): 训练集中图像所占的比例 (默认值: 0.8)。 output_train_file (str): 保存训练集 COCO JSON 文件的路径 (默认值: "train.json")。 output_test_file (str): 保存测试集 COCO JSON 文件的路径 (默认值: "test.json")。 """ with open (coco_file, 'r' ) as f: coco_data = json.load(f) images = coco_data['images' ] annotations = coco_data['annotations' ] categories = coco_data['categories' ] if 'categories' in coco_data else [] random.shuffle(images) train_size = int (len (images) * train_ratio) train_images = images[:train_size] test_images = images[train_size:] train_image_ids = [img['id' ] for img in train_images] test_image_ids = [img['id' ] for img in test_images] train_annotations = [ann for ann in annotations if ann['image_id' ] in train_image_ids] test_annotations = [ann for ann in annotations if ann['image_id' ] in test_image_ids] train_coco_data = { 'images' : train_images, 'annotations' : train_annotations, 'categories' : categories } test_coco_data = { 'images' : test_images, 'annotations' : test_annotations, 'categories' : categories } with open (output_train_file, 'w' ) as f: json.dump(train_coco_data, f) with open (output_test_file, 'w' ) as f: json.dump(test_coco_data, f) print (f"COCO 数据集分割完成:" ) print (f" - 训练集: {len (train_images)} 张图像, {len (train_annotations)} 个标注 (保存到 {output_train_file} )" ) print (f" - 测试集: {len (test_images)} 张图像, {len (test_annotations)} 个标注 (保存到 {output_test_file} )" ) if __name__ == "__main__" : coco_annotation_file = "nanodet_train.json" split_coco_data(coco_annotation_file, train_ratio=0.8 , output_train_file="train.json" , output_test_file="test.json" )
得到2:8的测试训练集
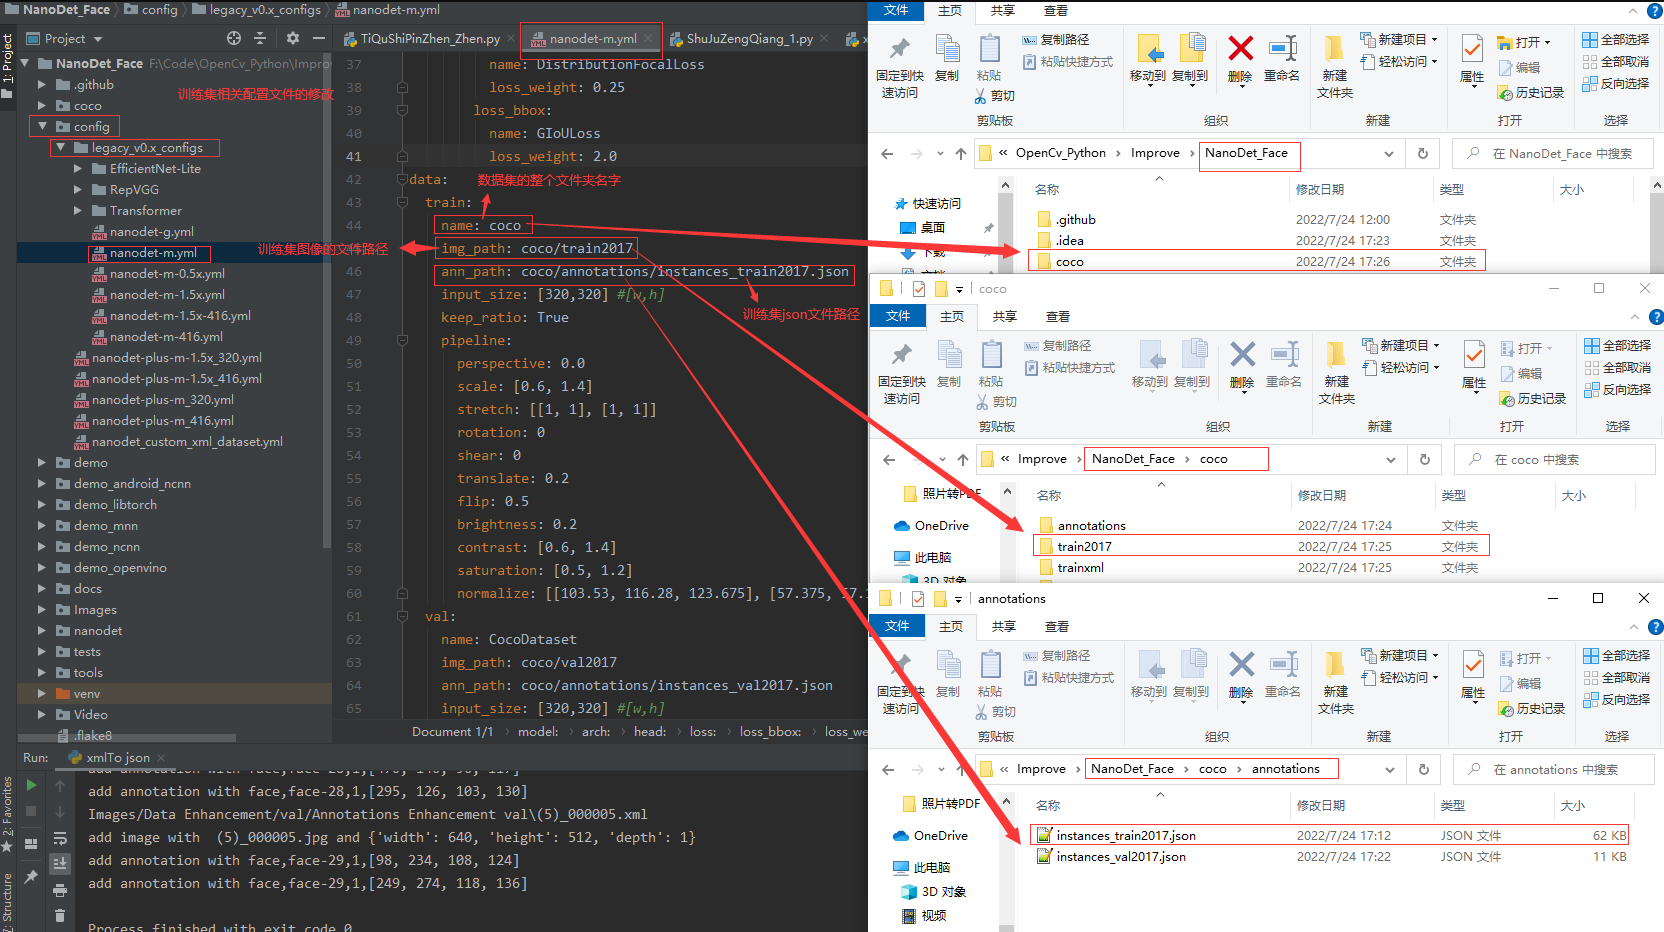
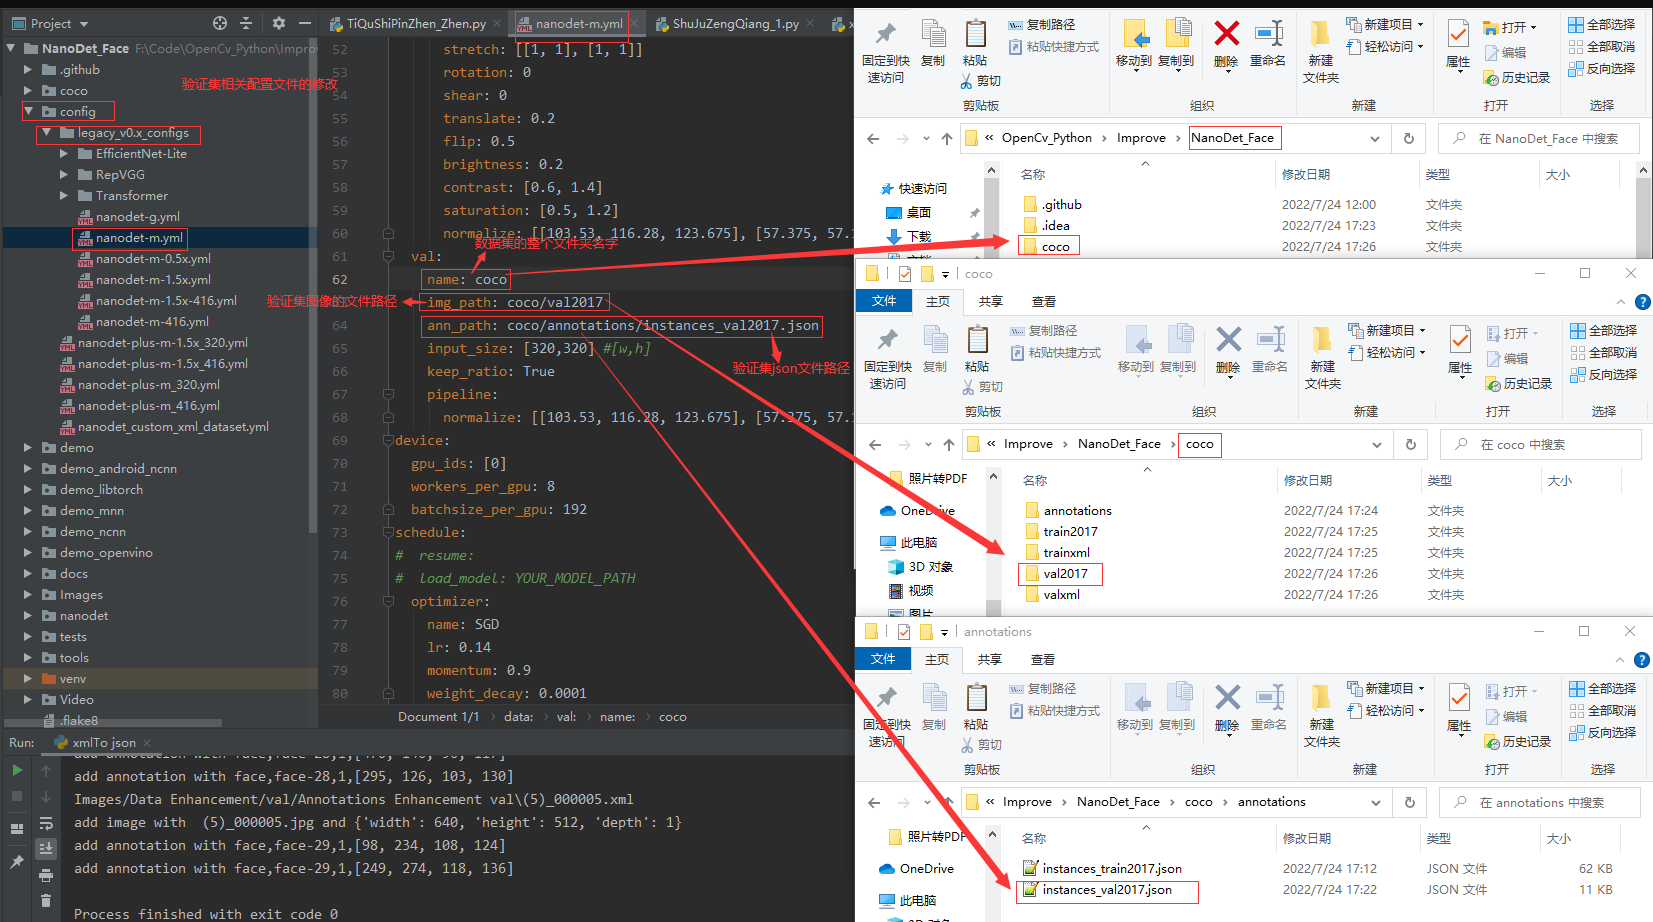
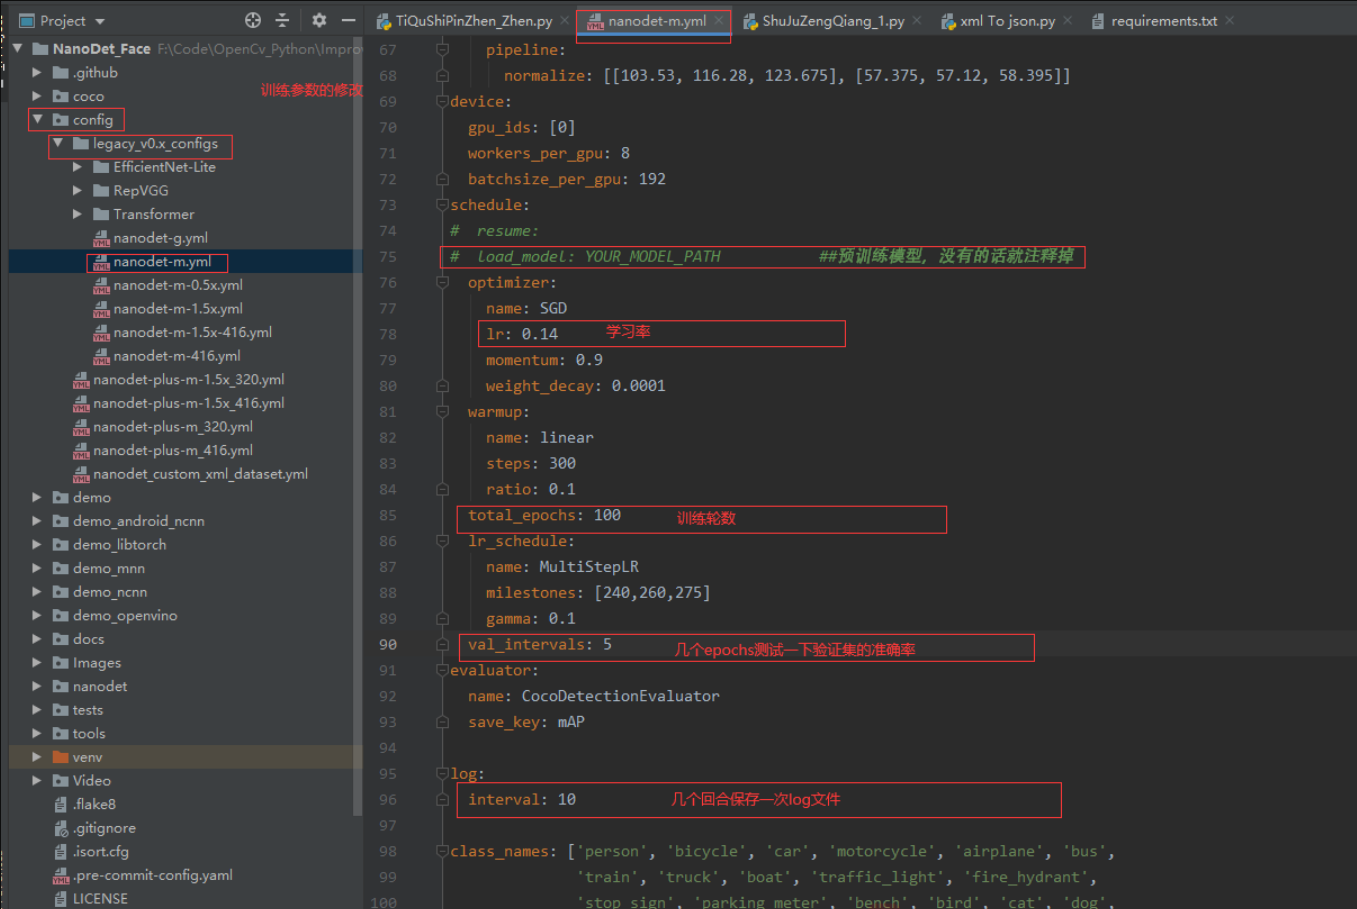
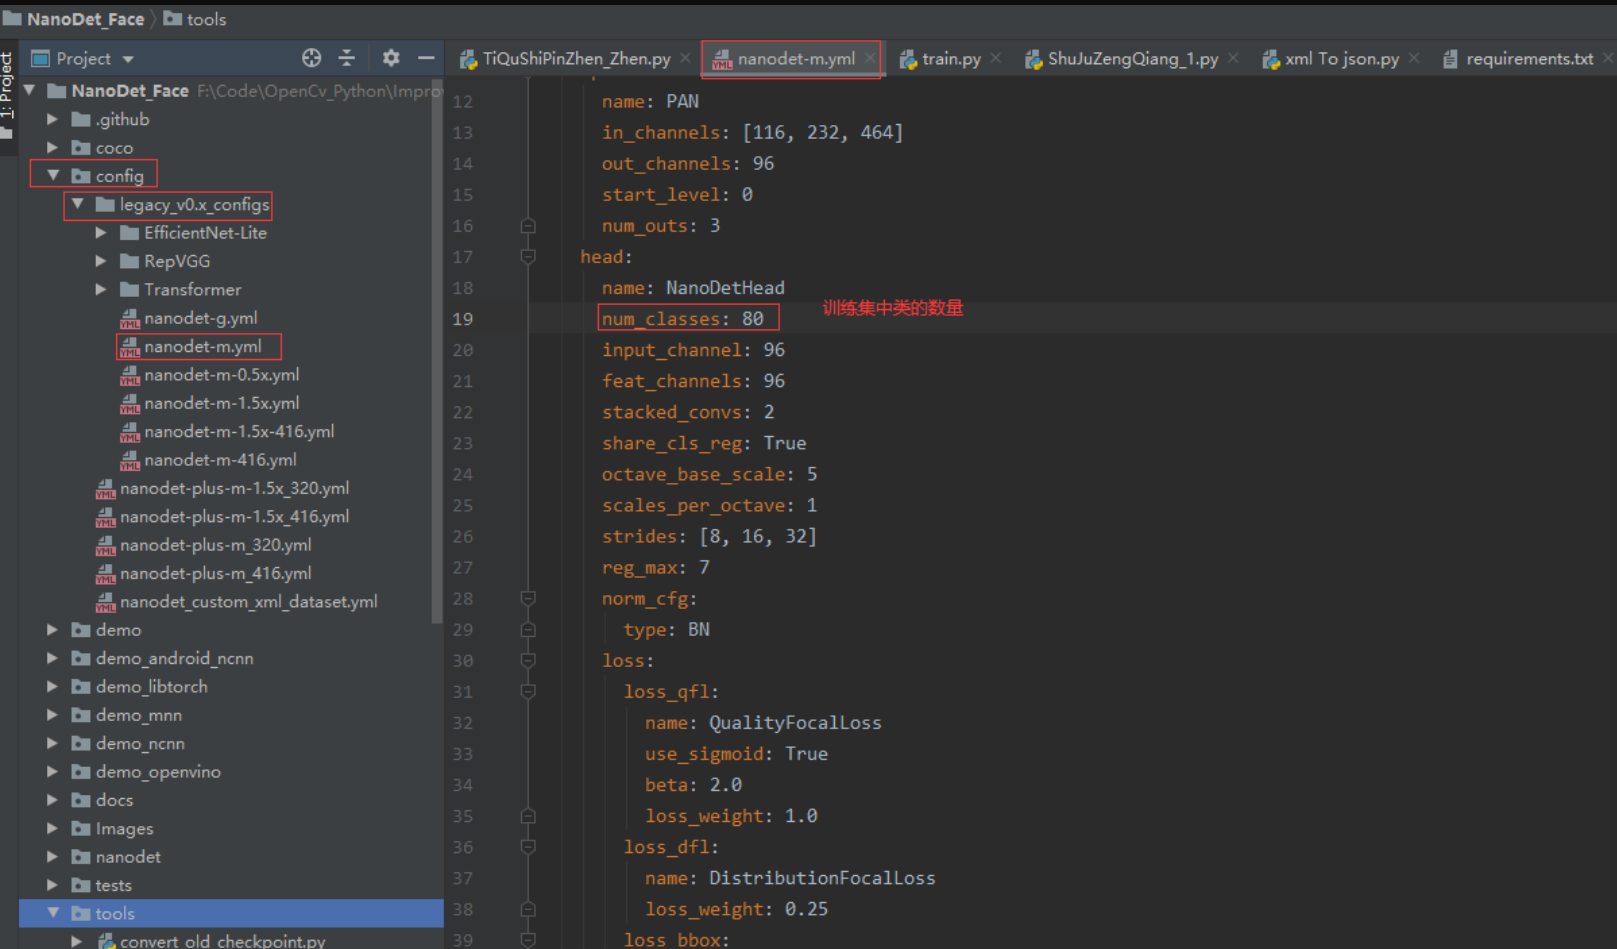
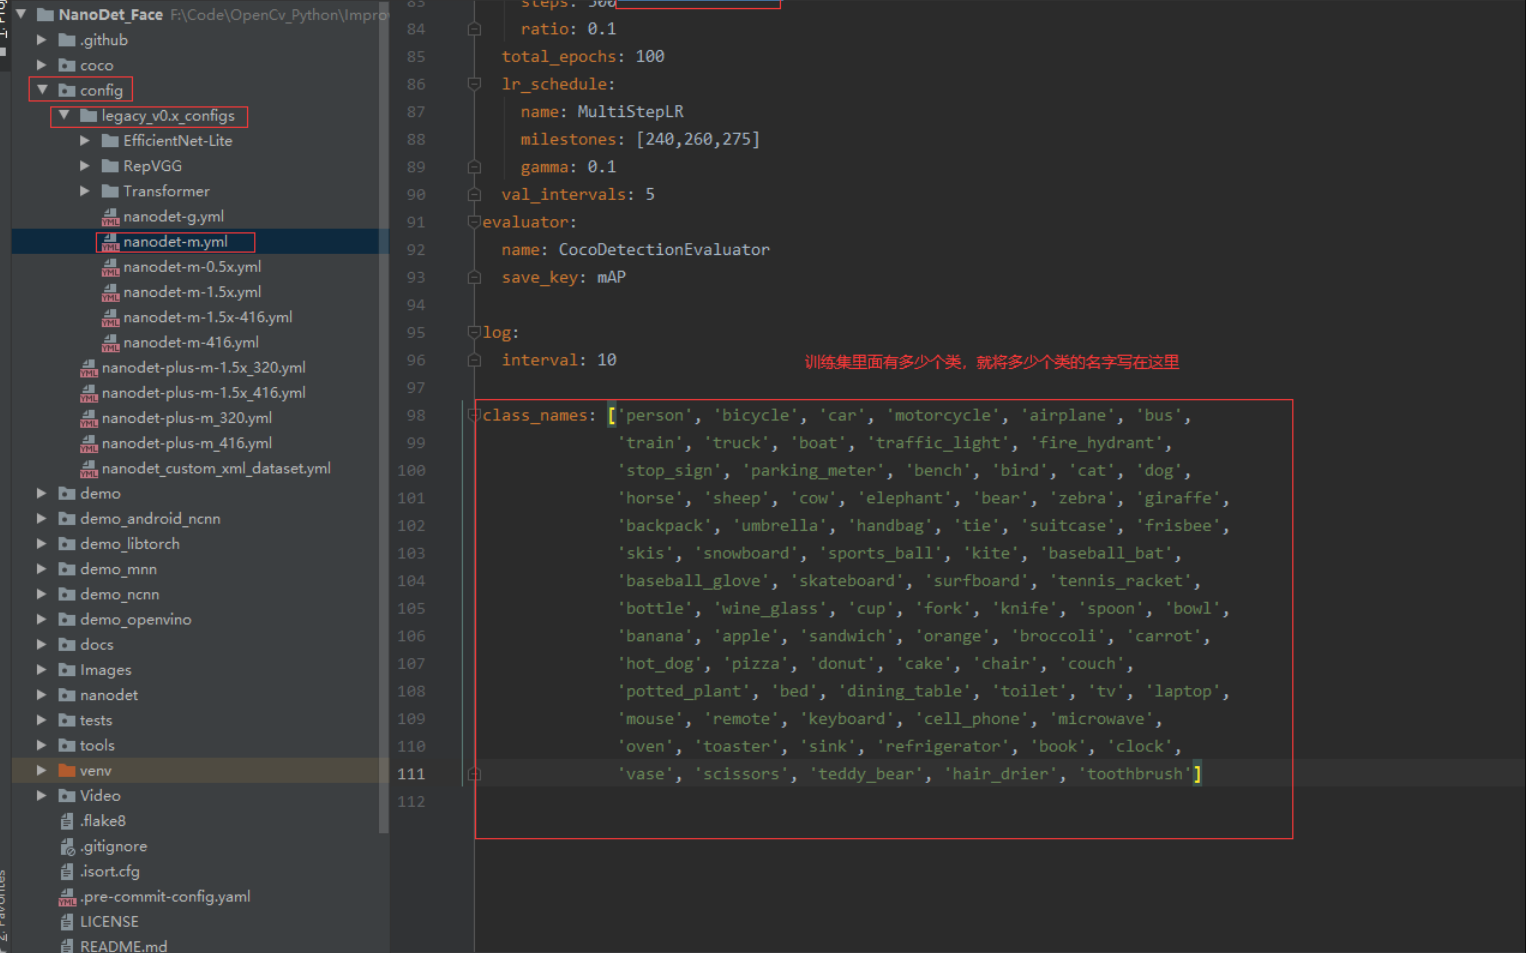
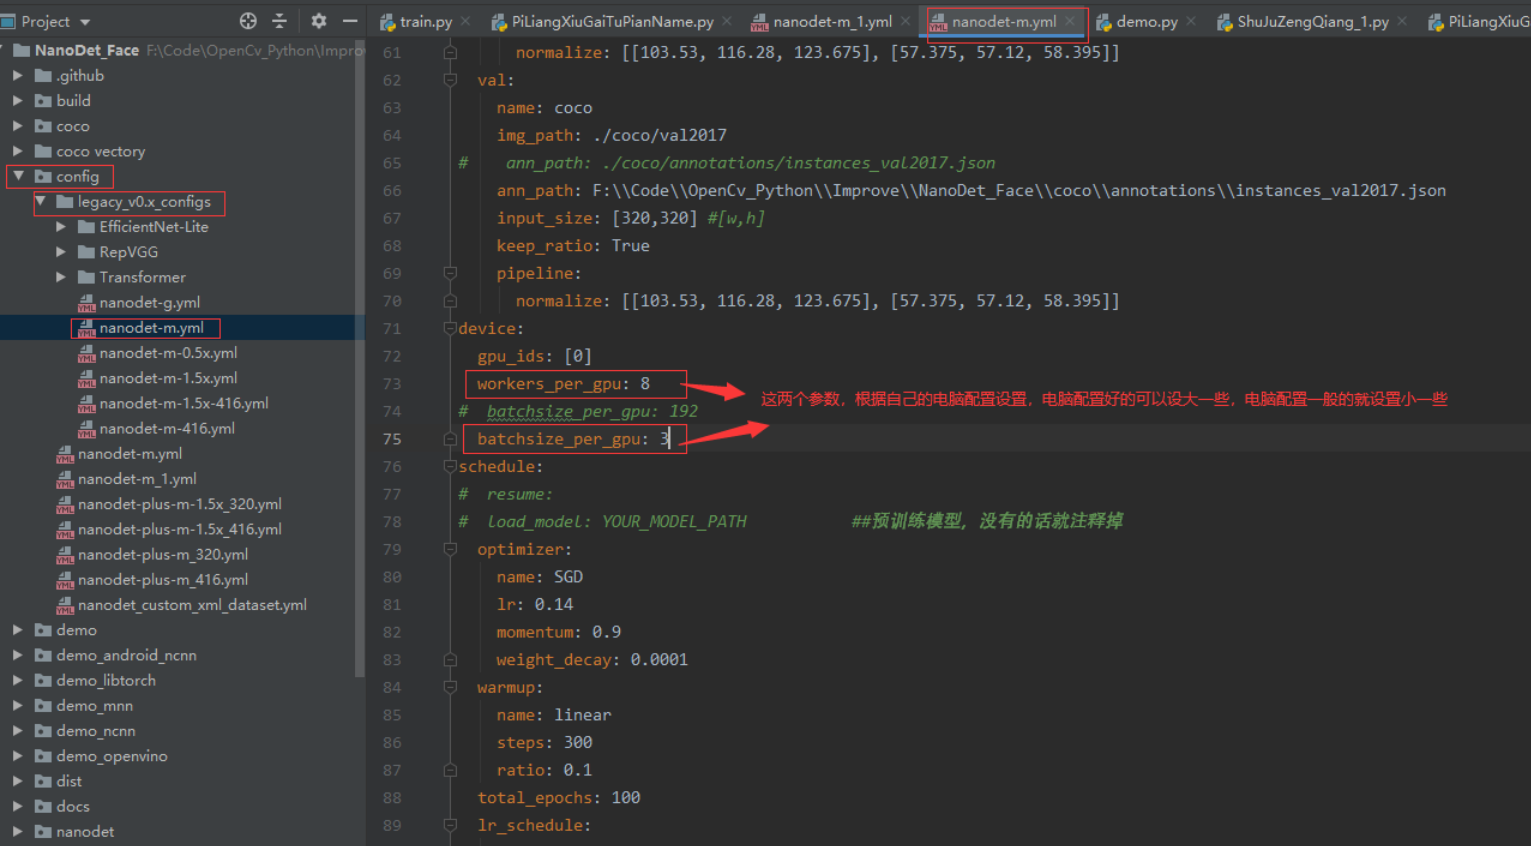
修改配置文件
模型训练
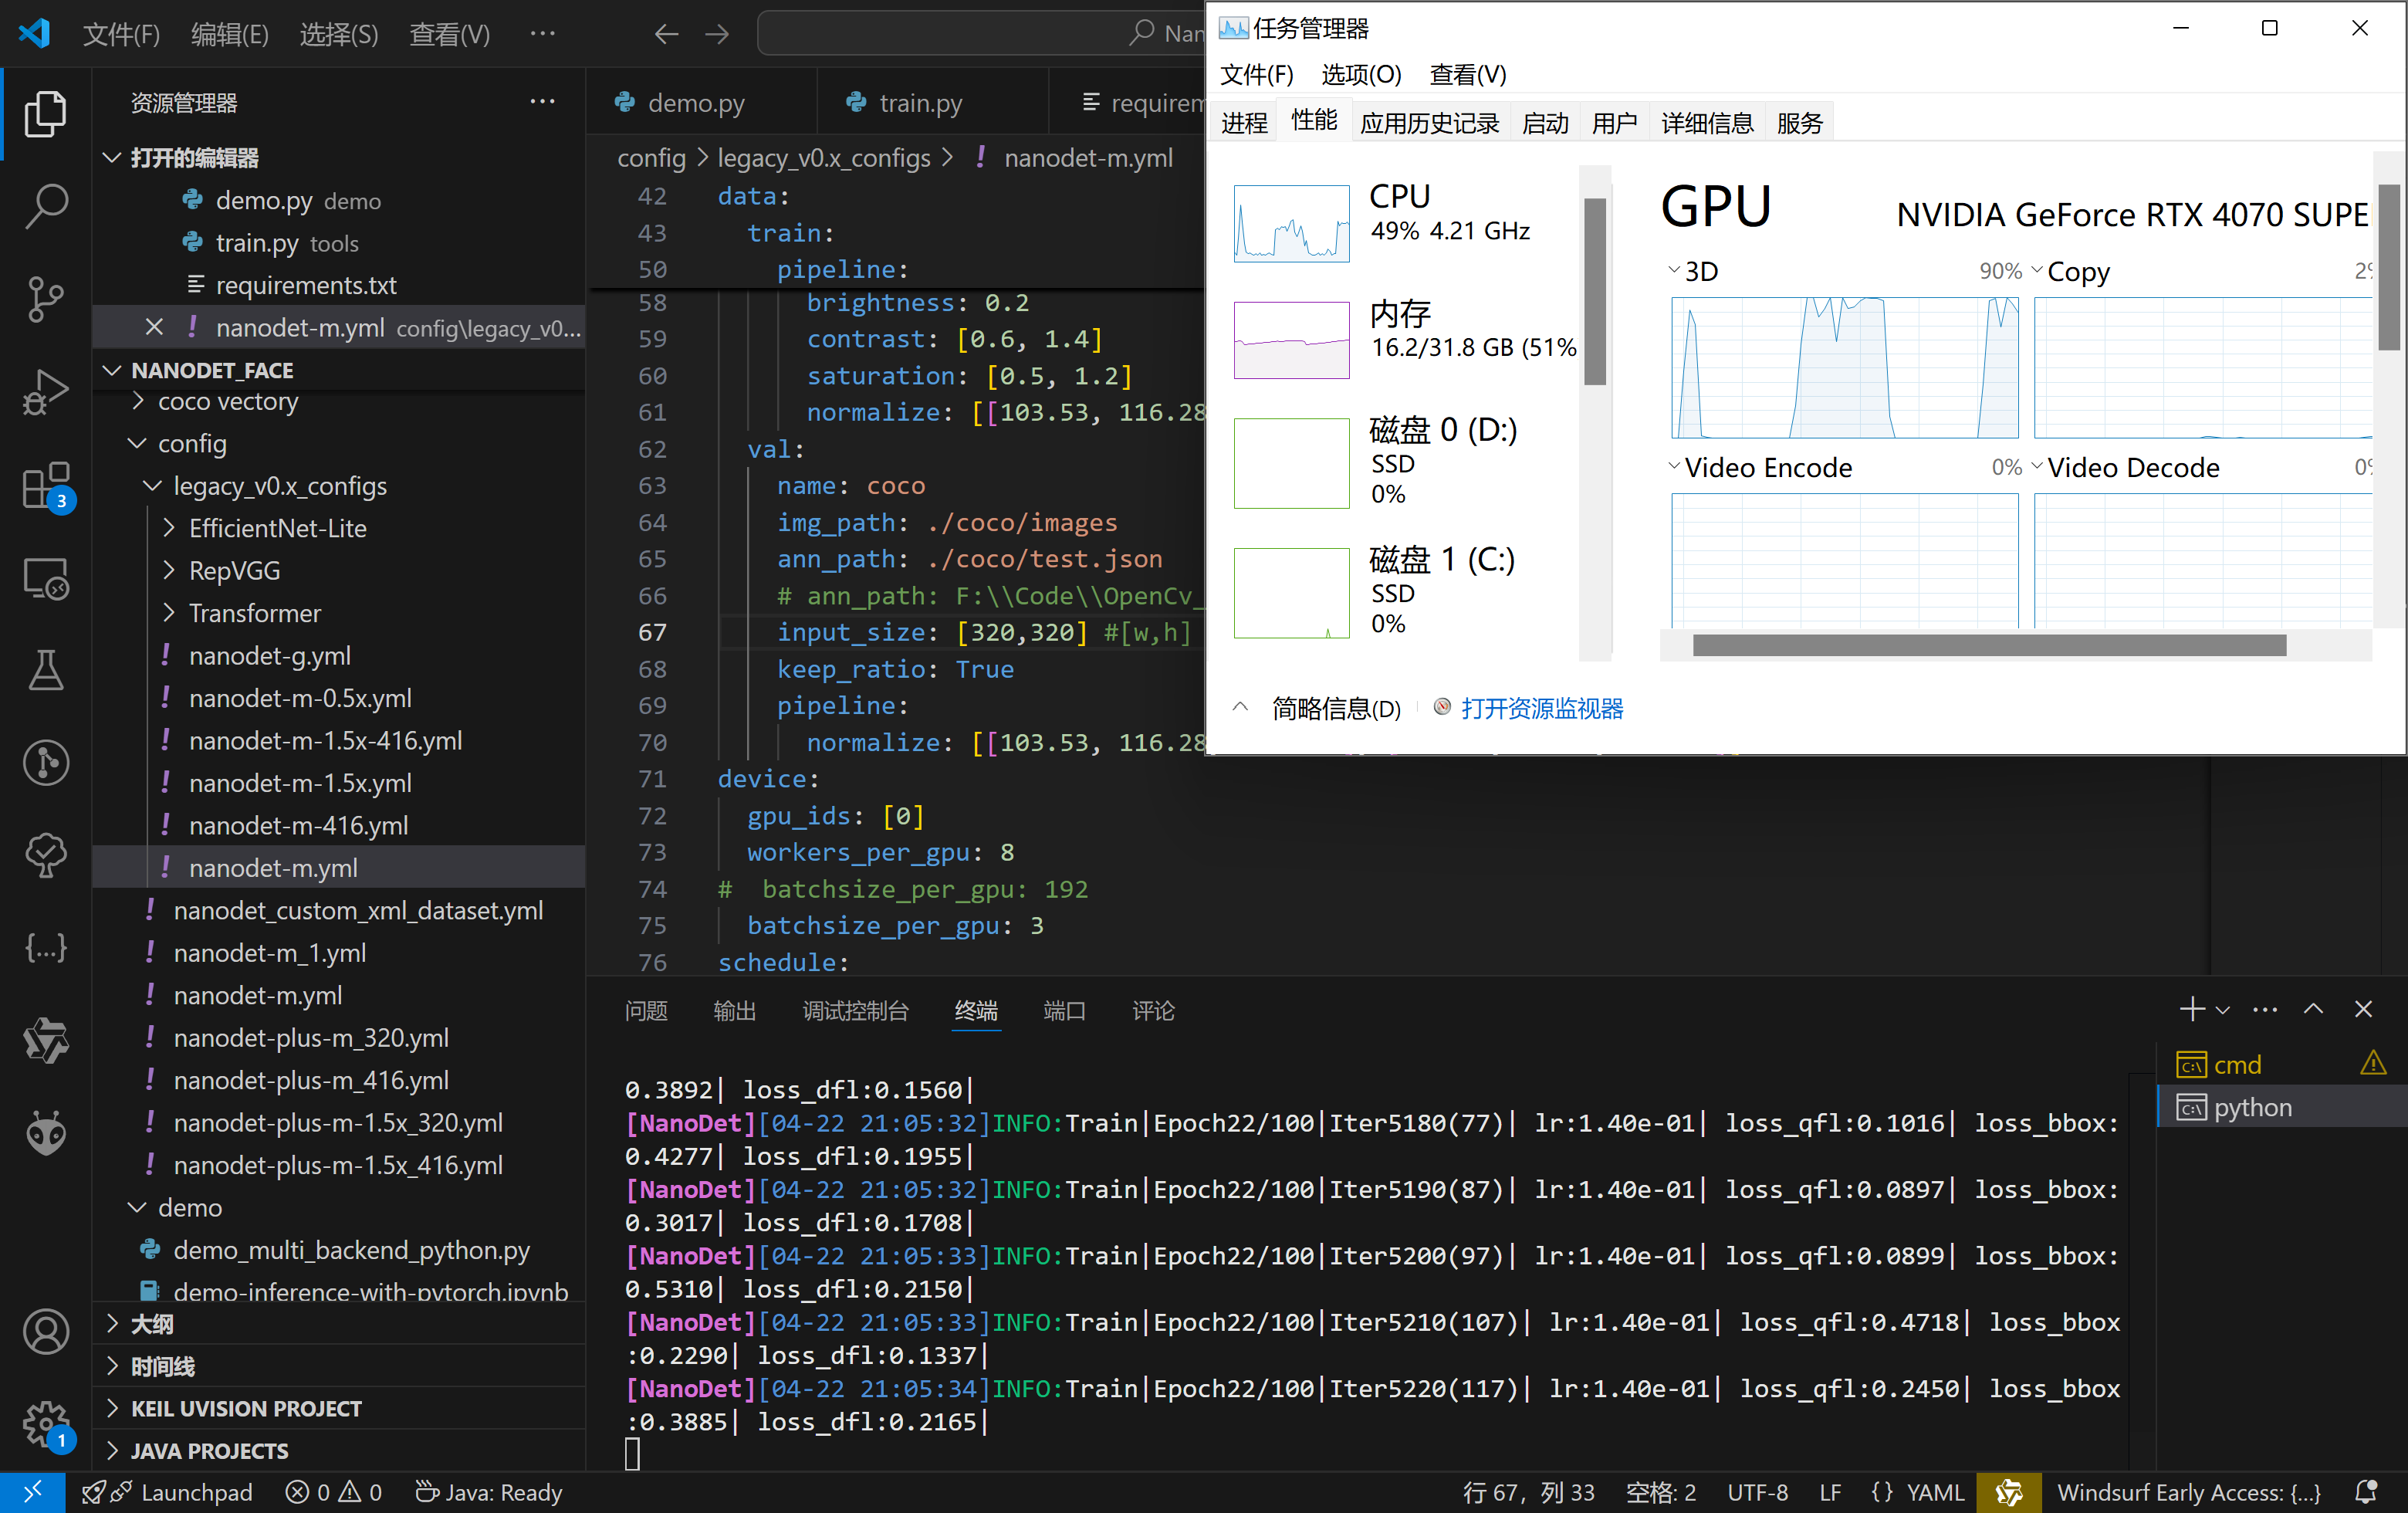
使用配置文件进行训练
1 python tools/train.py ./config/legacy_v0.x_configs/nanodet-m.yml
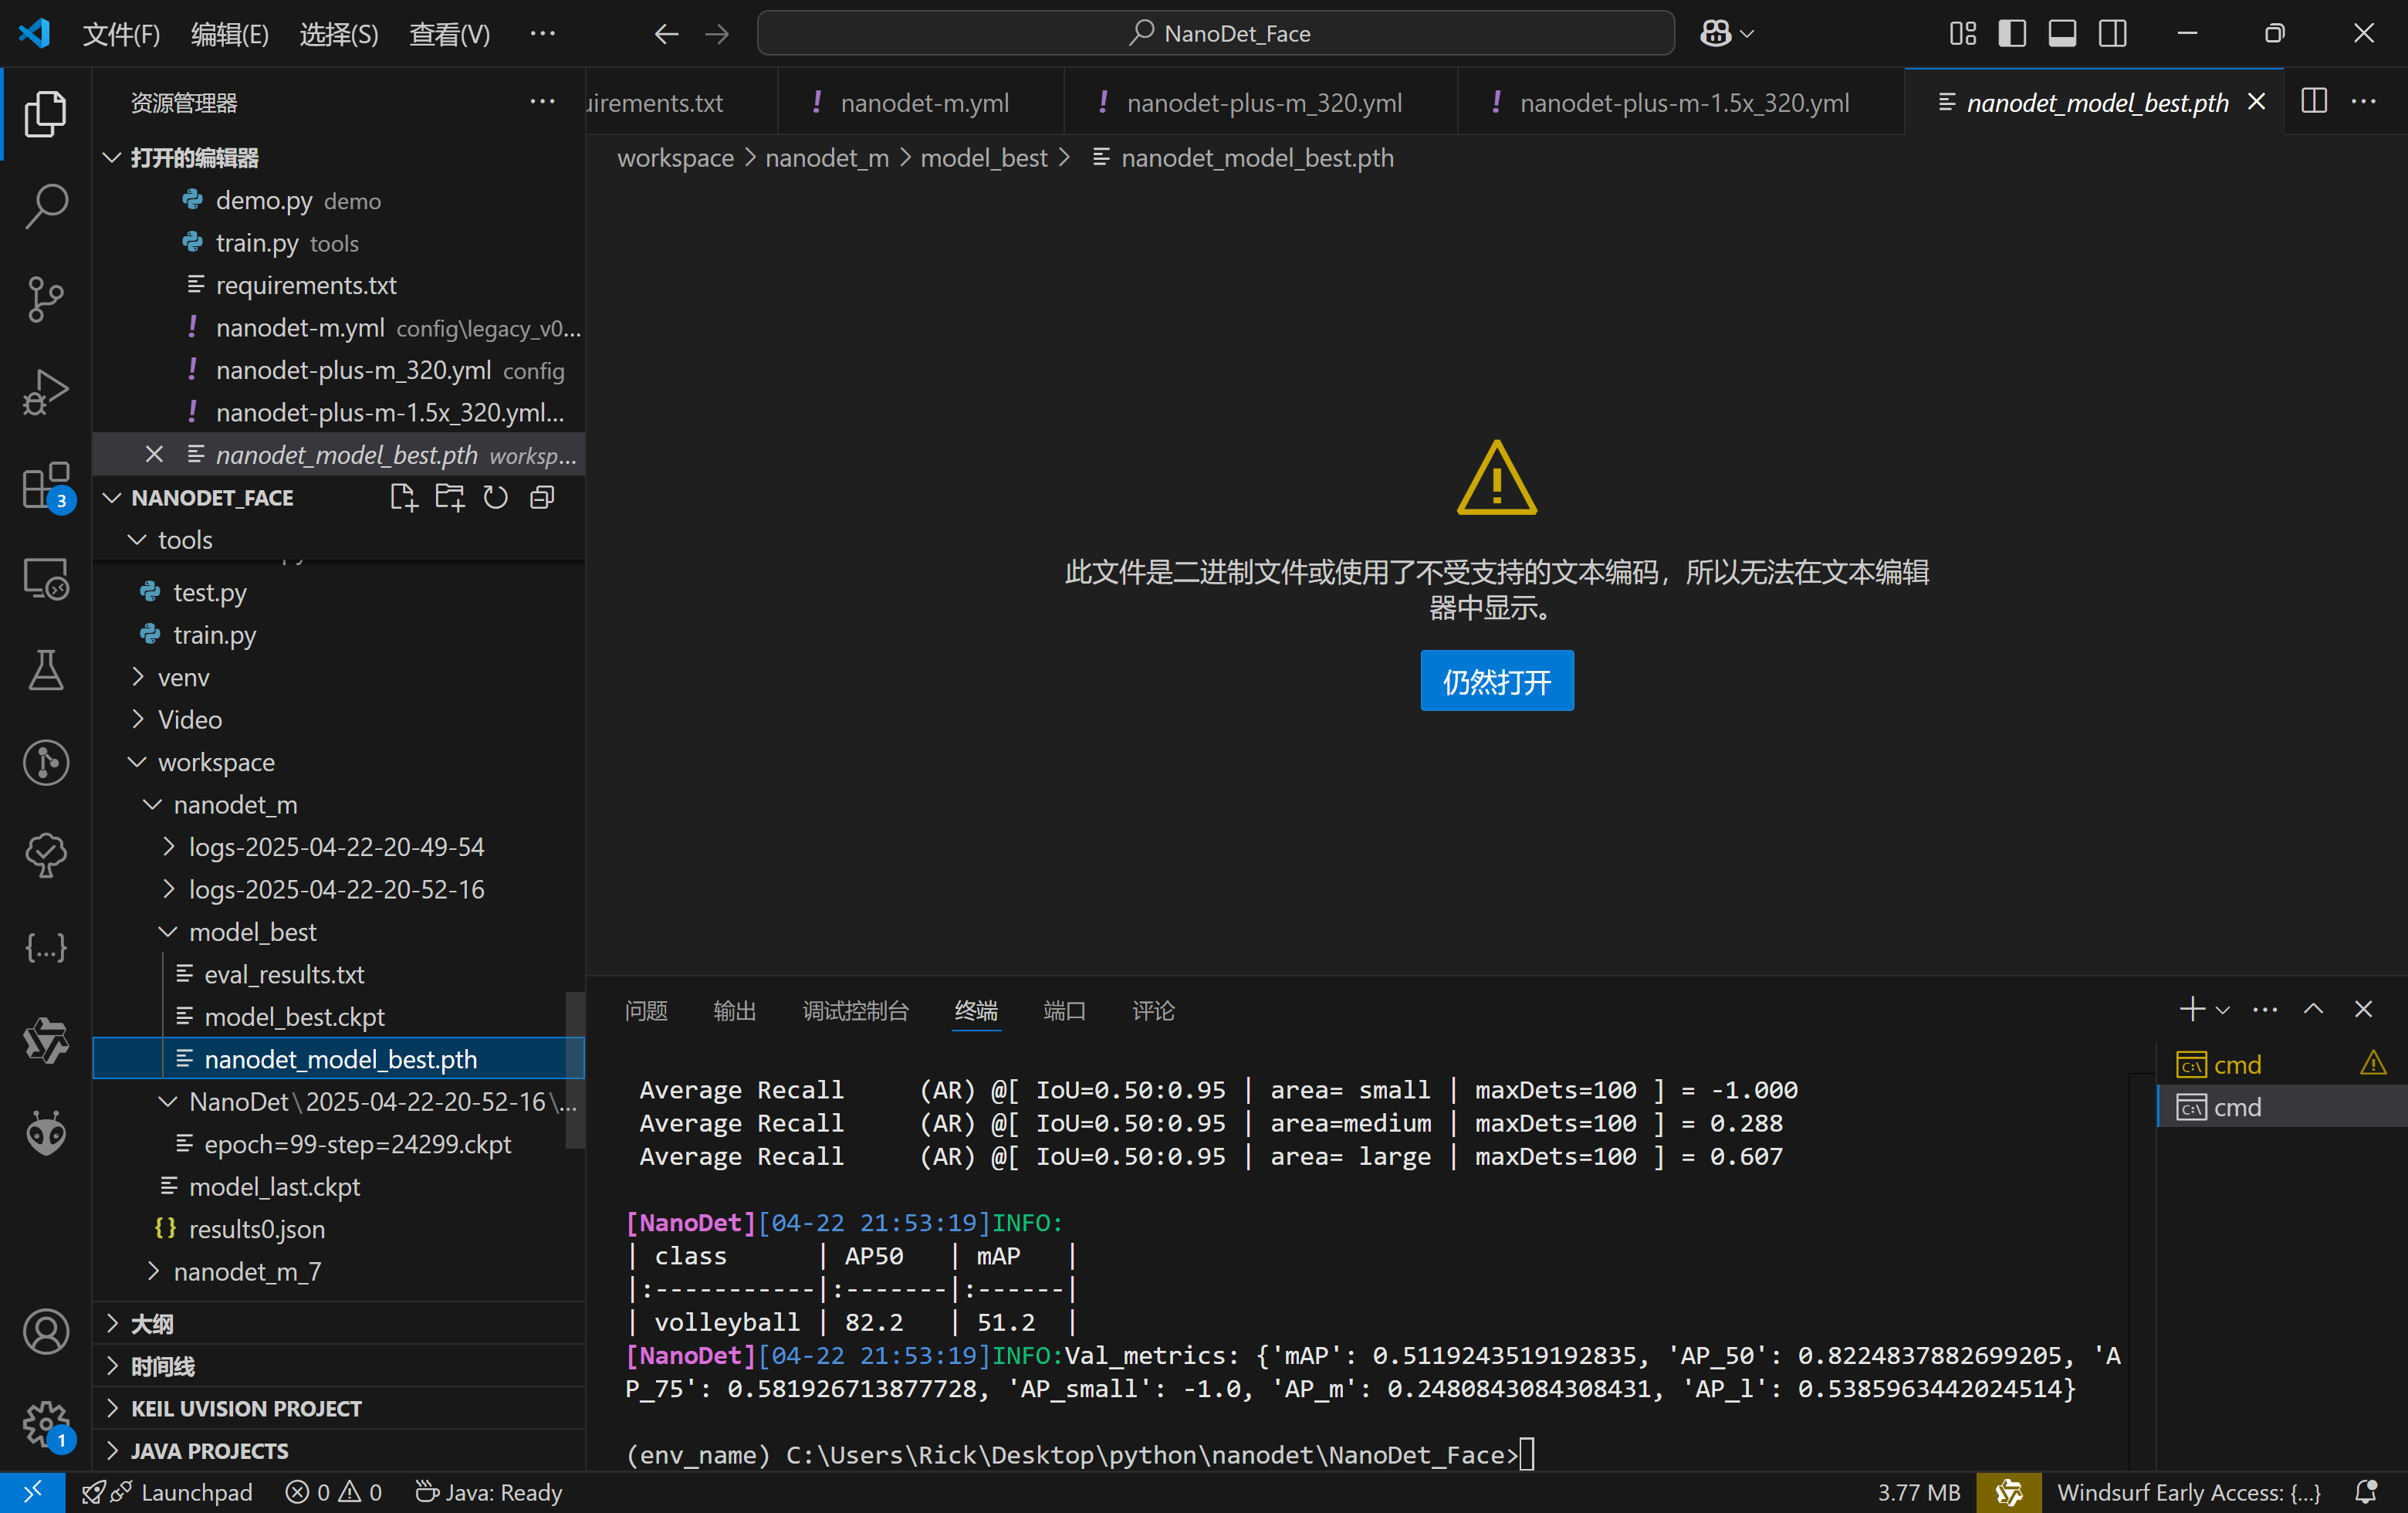
待训练完成后模型保存为pth,默认会按照mAP评分保持最佳模型。
可以用刚刚训练的模型测试一下
1 python demo/demo.py video --config ./config/nanodet-m.yml --model ./workspace/nanodet_m/model_best/nanodet_model_best.pth --path ./Video/rc.mp4
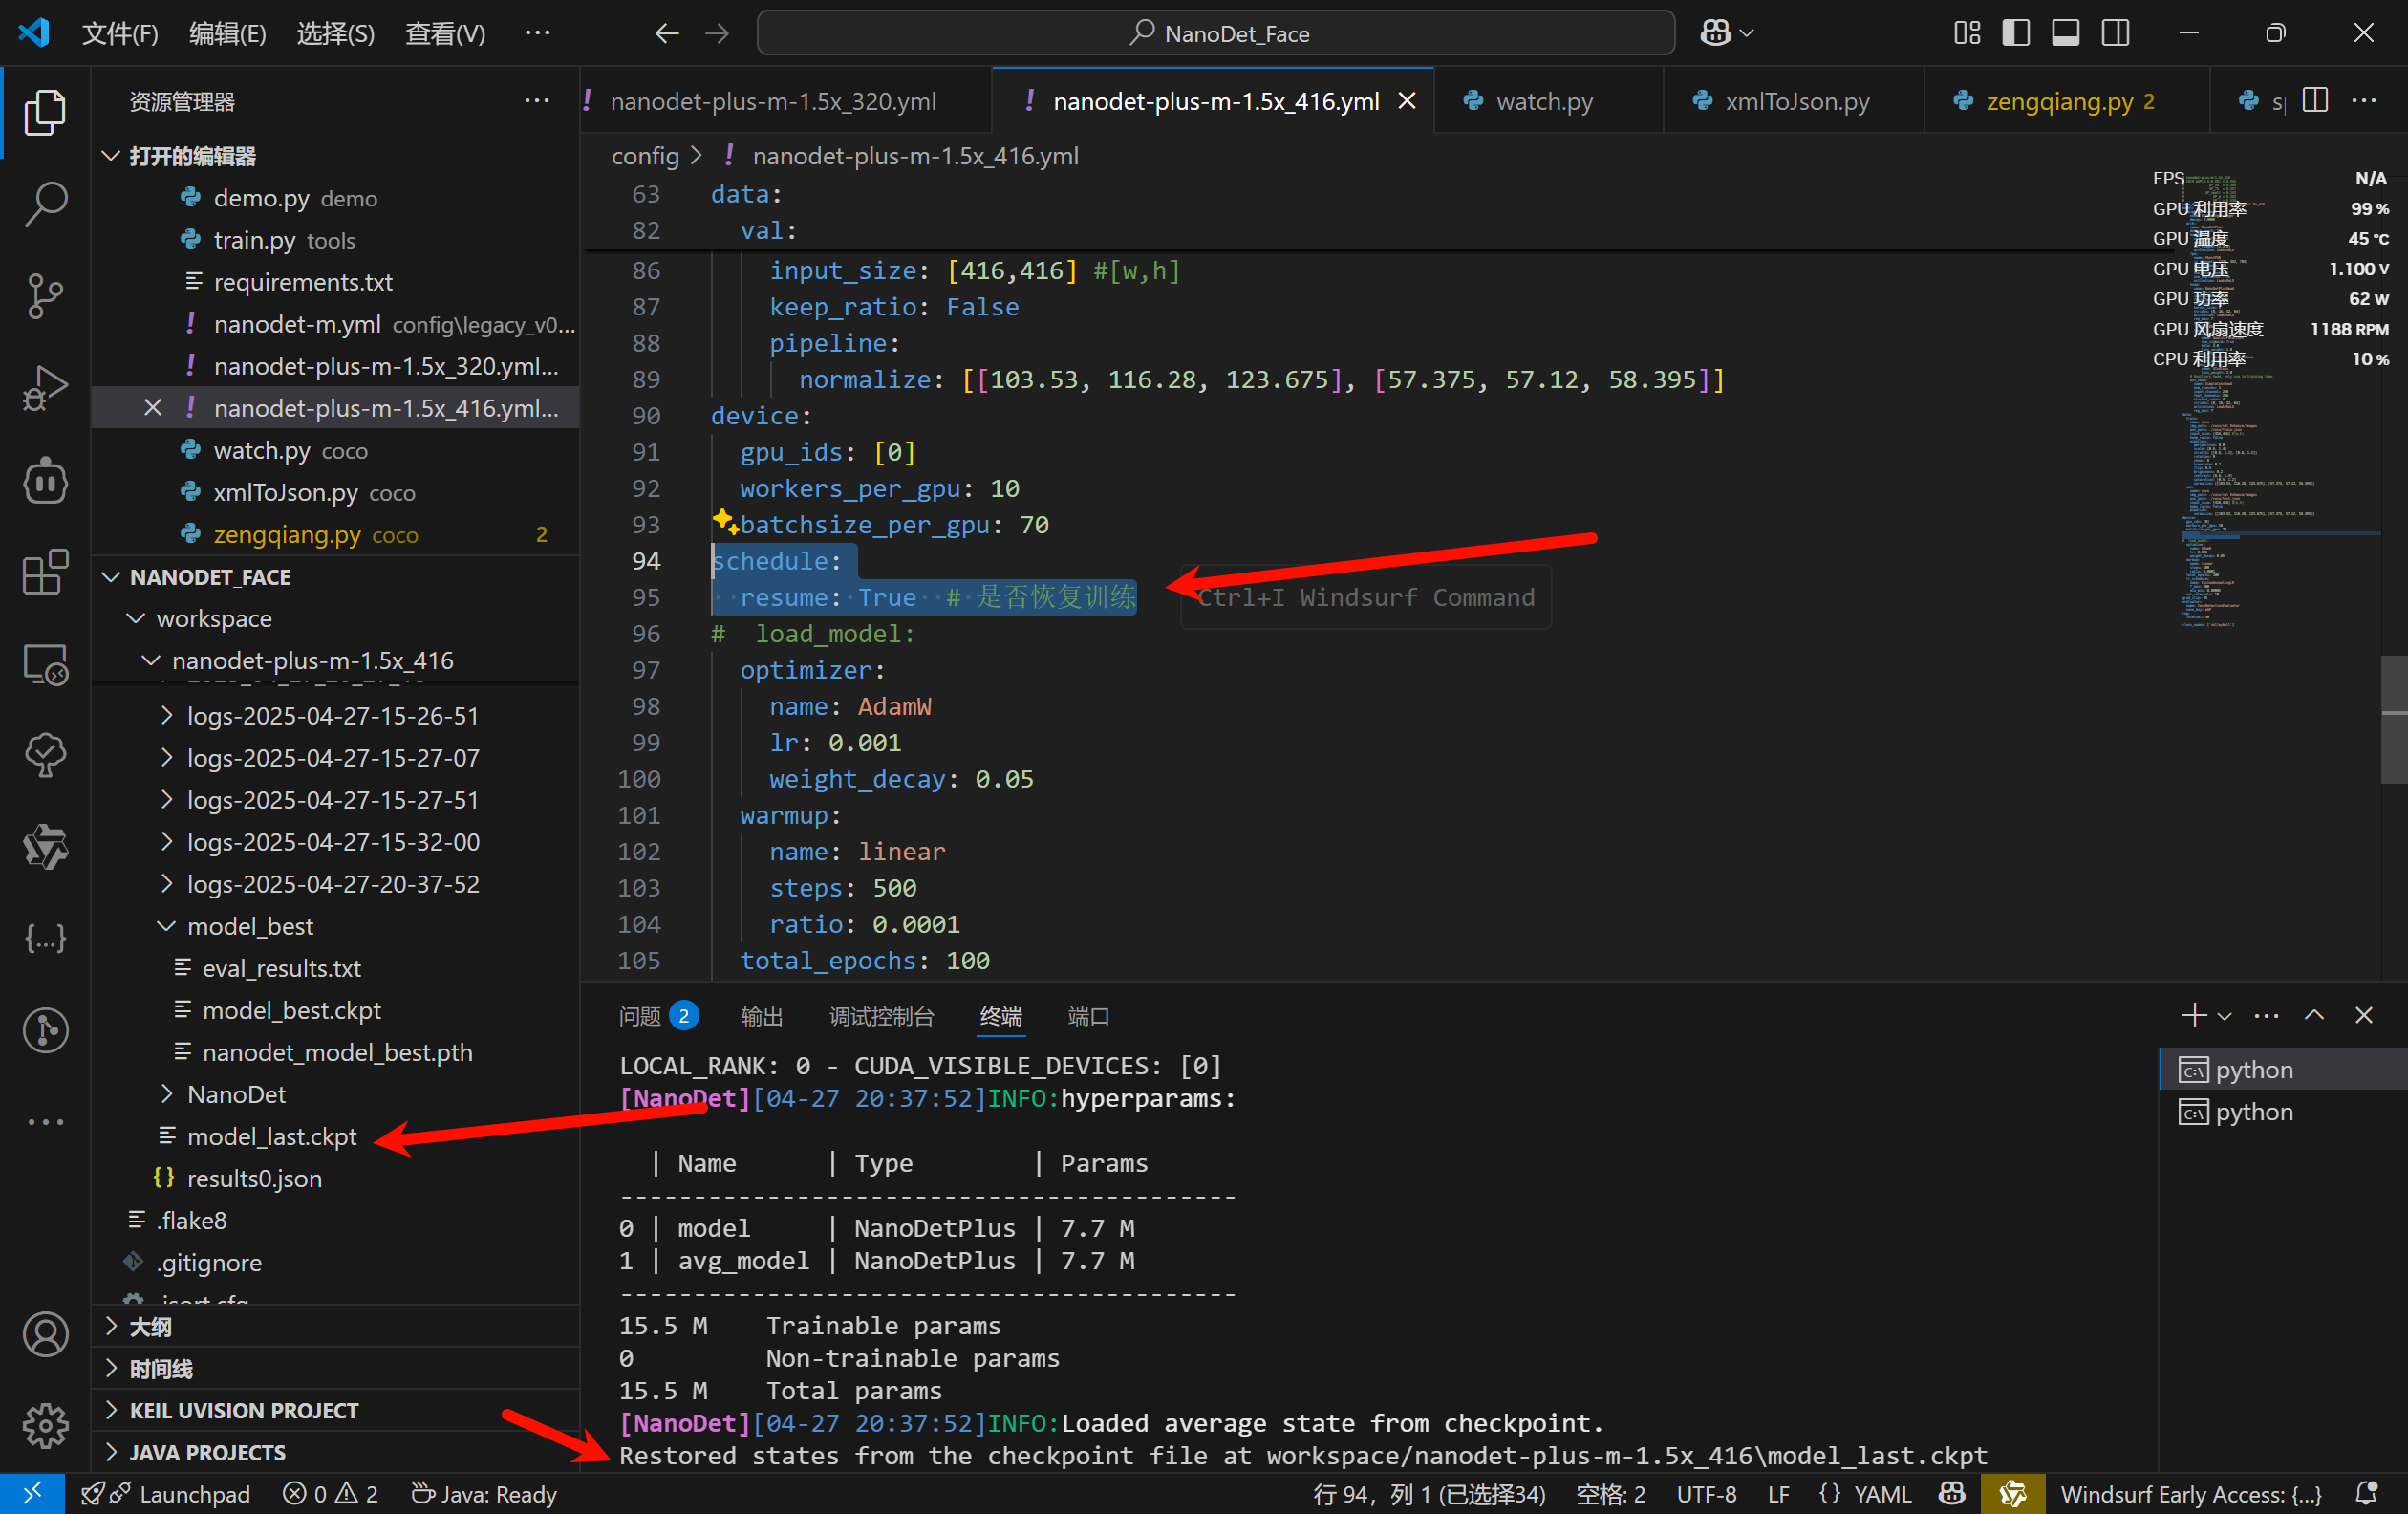
恢复中断训练
如果训练意外中断,可以使用PyTorch Lightning 提供的 checkpoint 功能,只需要更改配置文件,将schedule.resume设置为True即可
1
2
3
schedule: resume: True # 或者 False,取决于你是否要恢复训练 # 其他 schedule 配置
重新启动训练python tools/train.py config\nanodet-plus-m-1.5x_416.yml
PyTorch Lightning 会自动检测 model_last.ckpt 文件,并从上次保存的 checkpoint 恢复训练。
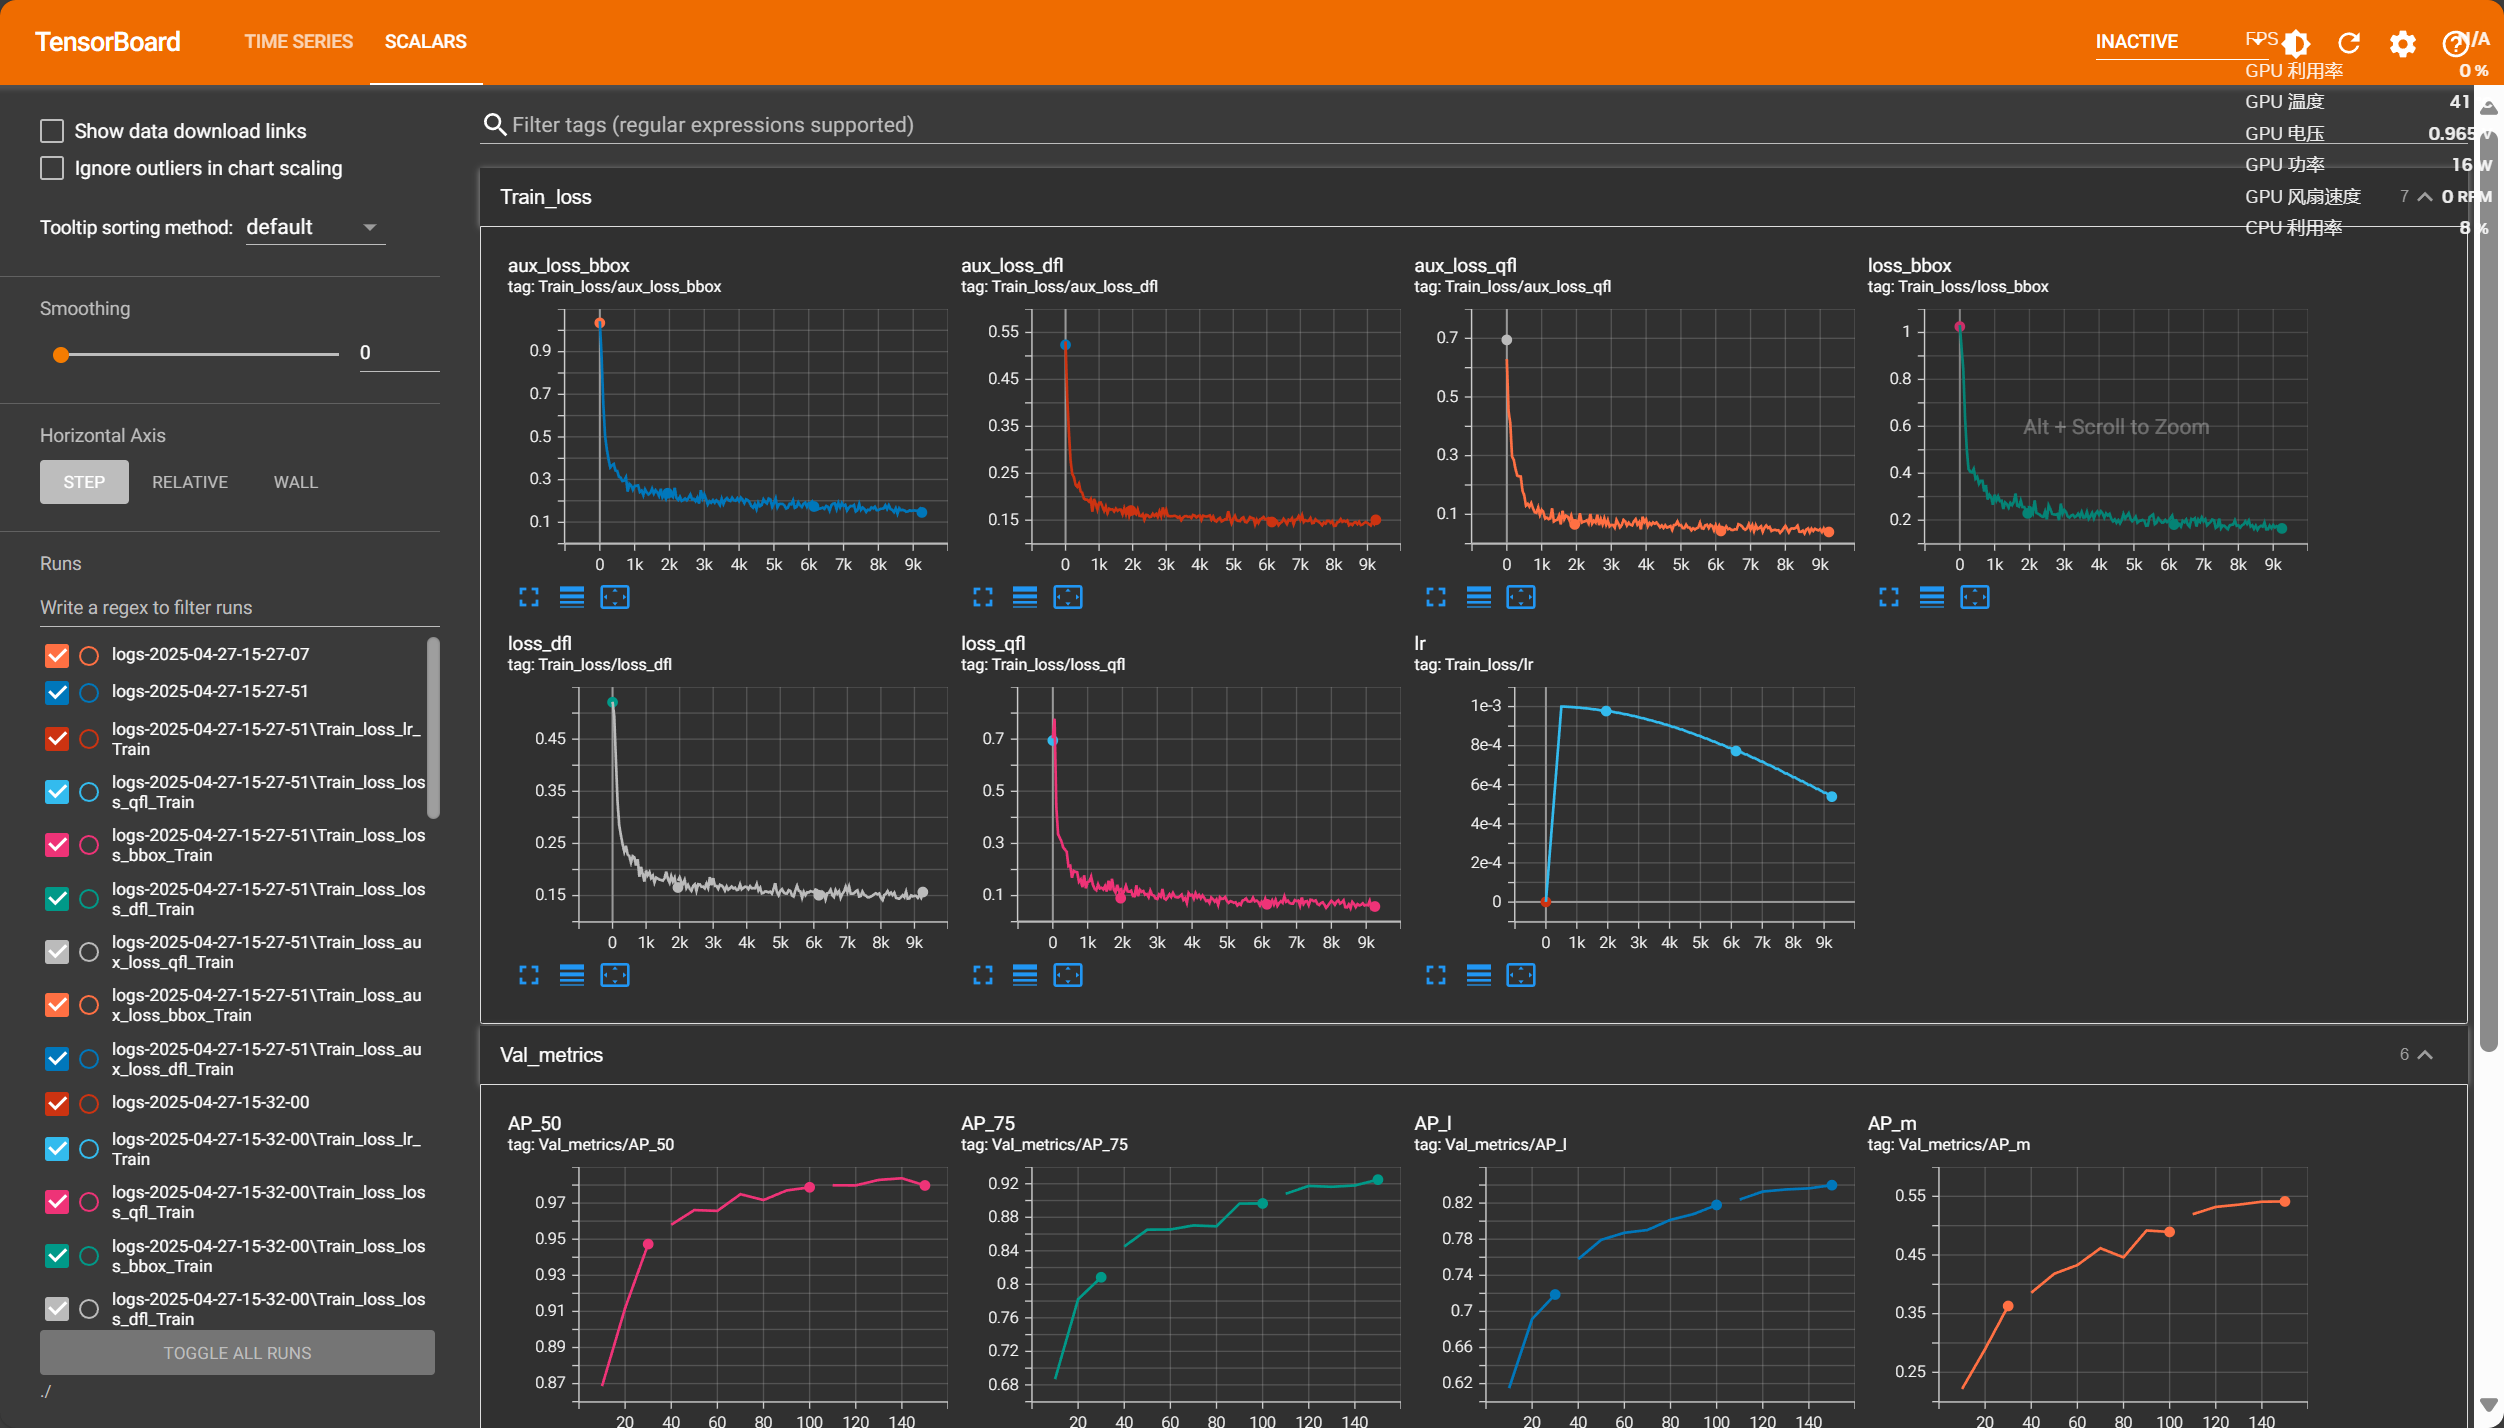
TensorBoard
可视化日志 save_dir
1
2
cd <YOUR_SAVE_DIR> tensorboard --logdir ./
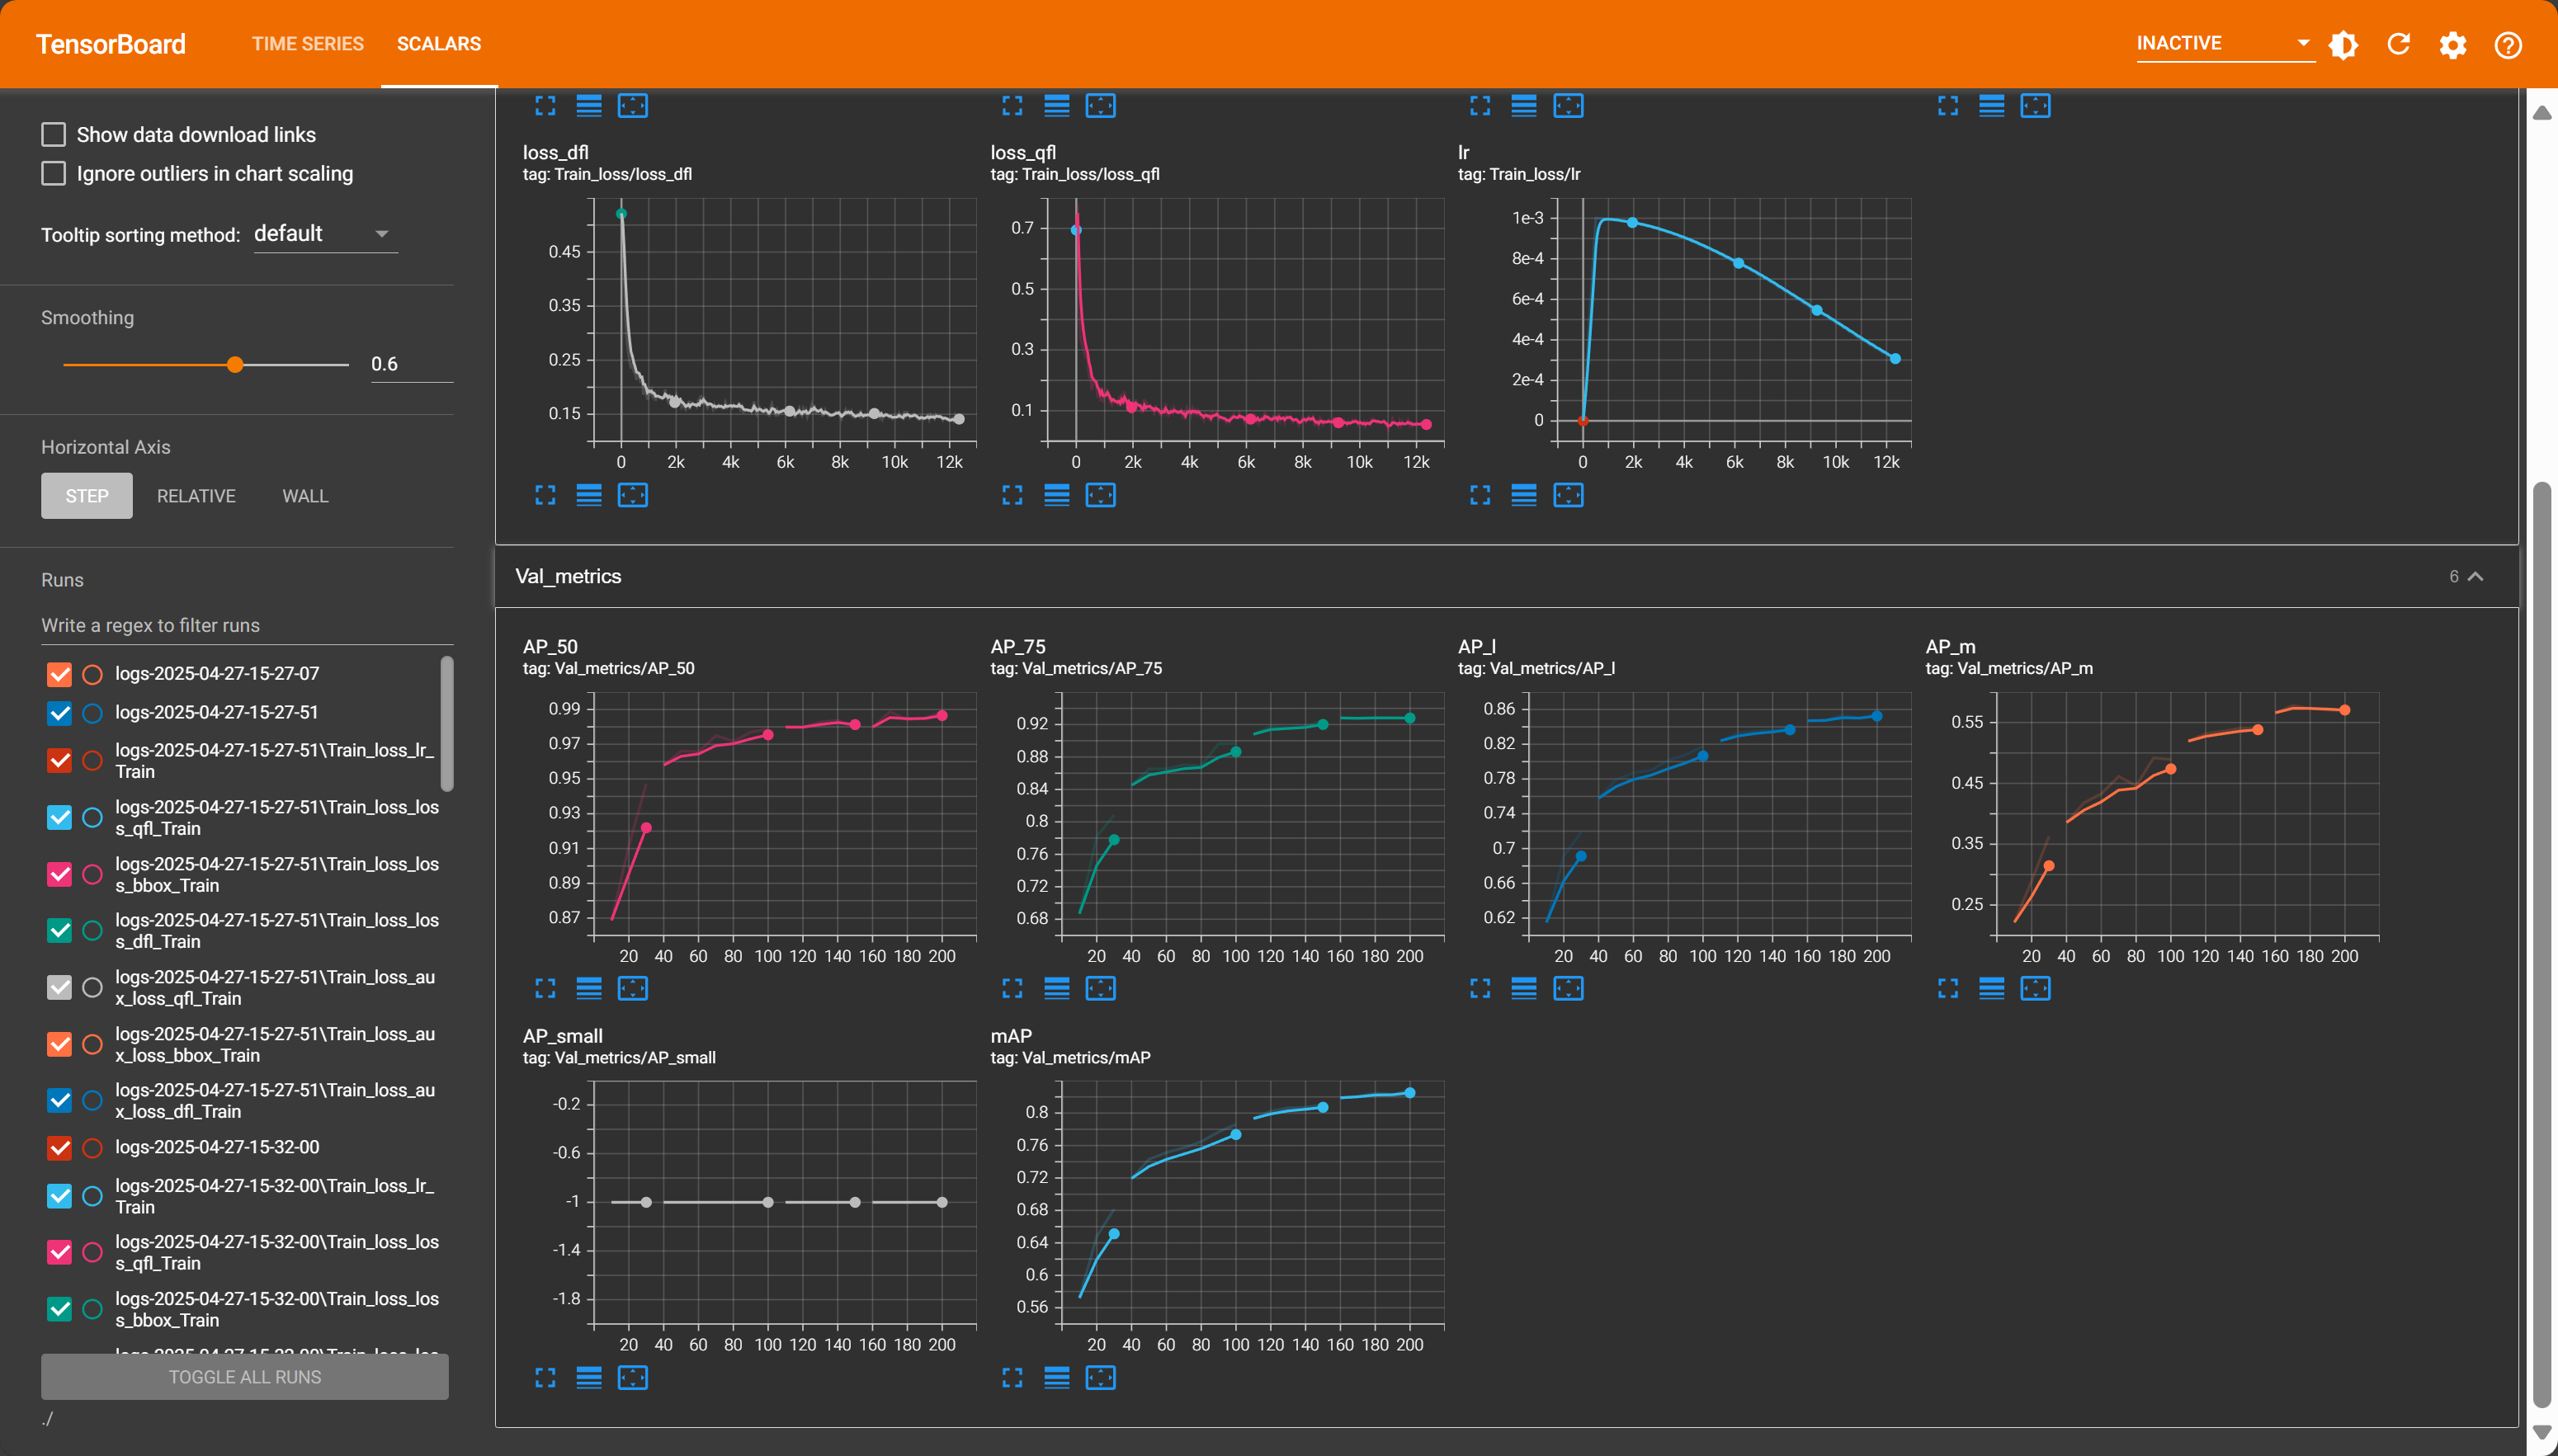
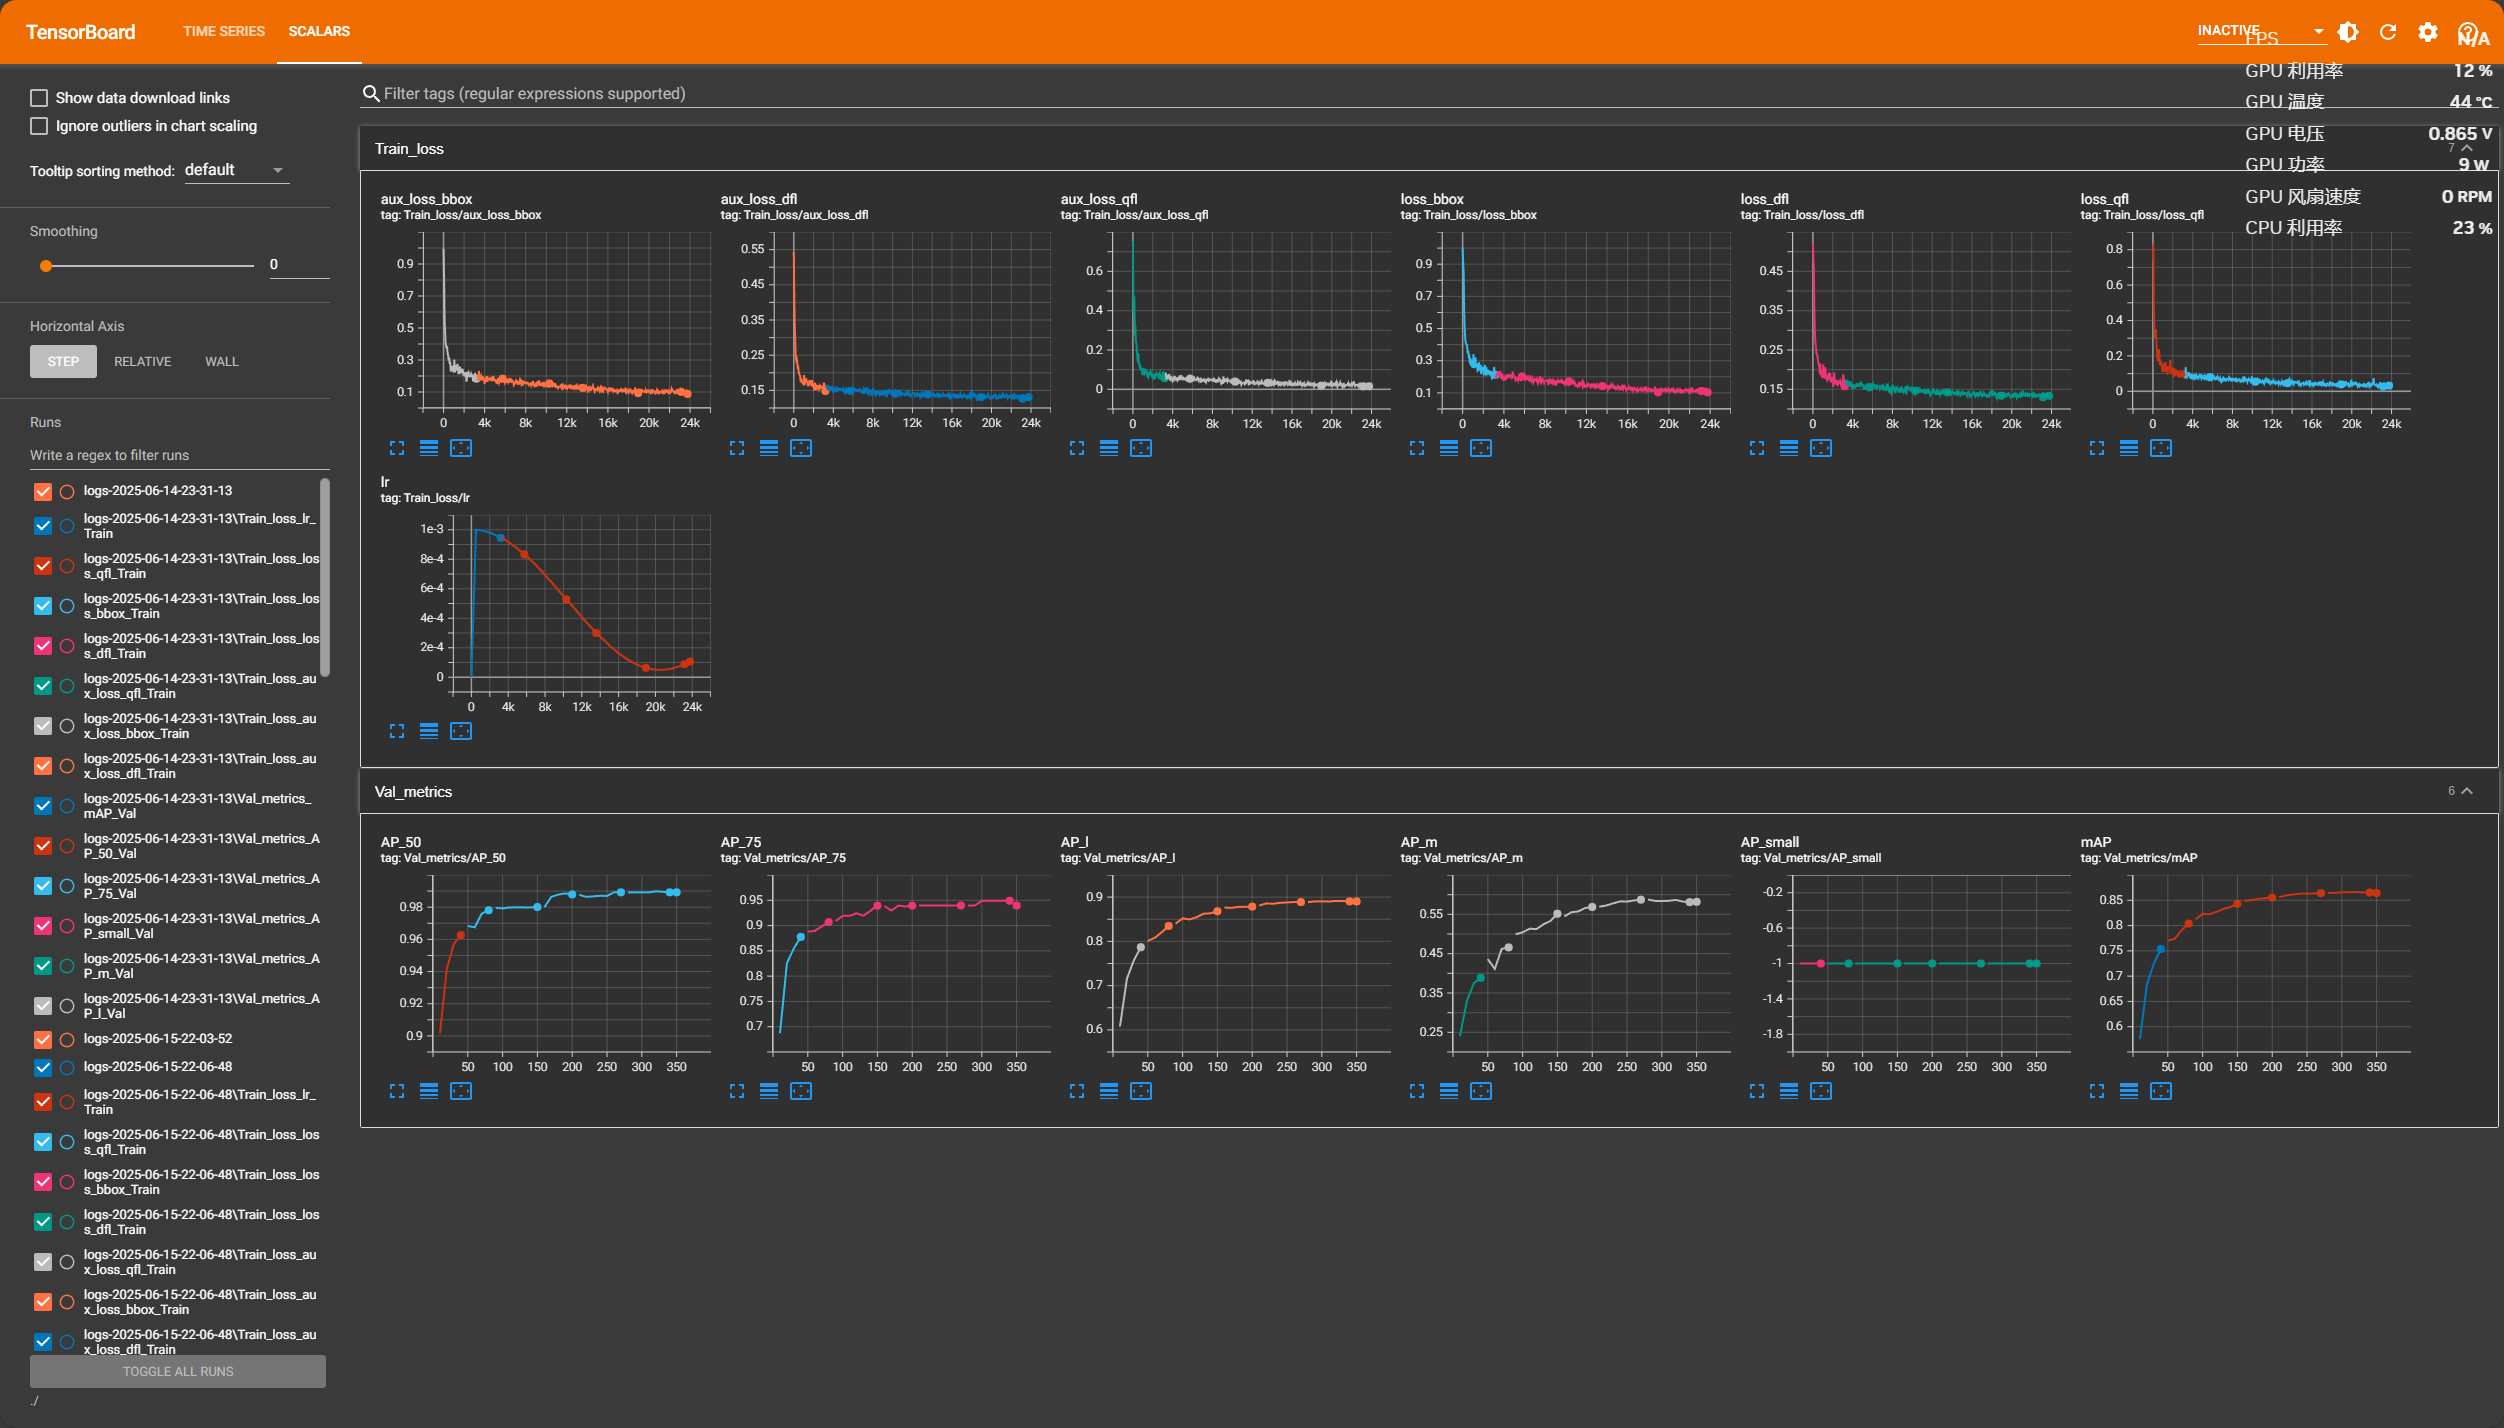
观察模型是否收敛:因为仅仅观察损失函数很难判断是否需要停止训练,可观测其性能指标增长趋势逐步调整训练轮次,因为经过数据增强数据集多达5000+,所以此处训练轮次可以适当减少。
主要观察mAP指标继续训练是否还有增长趋势,若还存在上升趋势可追加训练轮次,直到性能指标趋于平稳,则可认为模型以及拟合。
训练350轮
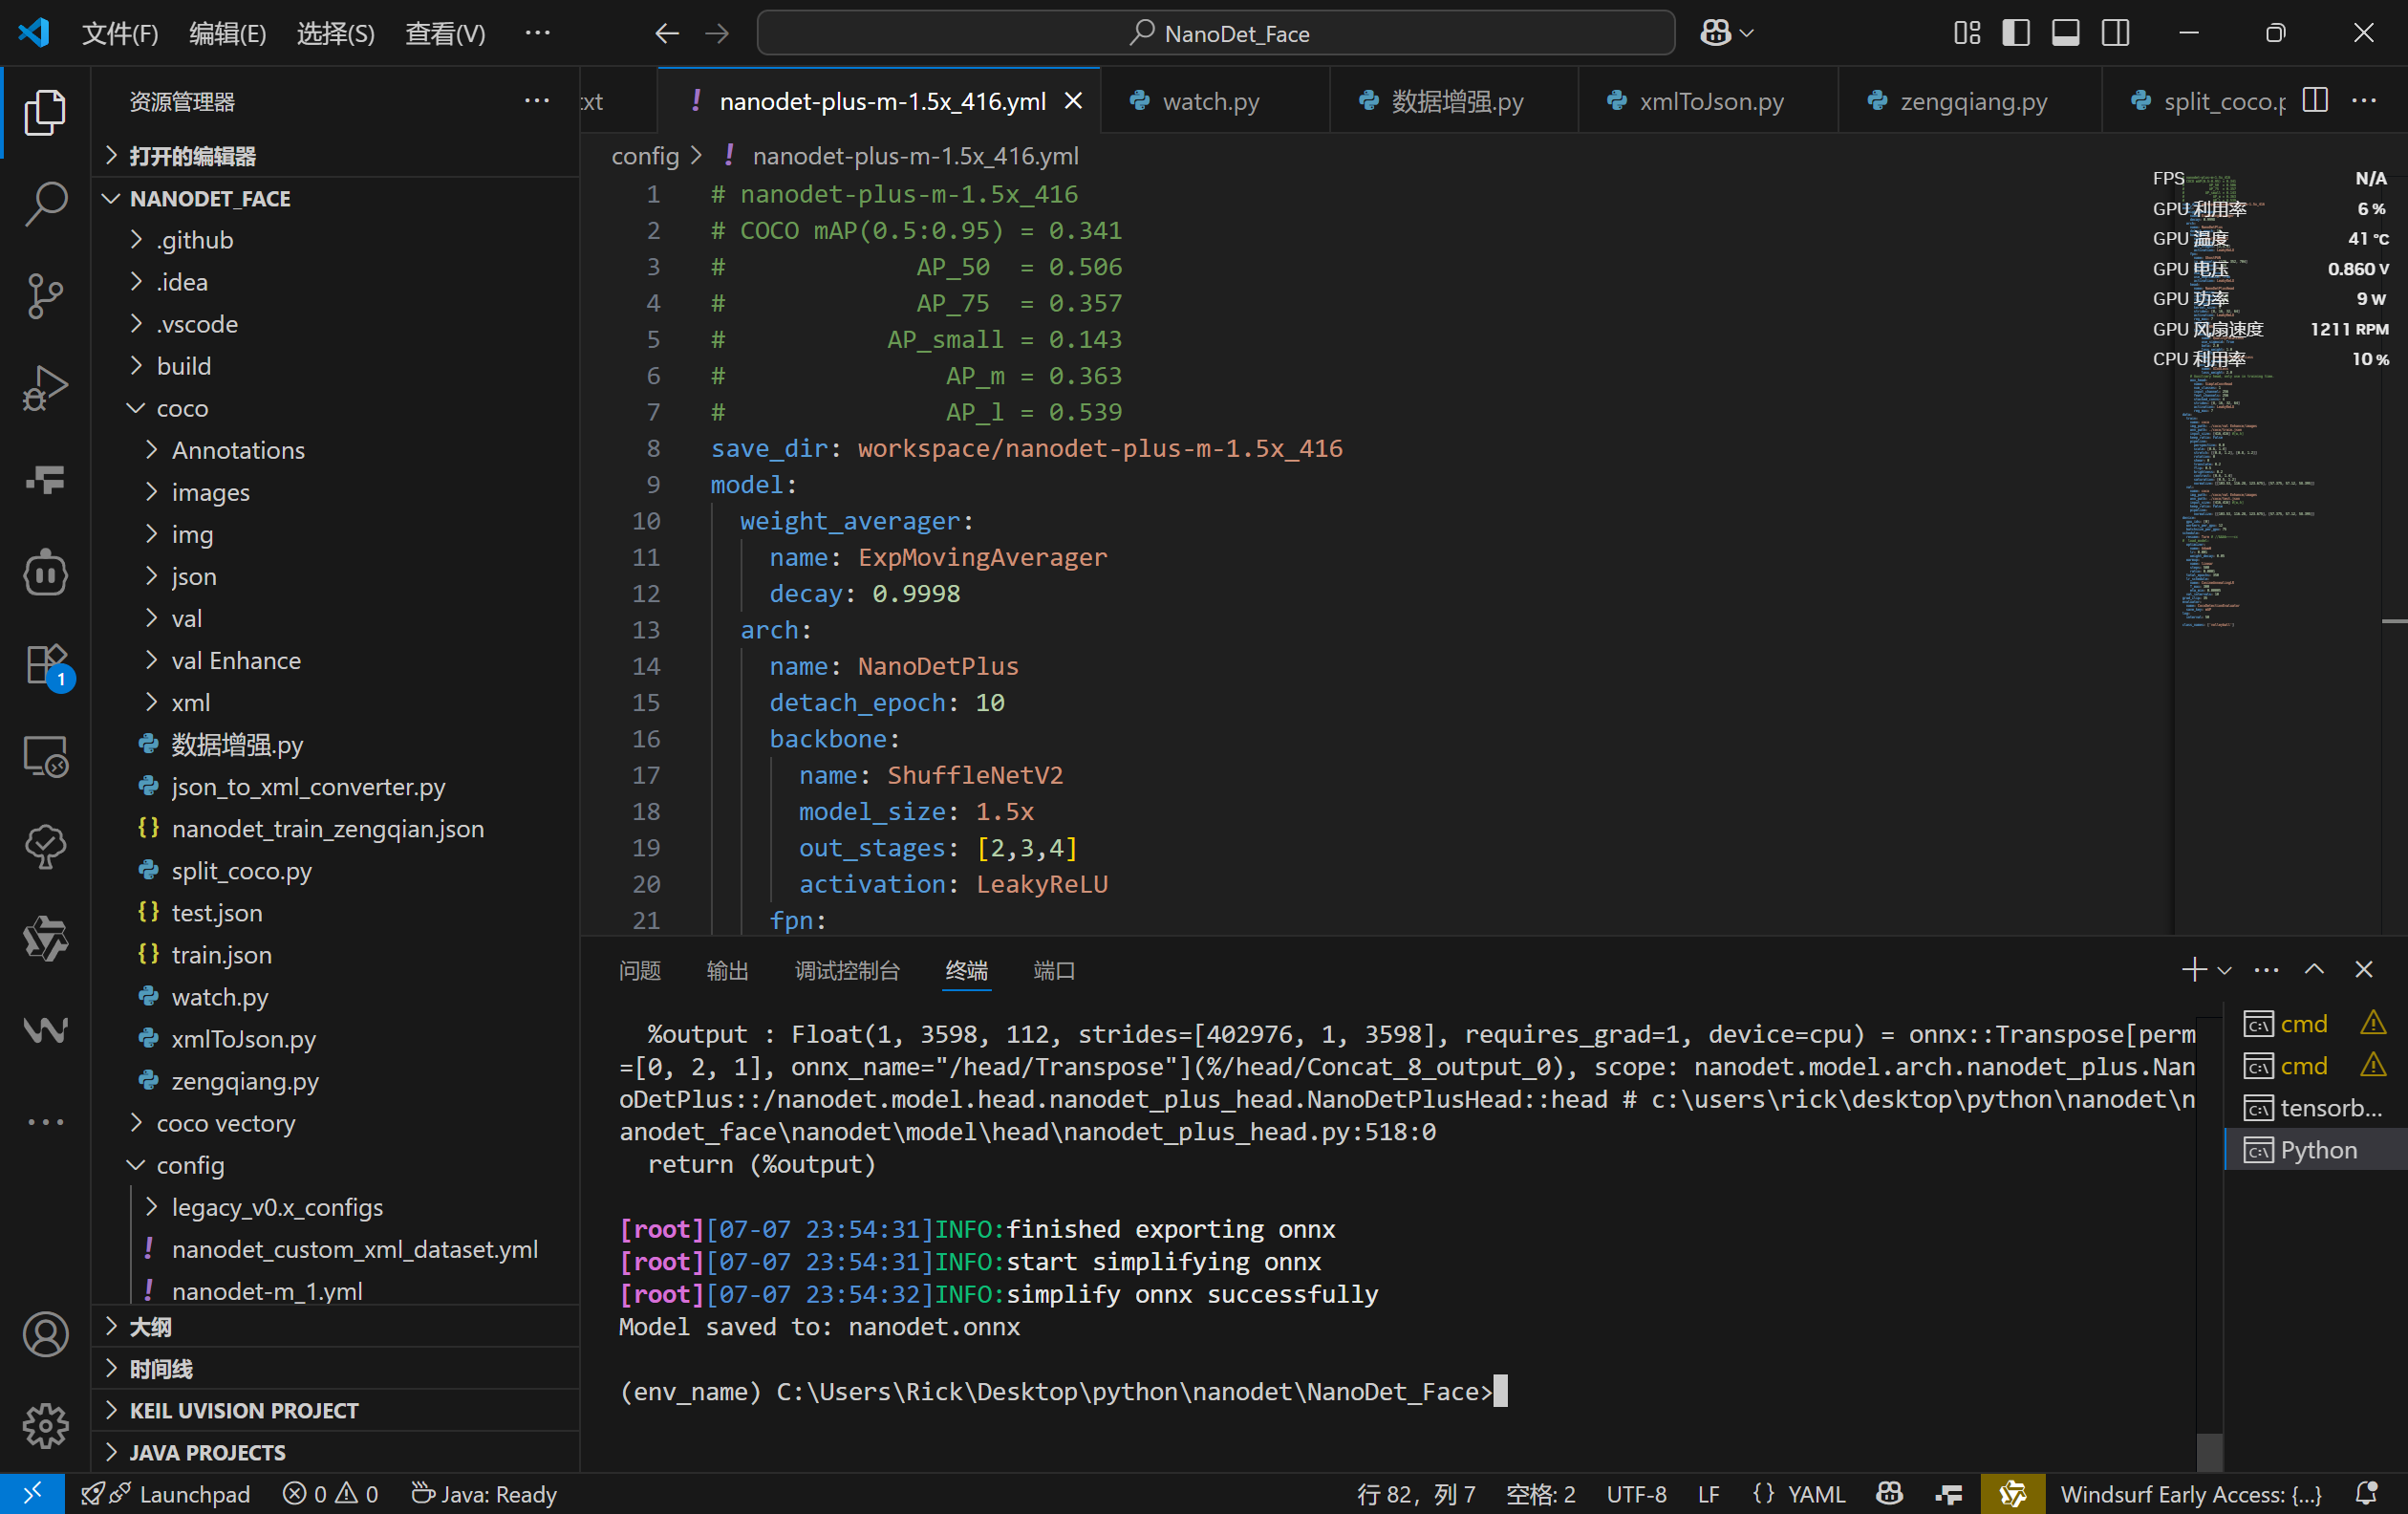
模型导出
pth转onnx
1 python tools/export_onnx.py --cfg_path ./config/nanodet-plus-m-1.5x_416.yml --model_path workspace/nanodet-plus-m-1.5x_416/model_best/nanodet_model_best.pth
onnx转IR
1
2
# 示例:将 ONNX 模型转换为 OpenVINO IR ovc your_model.onnx --output_model openvino_ir
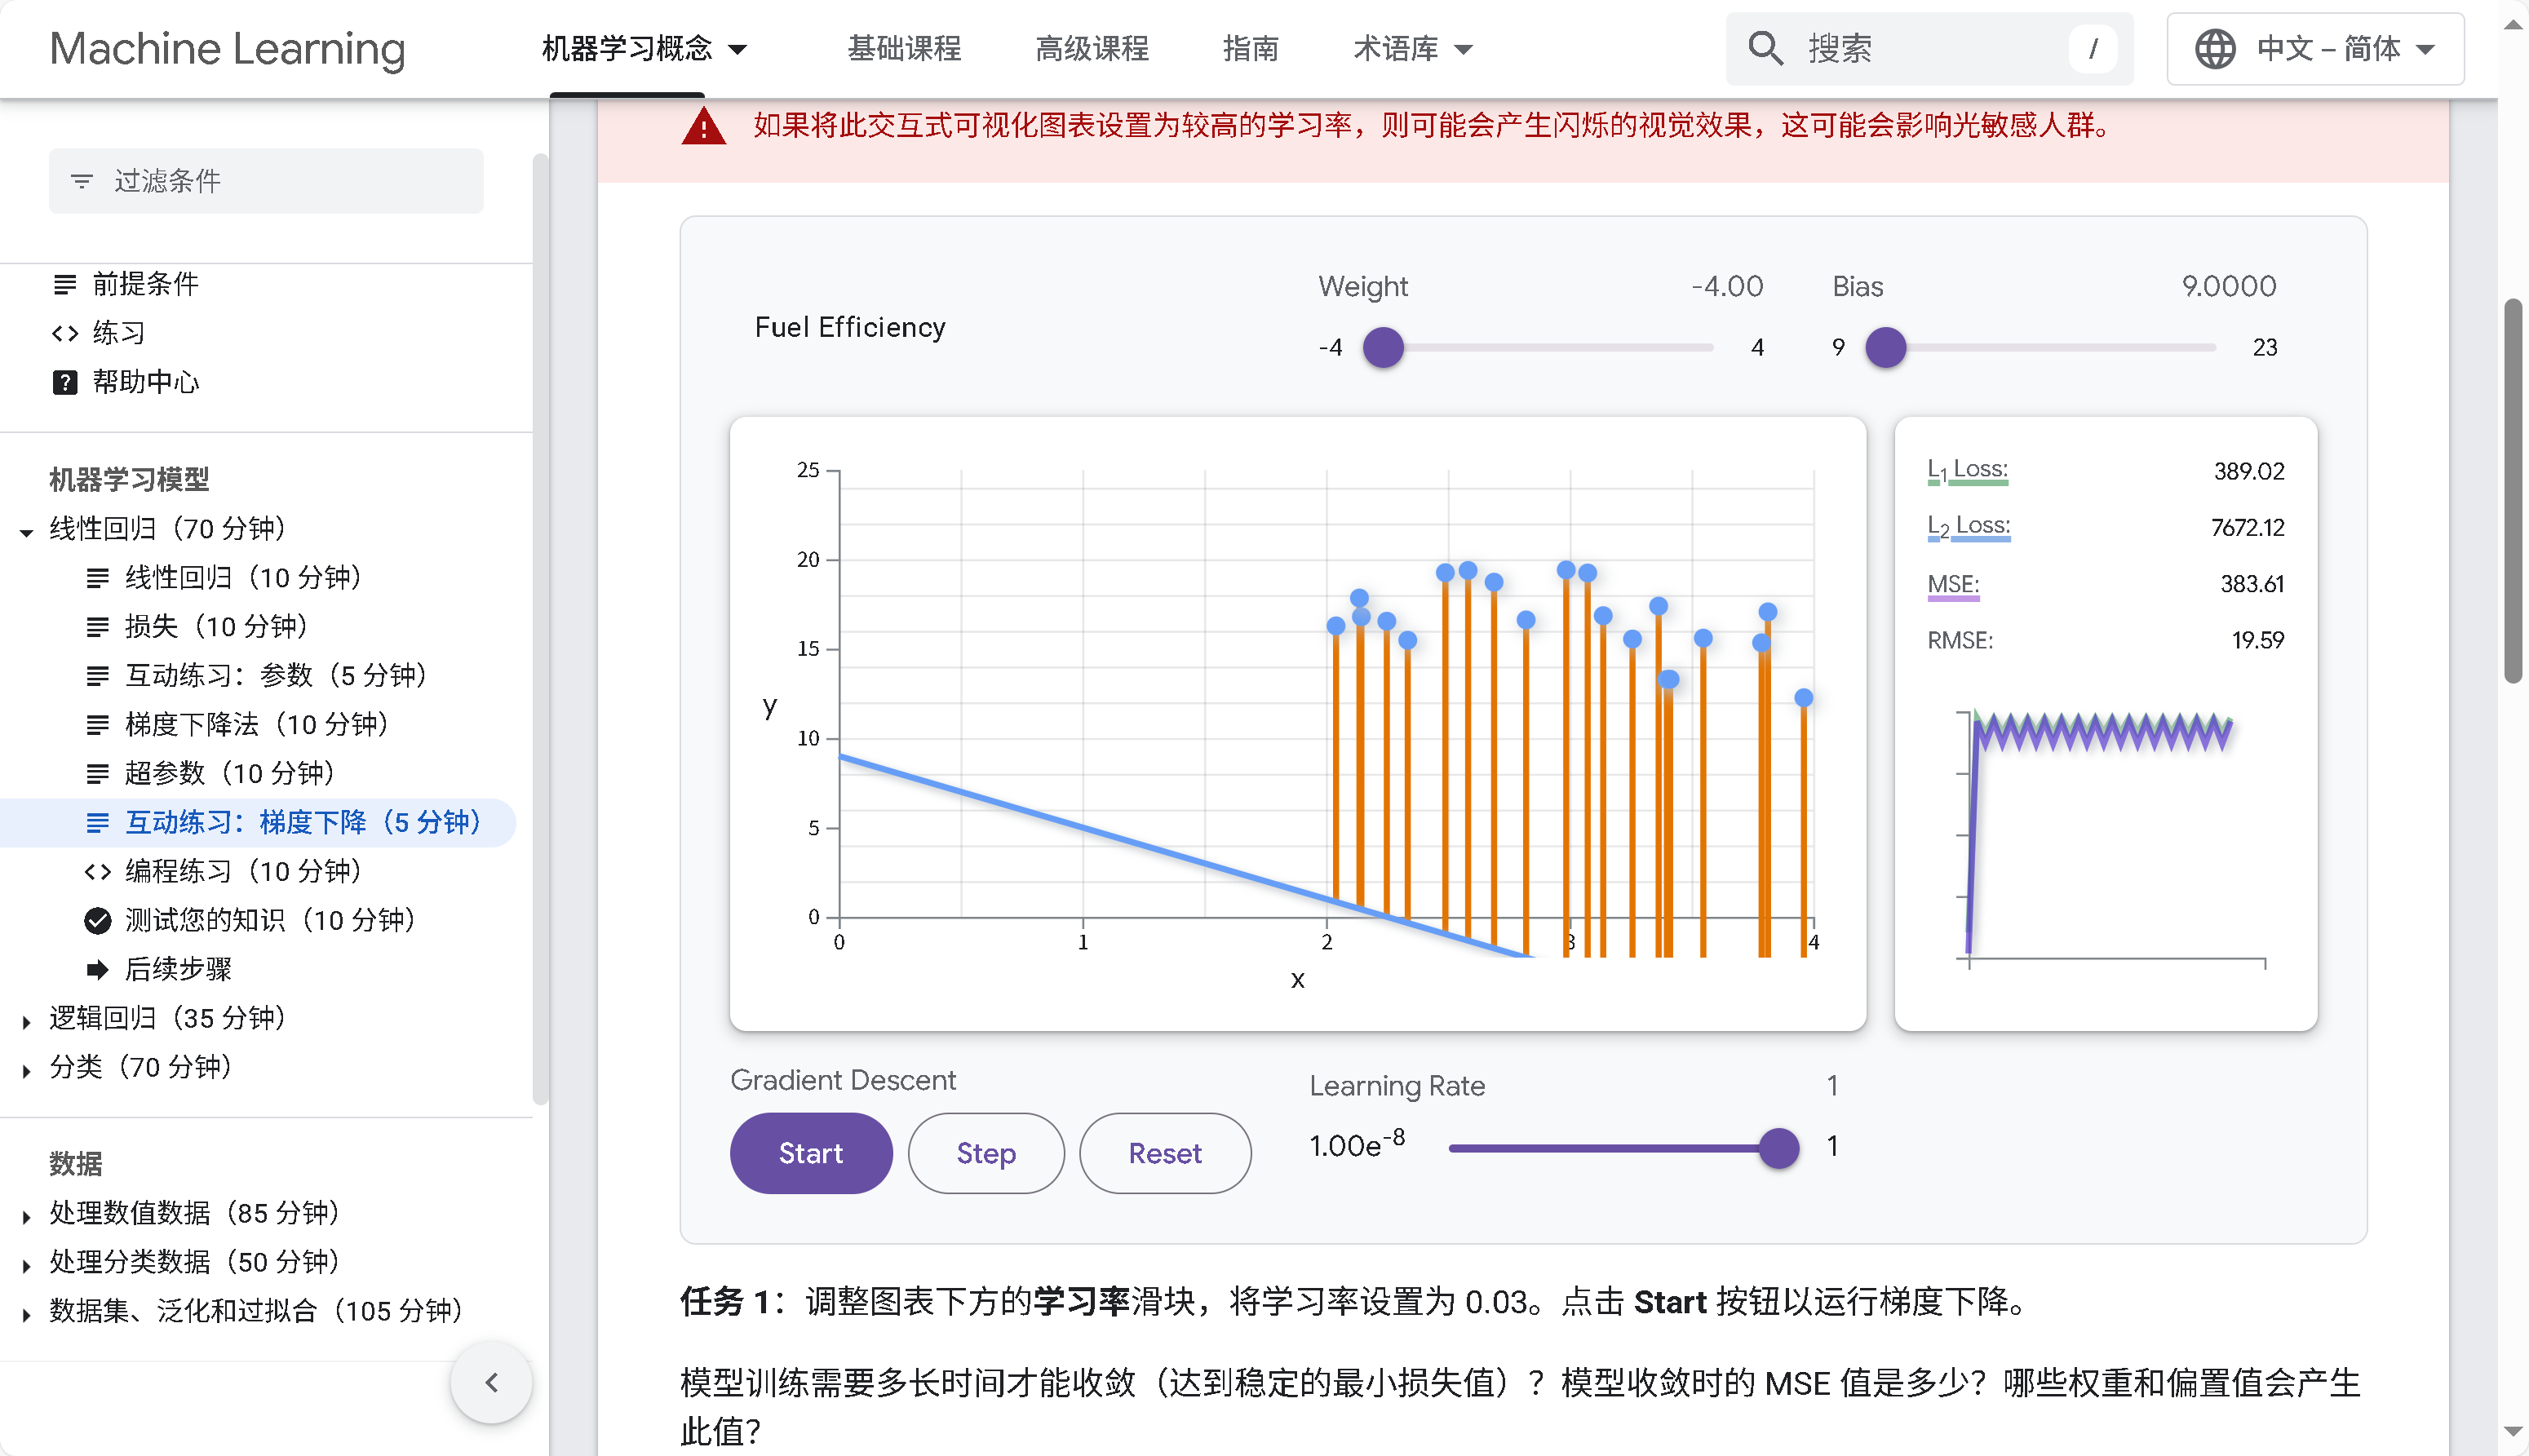
学习率
理论:机器学习——神经网络 | polar-bear~Blog
不同学习率:
过大的学习率 :可能导致模型在最优解附近震荡,或者在极端情况下导致模型发散。过小的学习率 :虽然能够保证模型最终收敛,但是会大大降低模型训练的速度。有时,它甚至可能导致模型陷入局部最优解。
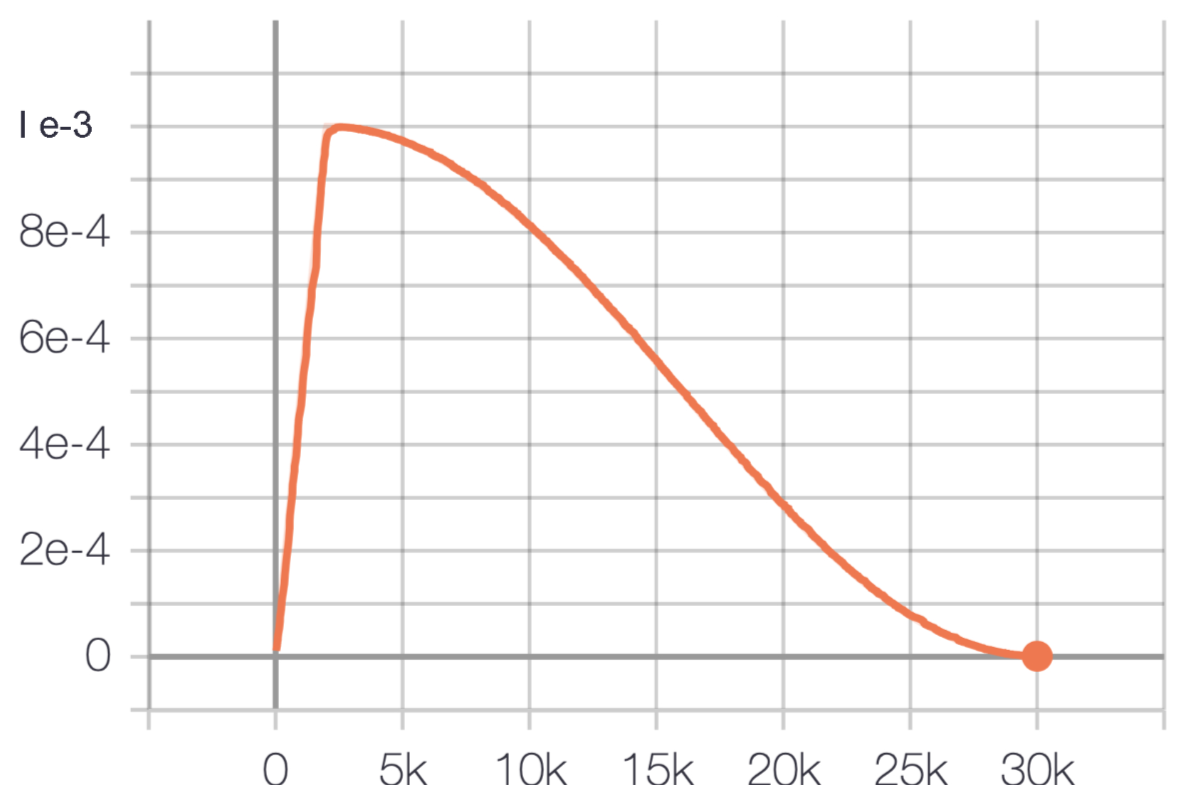
观察学习率曲线,此处使用学习率预热(warmup)和学习率衰减(Learning Rate Decay)
warm-up 是指在训练的初期,逐渐增加学习率的过程,以帮助模型更好地收敛到最优解,逐渐增加学习率,而不是直接使用高学习率再衰减的原因是防止在模型初始时高学习率快速降低损失函数至局部最优导致模型后期学习率衰减无法跳出局部最优寻找全局最优(长难句,个人理解)
ratio: 0.0001 # 预热的起始学习率与 lr 的比率在训练的开始会使用低学习率以实现在训练初期更好地适应数据,提高训练的稳定性和性能。
Learning Rate Decay则使模型在后期精细调节,防止震荡,避免过拟合
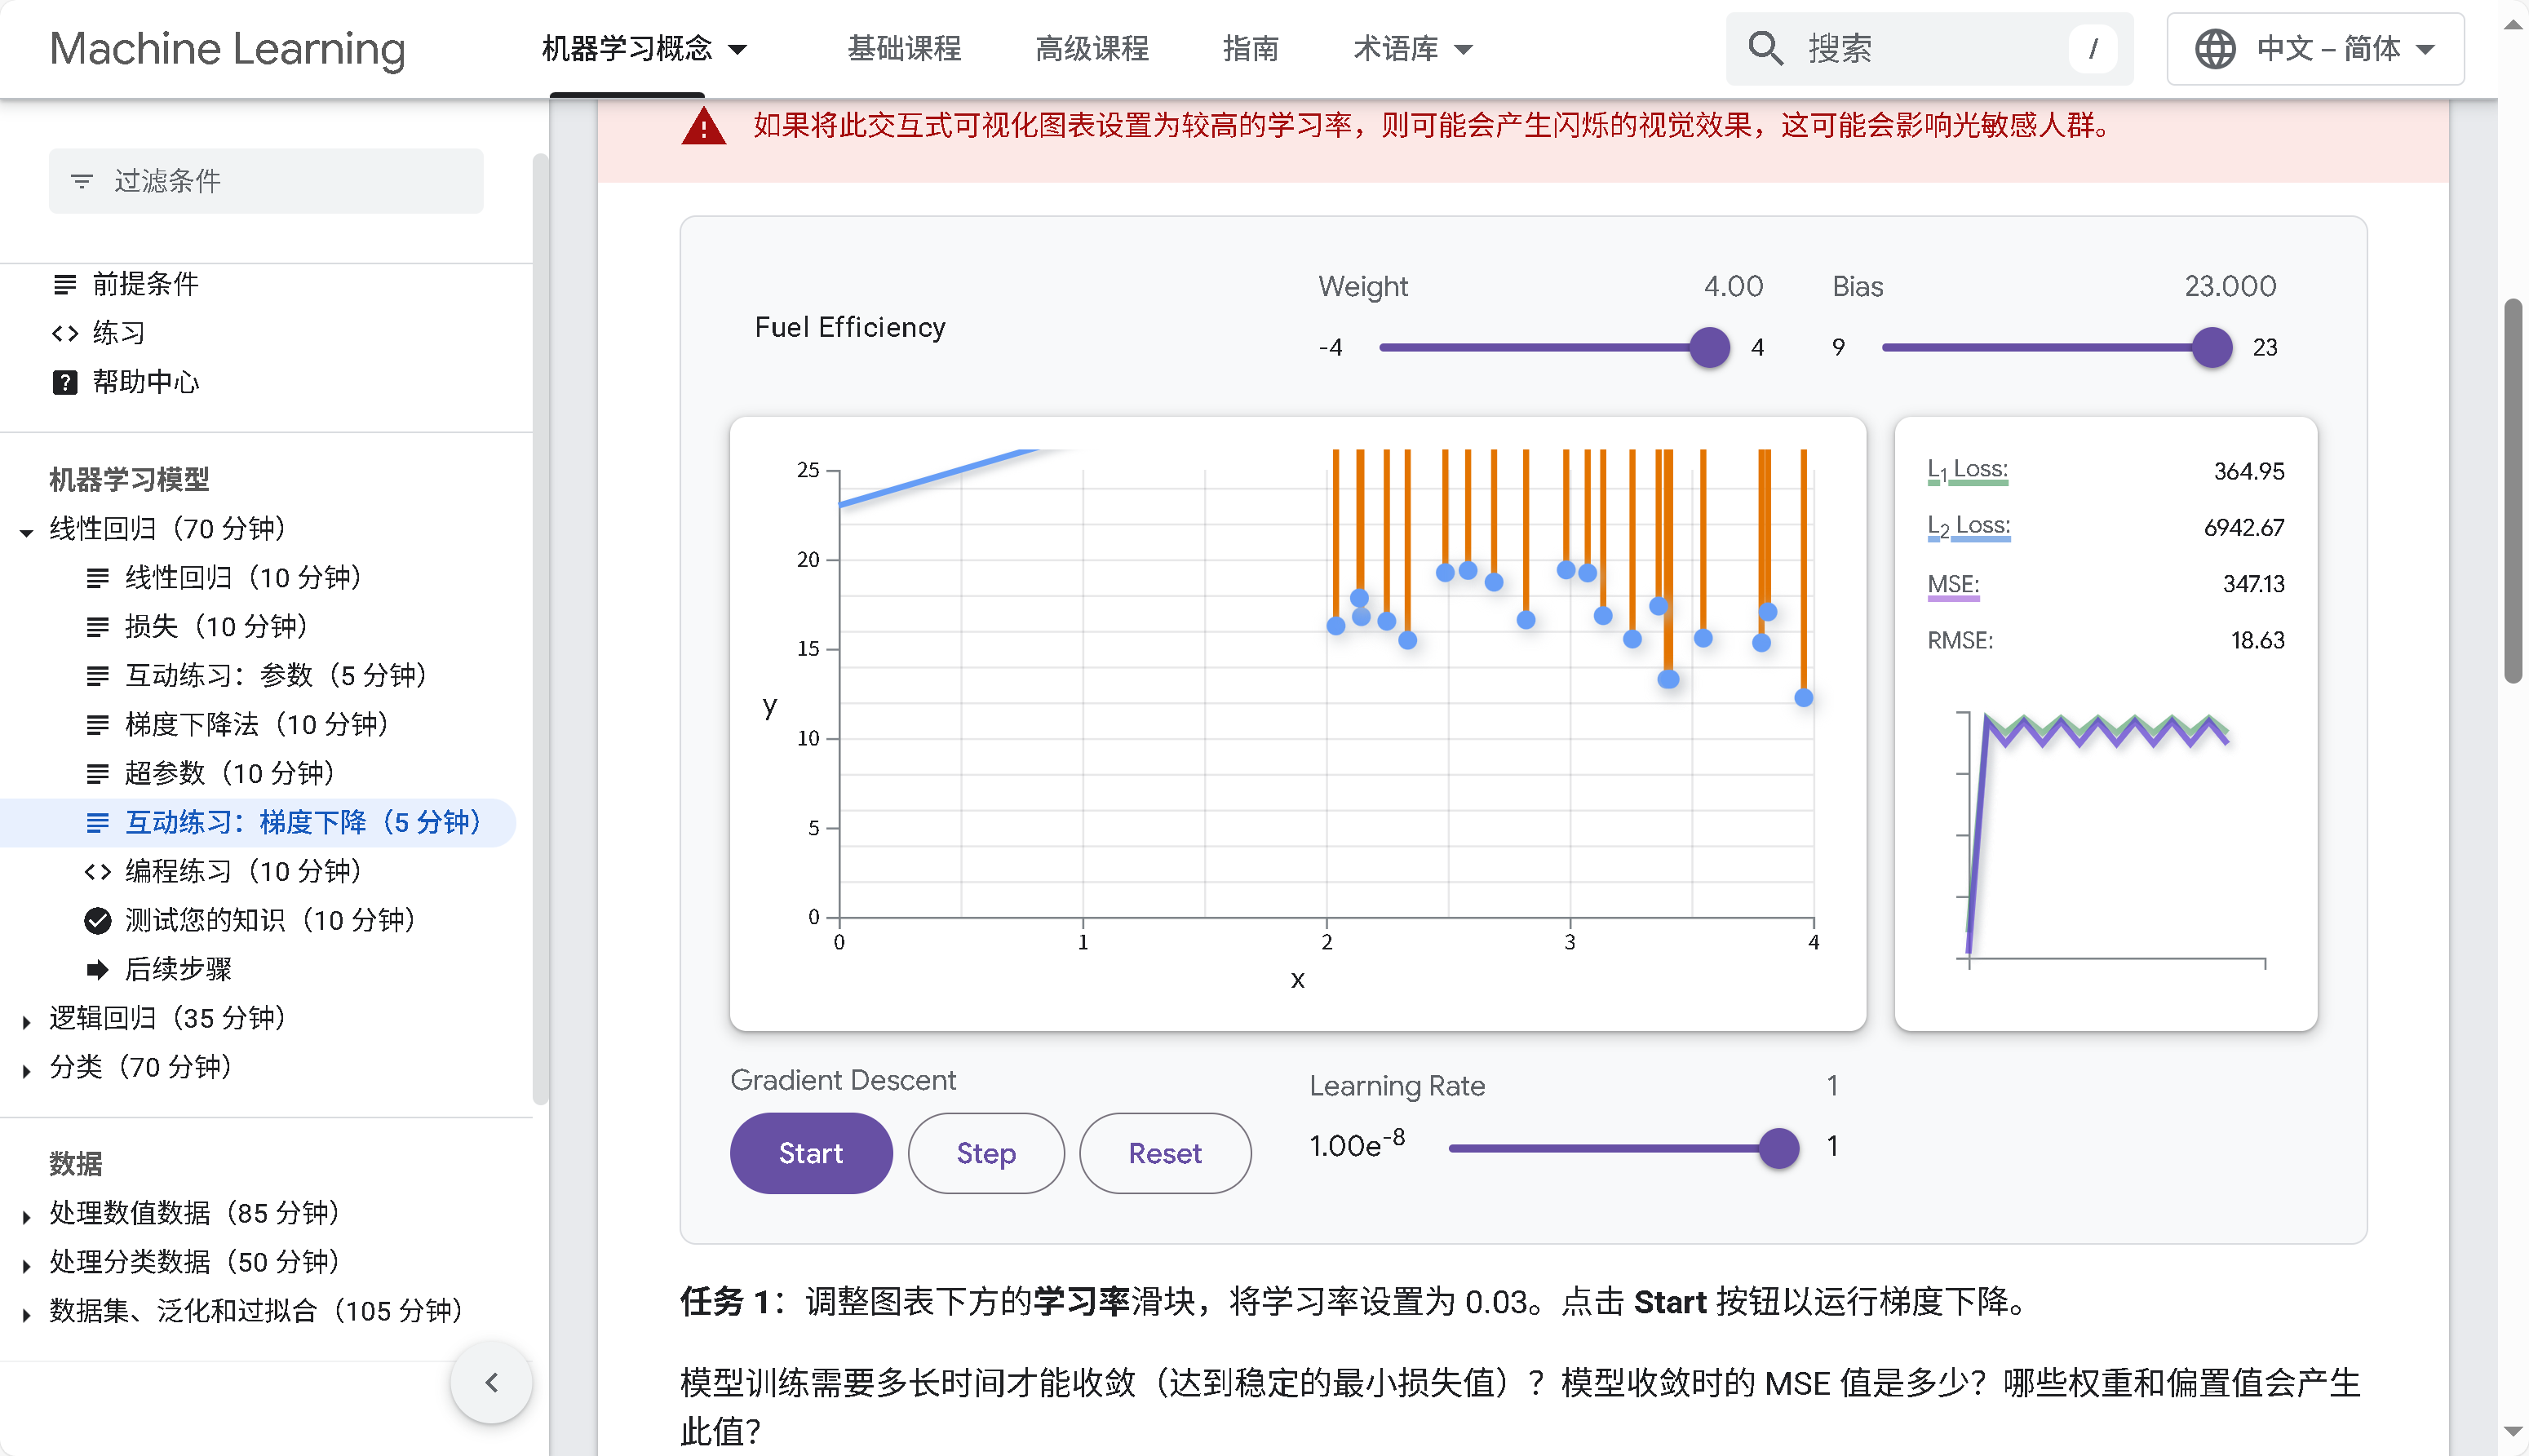
使用一个简单的线性回归案例,持续高学习率确实可以快速收敛,加快模型收敛速度,突破局部最优寻找全局最优,但是到了模型训练后期,应该缓慢降低学习率,否则高学习率会导致模型陷入局部震荡无法正常收敛,如下图。
(在高学习率下线性回归模型损失值会大幅波动。 这表示学习速率过高,模型训练永远不会收敛。)
余弦退火衰减 CosineAnnealingLR:
当越来越接近Loss值的全局最小值时,学习率应该变得更小来使得模型尽可能接近这一点,而余弦退火(Cosine annealing)可以通过余弦函数来降低学习率。余弦函数中随着x的增加余弦值首先缓慢下降,然后加速下降,再次缓慢下降。这种下降模式能和学习率配合,以一种十分有效的计算方式来产生很好的效果。
神经网络在刚开始训练时,并非如同理想的情况一样,只需要确定一个方向即可。模型参数在初始化时,是非常不稳定的,因此在刚开始时需要选用小的学习率。
(图片来自文2)
学习率衰减之余弦退火(CosineAnnealing)-CSDN博客
狗都会用的余弦退火(CosineAnnealingLR)学习率调节算法讲解-CSDN博客
pytorch的余弦退火学习率 - 知乎
Openvino部署
Openvino安装
OpenVINOTM安装分为完整版安装与不完整版(Runtime)安装。
完整版安装会安装所有部件,包括模型优化器和推理部署套件运行工具(Runtime),目前该方式支持PIP安装方式,因此建议采用PIP安装在虚拟环境中,防止安装出错照成电脑环境出现问题。该安装方式至此Python、C++同时使用,由于安装路径较长,对C++使用不太方便,因此该安装方式最好使用Python编程。
非完整版安装主要安装编译环境(Runtime),安装比较简单,且一般会安装到根目录下,方便使用,因此如果不使用模型优化且情况下,或者使用C++编译环境的话,建议选用此方式。
openvino推荐使用存档直接安装或者conda安装
ubuntu:Ubuntu 24.04.2 LTS
openvino:2025.1
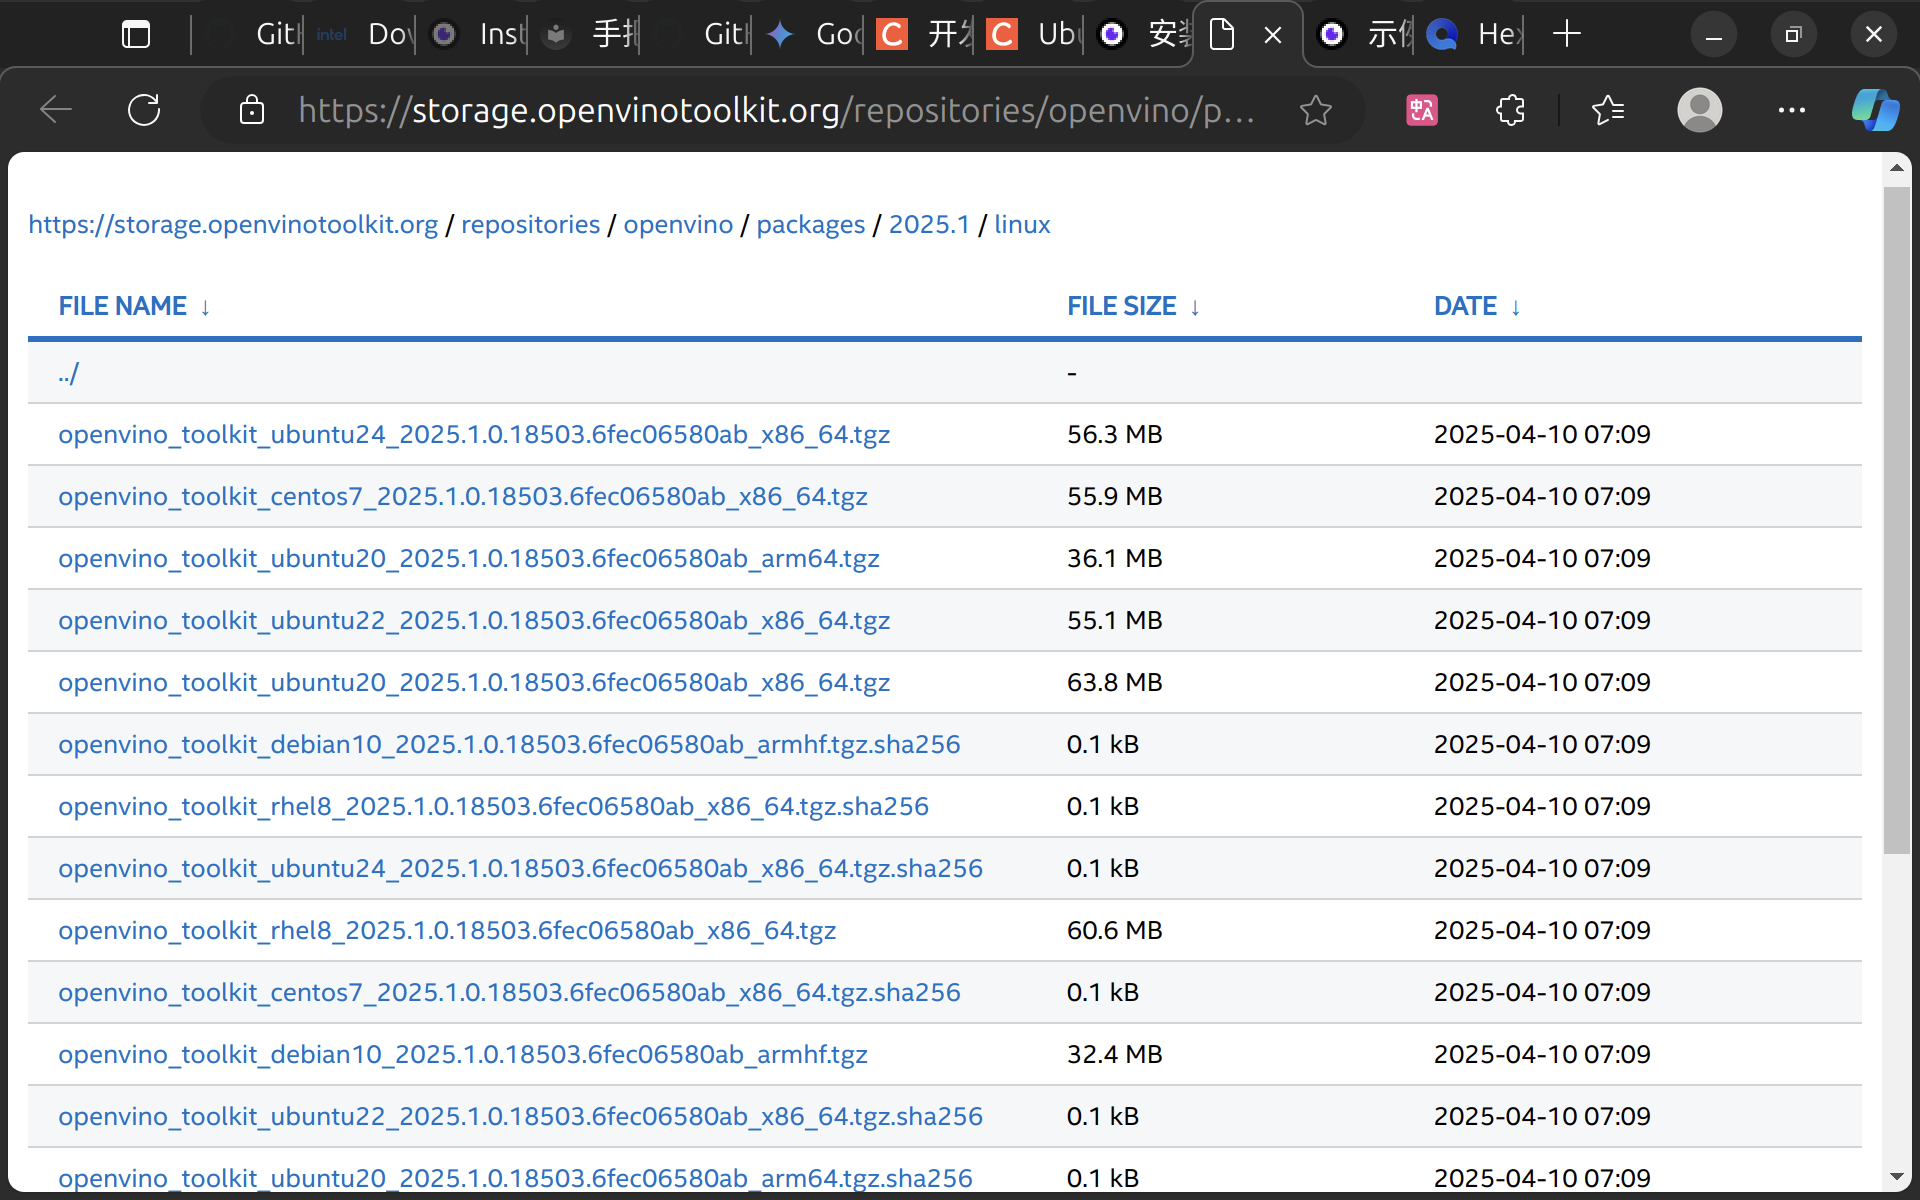
直接安装
https://docs.openvino.ai/2025/get-started/install-openvino.html?PACKAGE=OPENVINO_BASE&VERSION=v_2025_1_0&OP_SYSTEM=LINUX&DISTRIBUTION=ARCHIVE
前往官网下载对应版本
在/opt下创建文件夹
解压后移动到/opt/intel
1
2
tar -xf openvino_2025.0.0.tgz sudo mv openvino_toolkit_ubuntu22_2025 /opt/intel/openvino_2025.0.0
可以创建软链接,方便路径。
1
2
cd /opt/intel sudo ln -s openvino_2025.1.0 openvino_2025
安装openvino环境依赖
1
2
cd /opt/intel/openvino_2025.1.0 sudo -E ./install_dependencies/install_openvino_dependencies.sh
配置环境变量
将脚本路径添加进去,这样每次启动终端都会加载openvino
1
2
source /opt/intel/openvino_2025/setupvars.sh
conda
https://www.anaconda.com/download/success
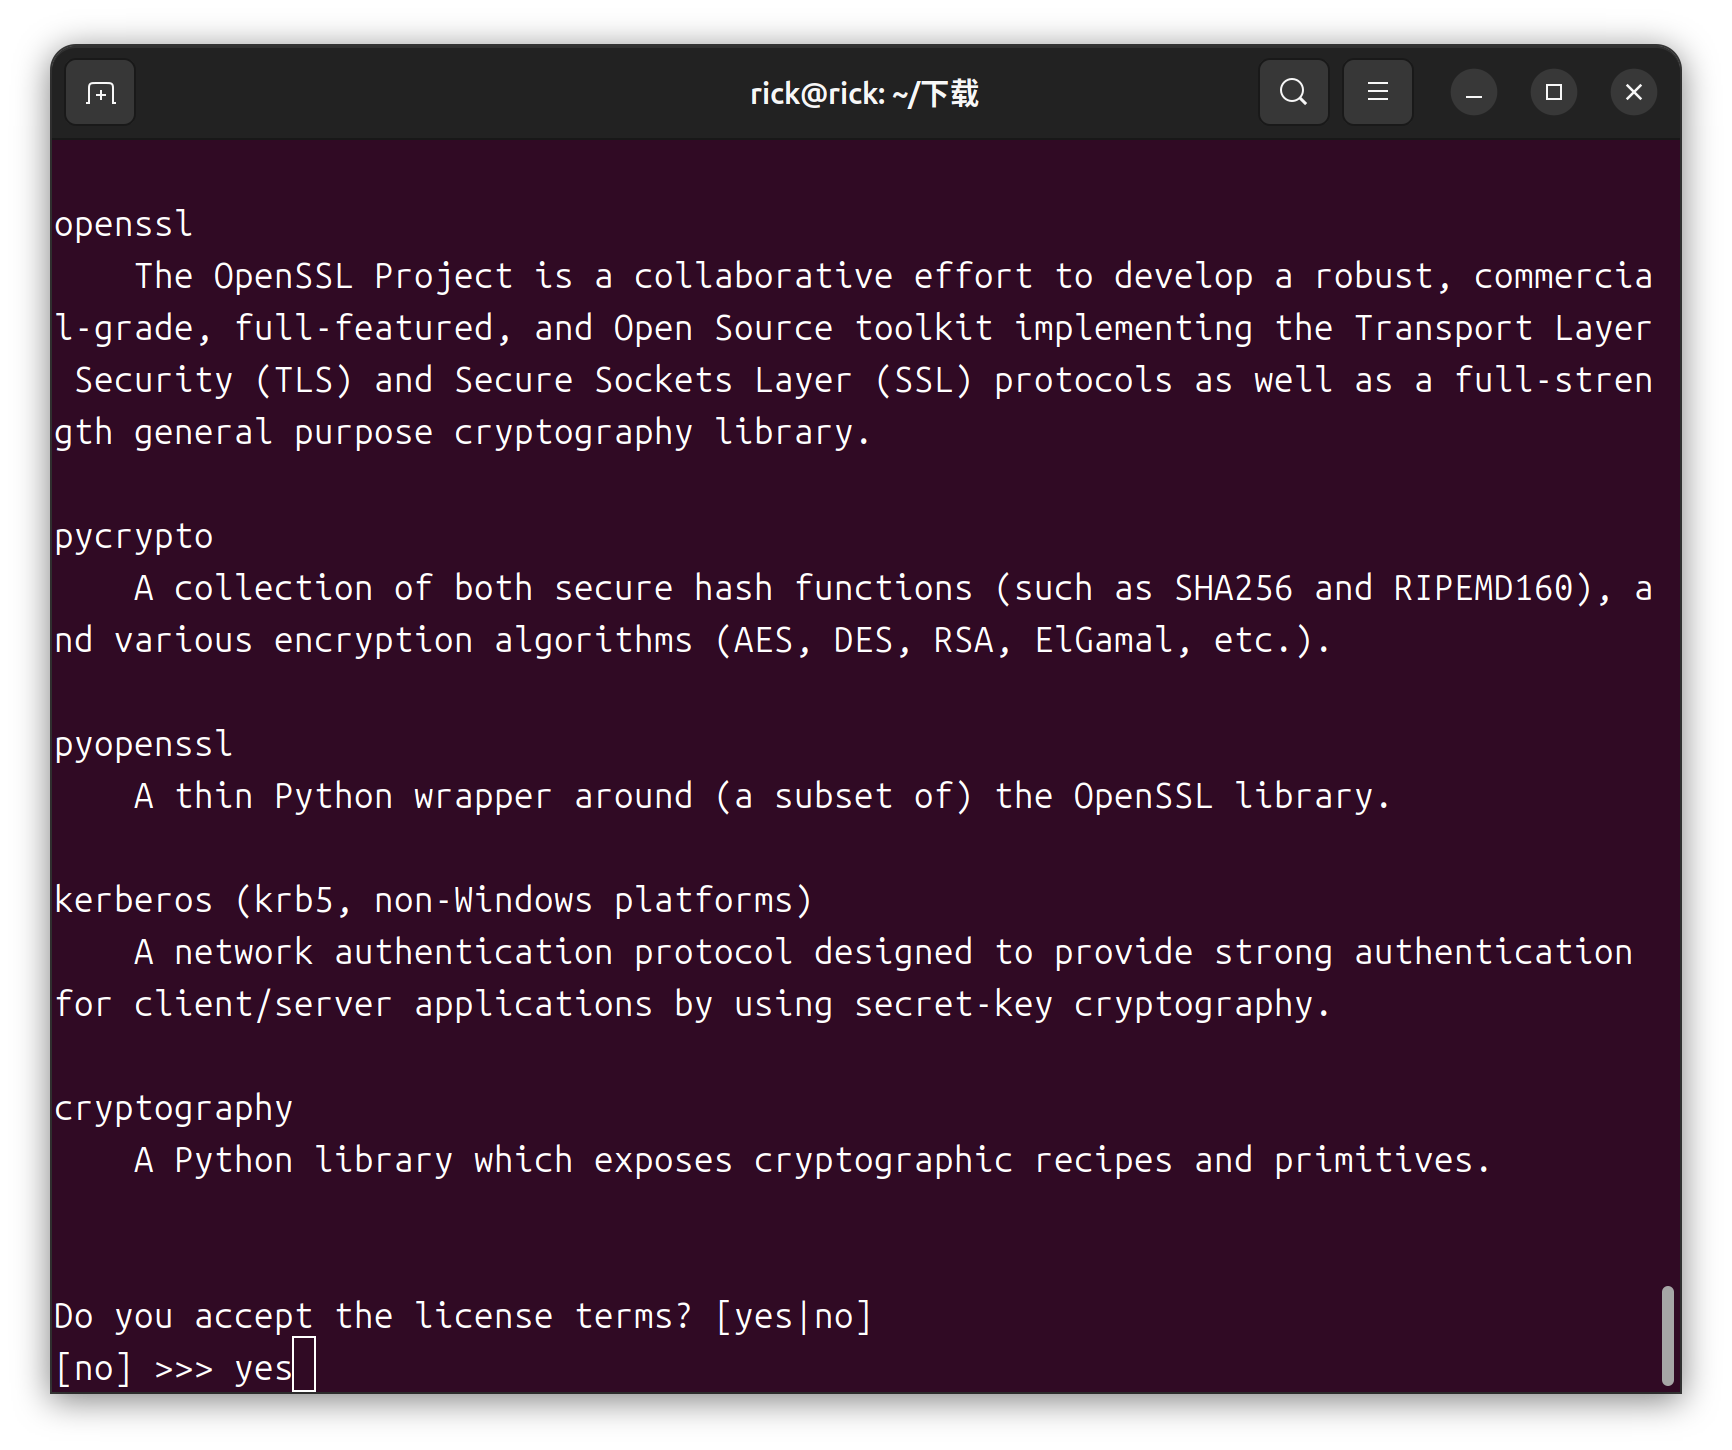
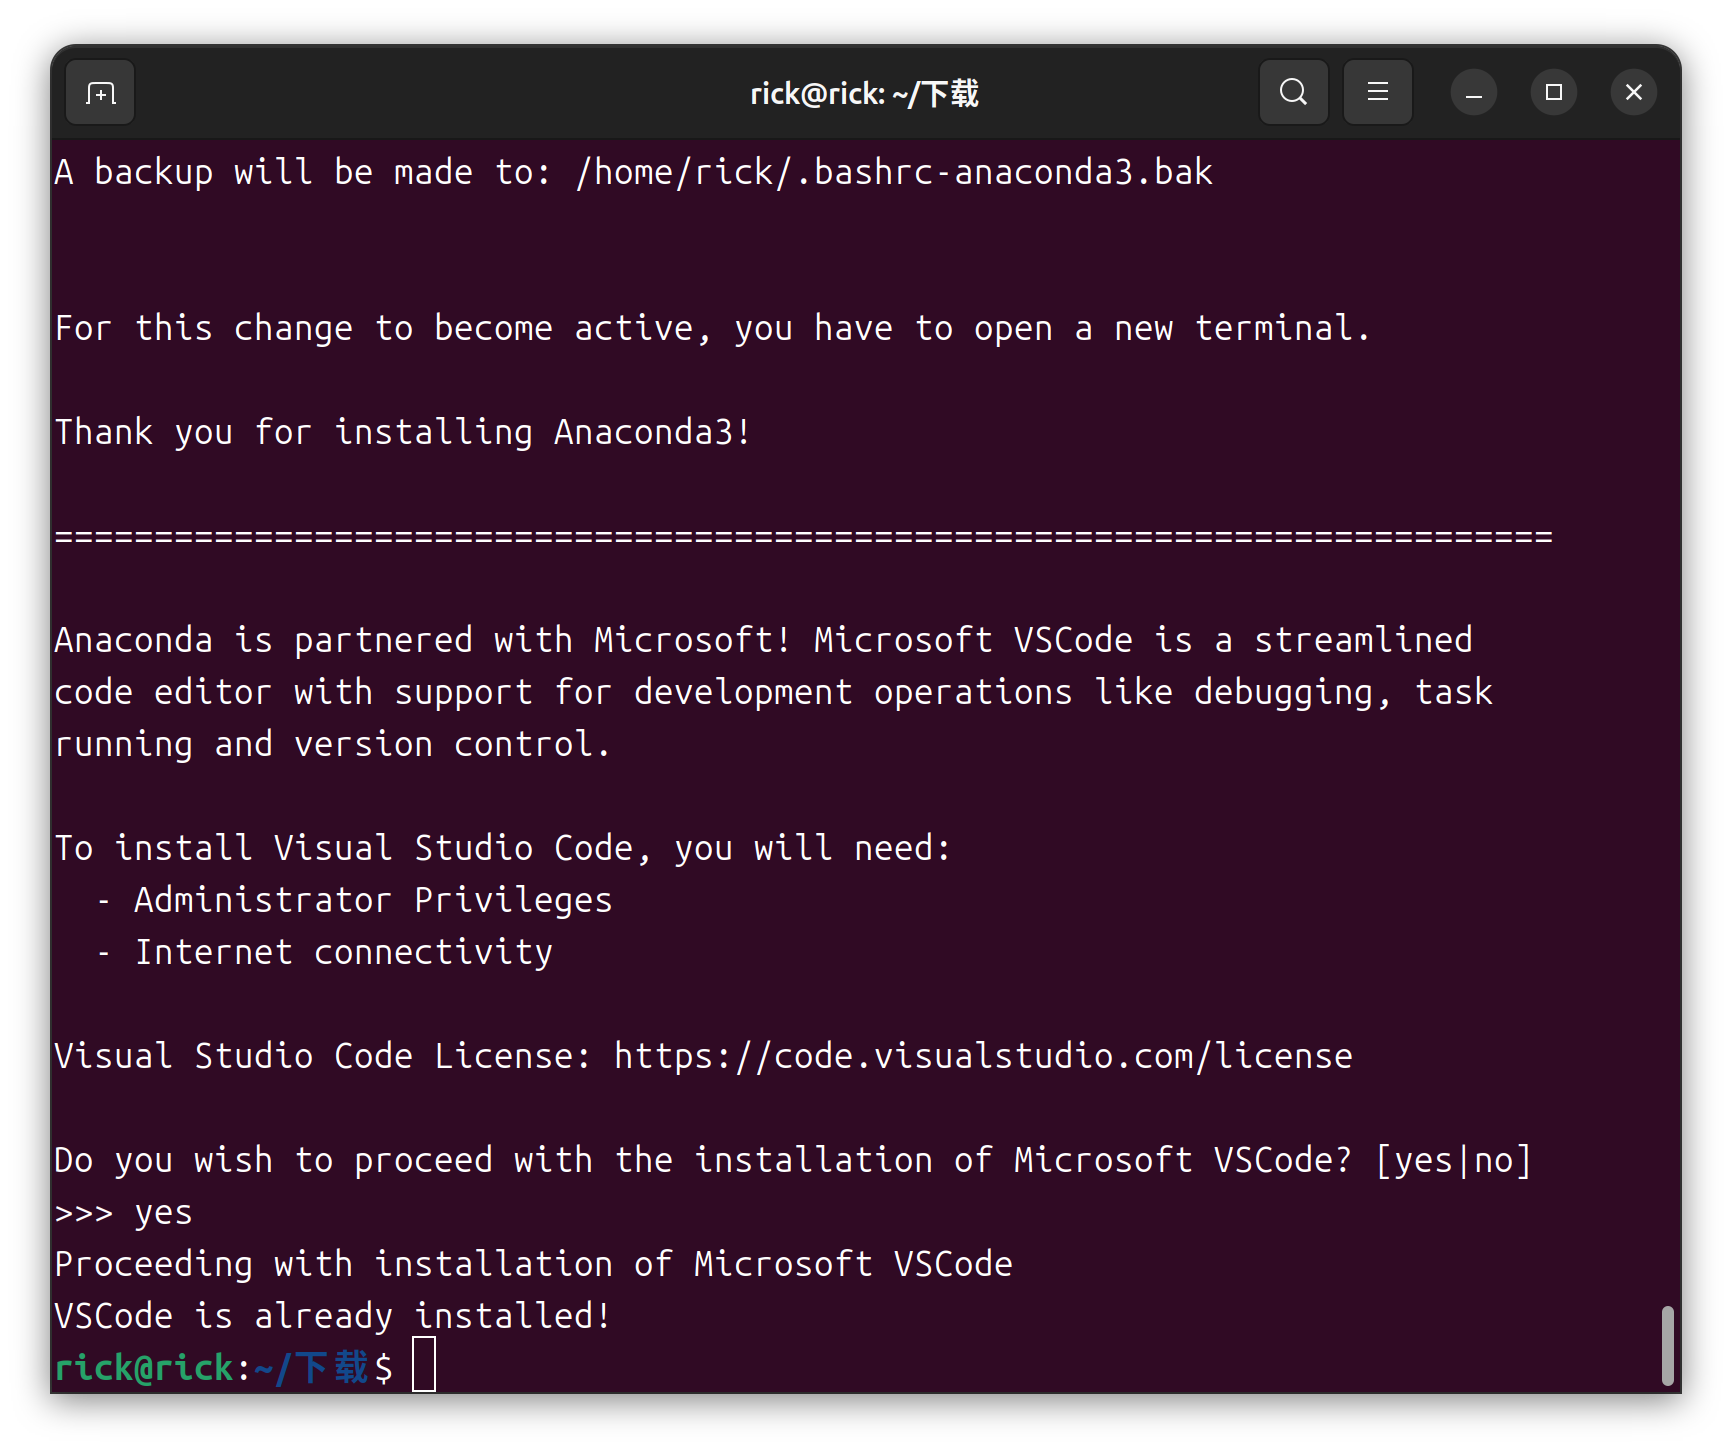
下载conda安装脚本
一路yes即可
完成安装,刷新一下终端
输入
conda
安装完成后最好升级一下conda
1 conda update -n base -c defaults conda
创建虚拟环境
1 conda create --name py310 python=3.10
进入虚拟环境
将以下命令行添加到 ~/.bashrc ,只需要在终端输入 py310 就直接进入了
1 alias py310='source activate py310'
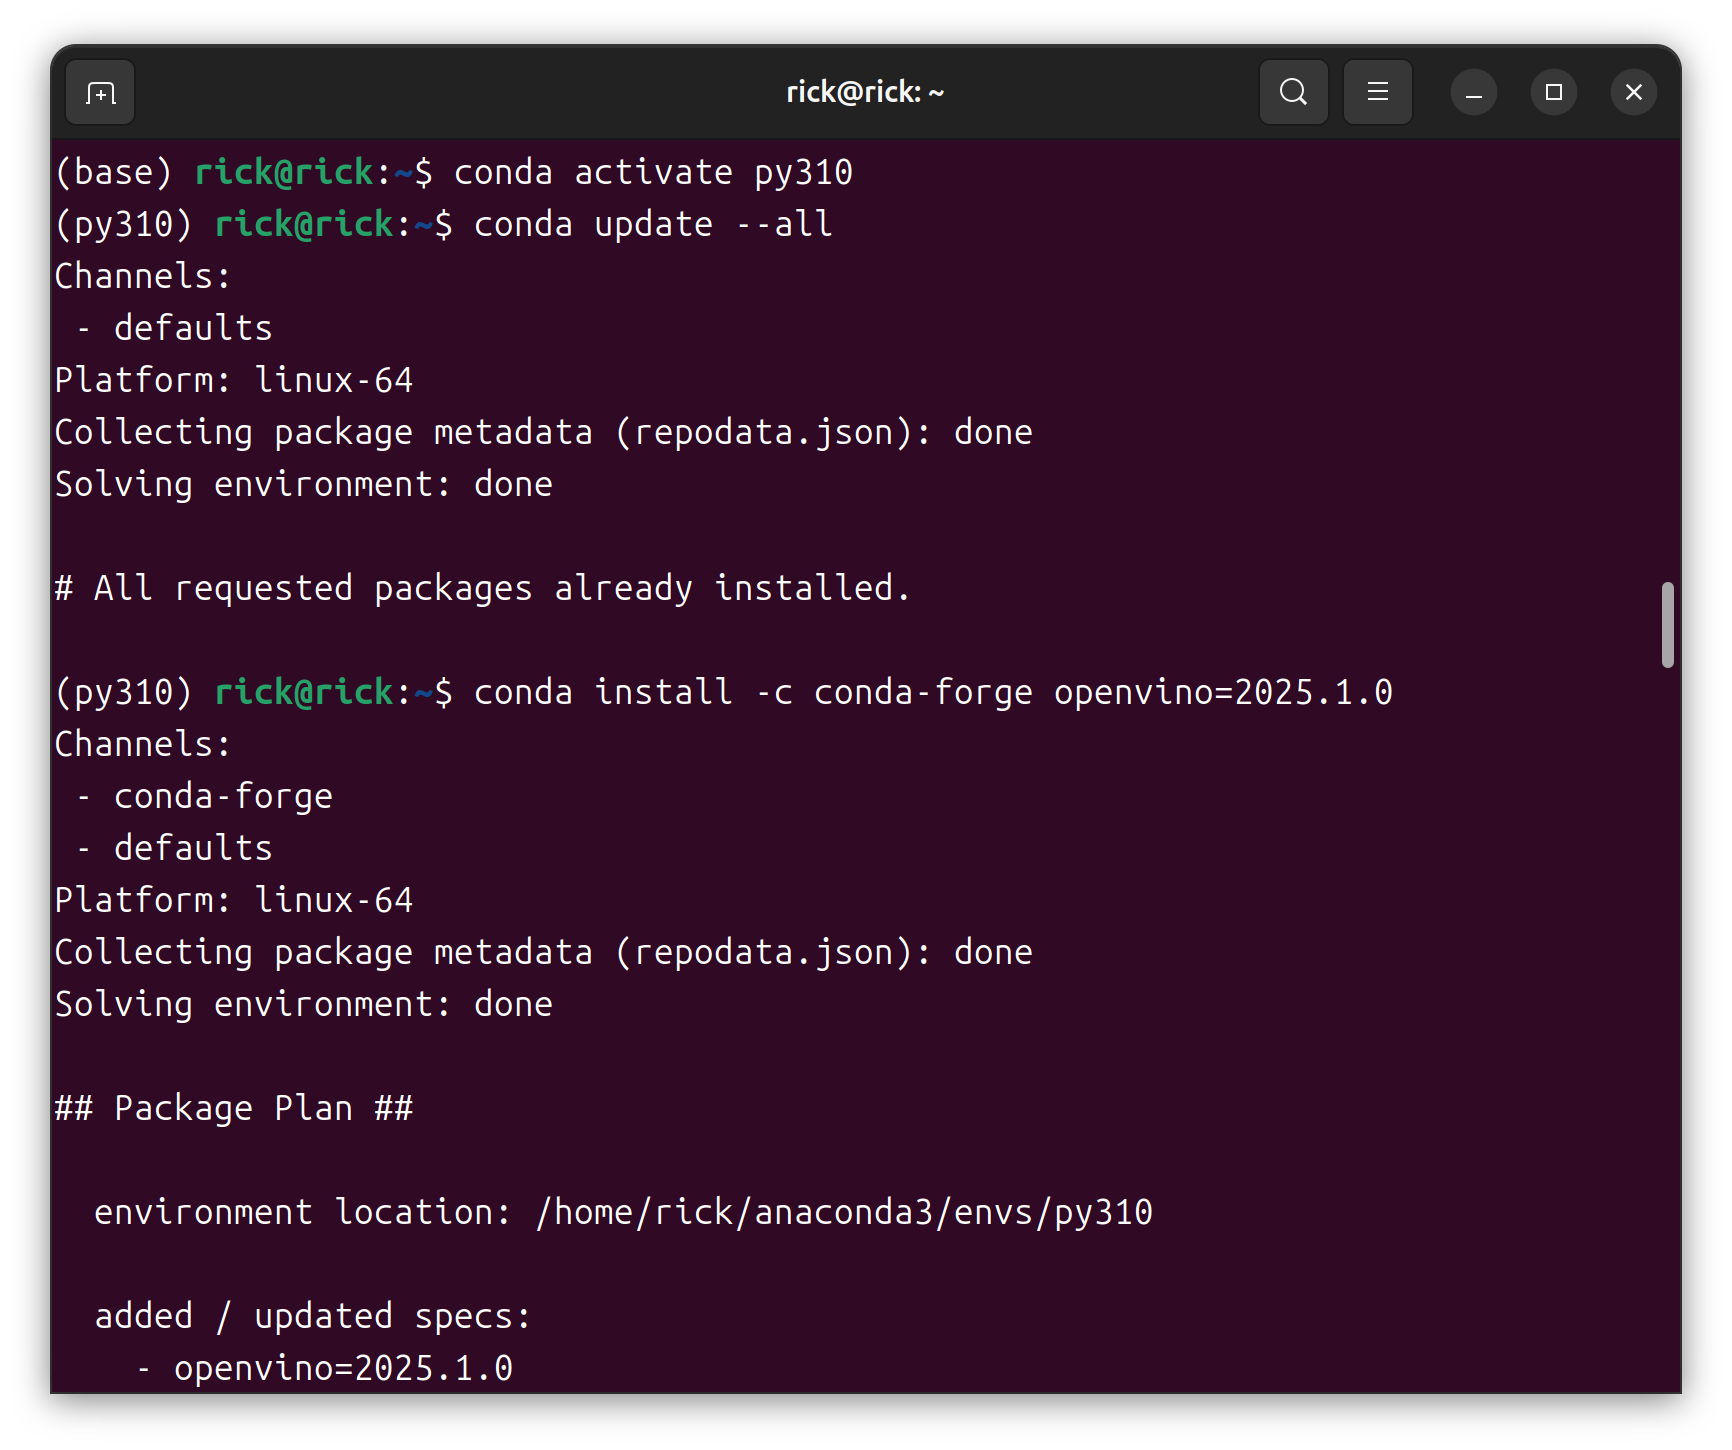
使用conda安装openvino
1
2
conda update --all conda install -c conda-forge openvino=2025.1.0
openvino安装位置位于
/home/rick/anaconda3/envs/py310/include
/home/rick/anaconda3/envs/py310/lib
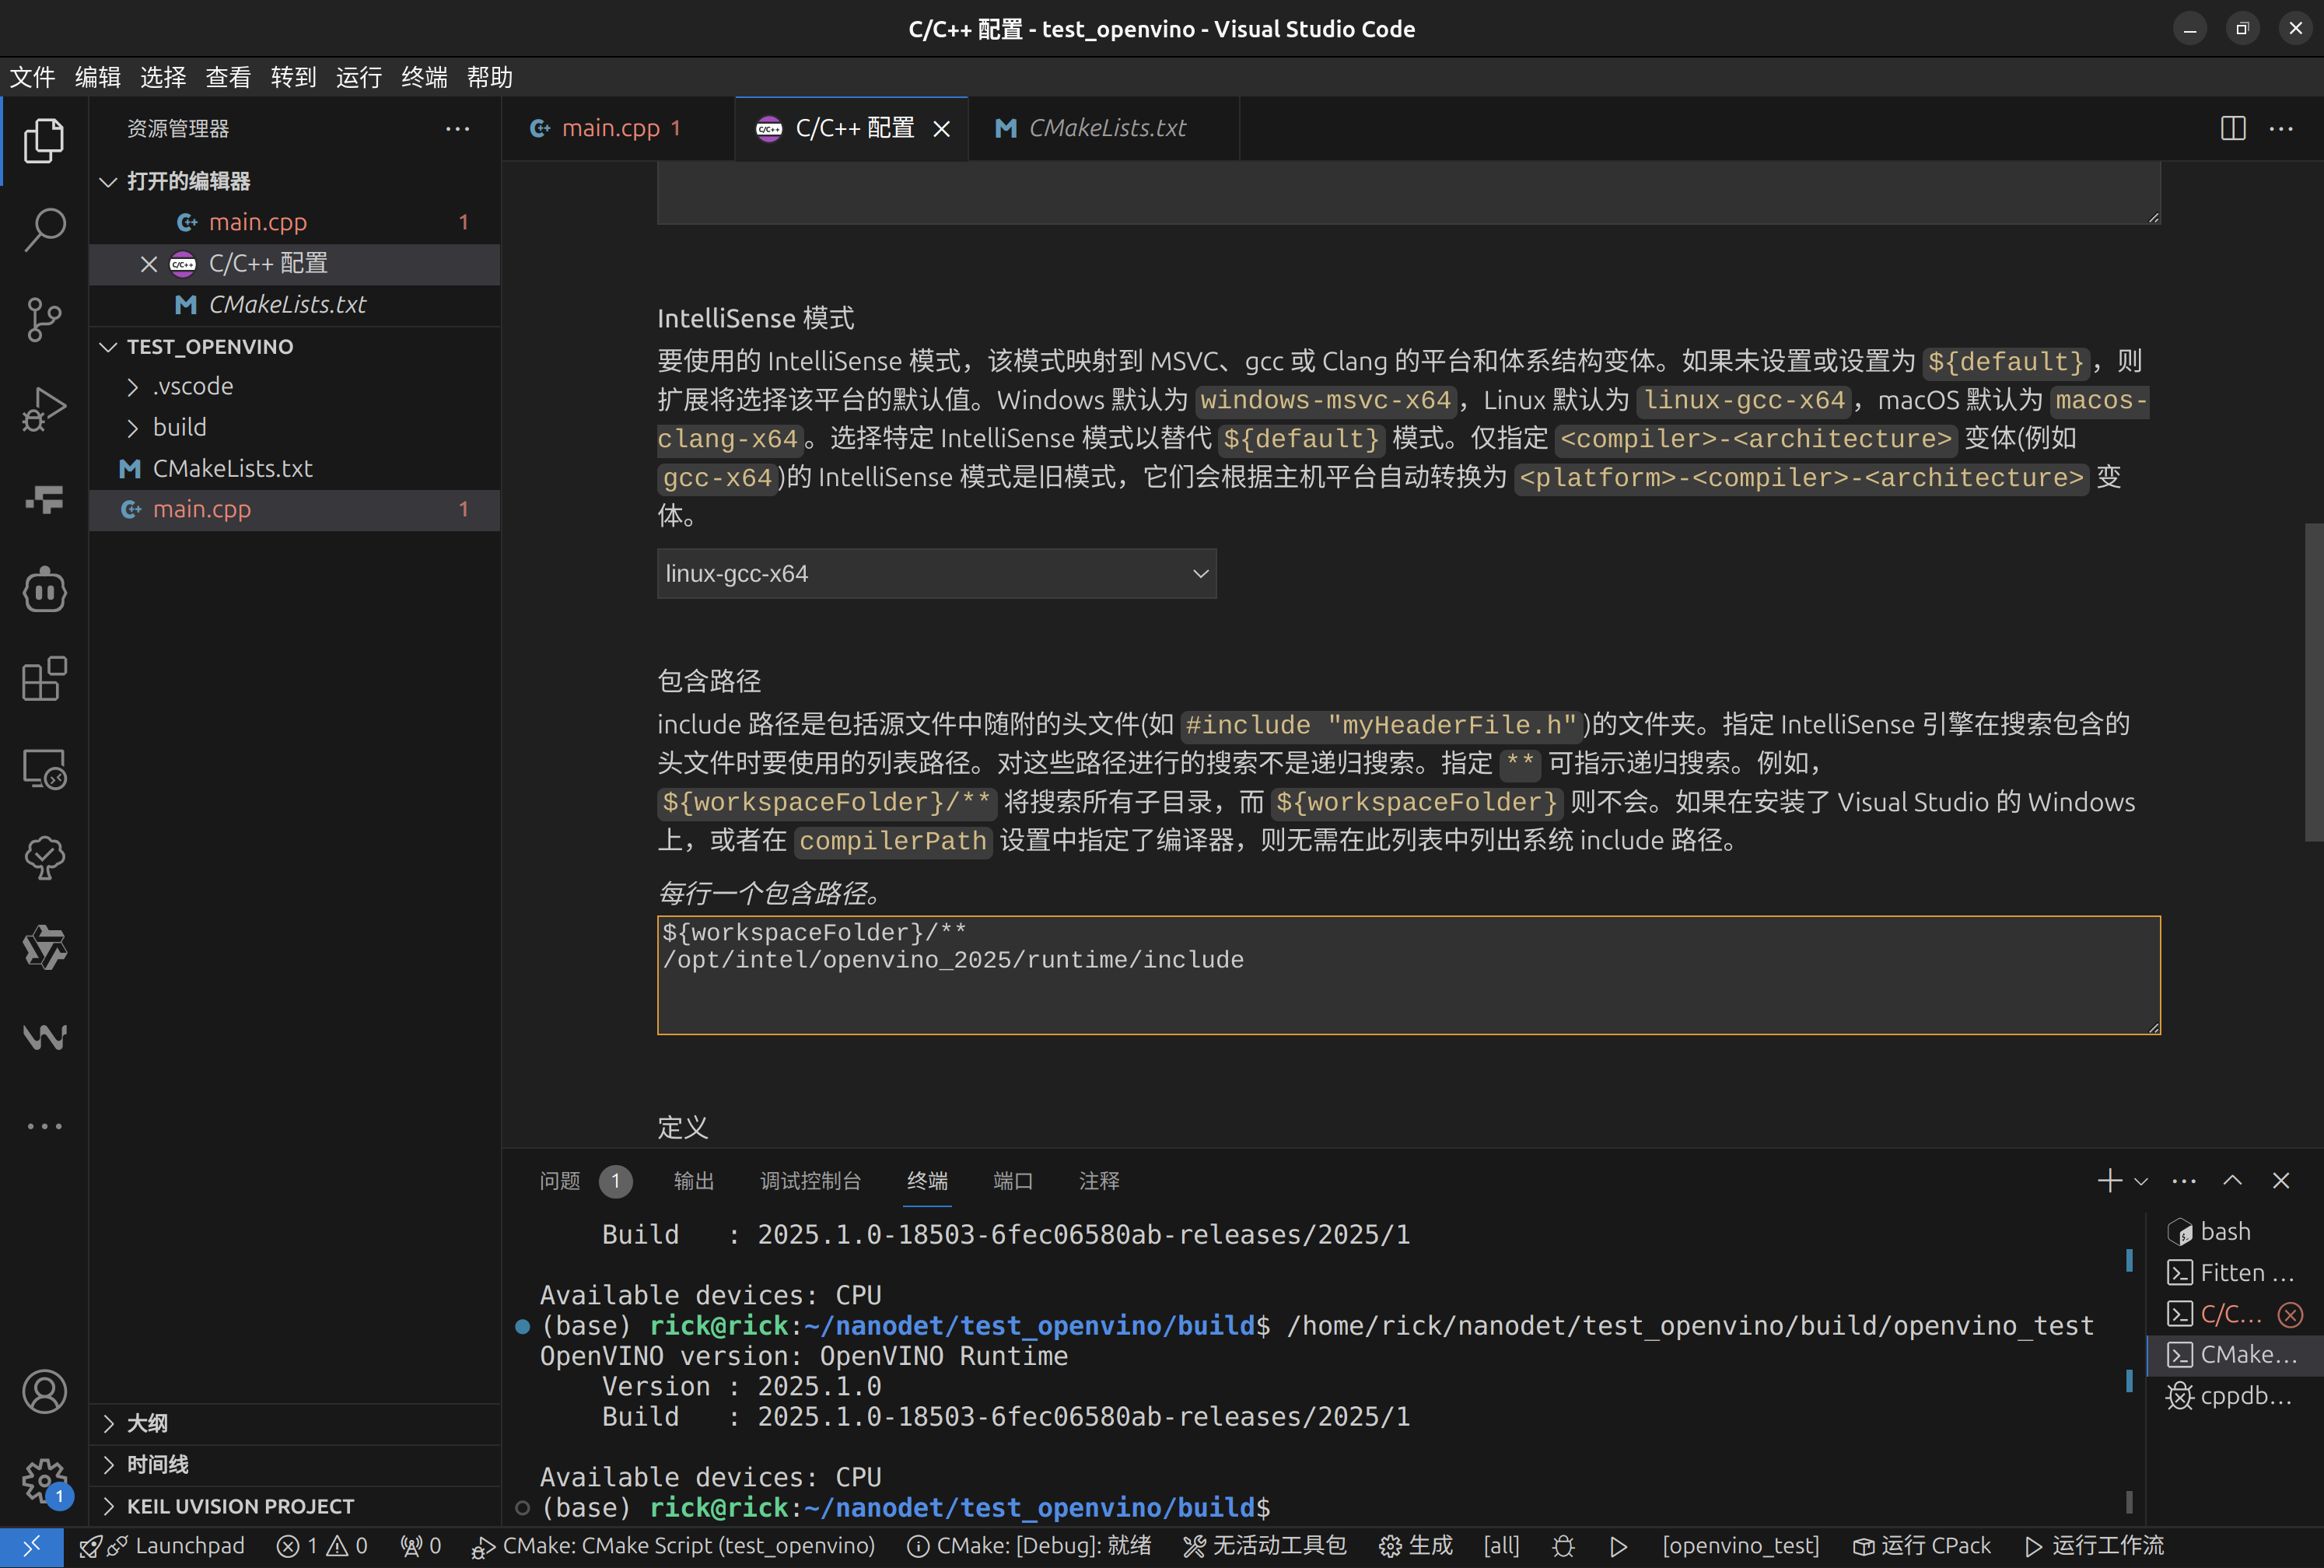
测试openvino安装状态
新建main.cpp
1 2 3 4 5 6 7 8 9 10 11 12 13 14 15 16 17 18 19 20 21 22 23 24 25 26 #include <iostream> #include <openvino/openvino.hpp> int main () try { ov::Core core; std::cout << "OpenVINO version: " << ov::get_openvino_version () << std::endl; std::vector<std::string> available_devices = core.get_available_devices (); std::cout << "Available devices: " ; for (const auto & device : available_devices) { std::cout << device << " " ; } std::cout << std::endl; return 0 ; } catch (const std::exception& ex) { std::cerr << "Exception: " << ex.what () << std::endl; return -1 ; } }
新建CMakeLists.txt
1
2
3
4
5
6
7
8
9
10
11
12
13
14
15
16
17
18
cmake_minimum_required(VERSION 3.5) project(openvino_test) set(CMAKE_CXX_STANDARD 17) set(CMAKE_CXX_STANDARD_REQUIRED ON) # 设置OpenVINO路径 set(OpenVINO_DIR "/opt/intel/openvino_2025/runtime/include") # 查找OpenVINO包 find_package(OpenVINO REQUIRED) # 添加可执行文件 add_executable(openvino_test main.cpp) # 链接OpenVINO库 target_link_libraries(openvino_test PRIVATE openvino::runtime)
执行:
1 mkdir -p build && cd build && cmake .. && make
ctrl+shift+p或F1打开快捷指令输入
edit configurations (UI)
找到include路径,将openvino路径填入,防止code找不到库,导致include报红。
选择调试配置,使用Cmake
点击cmake插件底部的运行即可使用cmakelist完成编译运行。
安装opencv
直接安装在系统目录
1 sudo apt install libopencv-dev
在cmakelist.txt可以使用
1
2
# 查找依赖包 find_package(OpenCV REQUIRED)
自动搜索到。
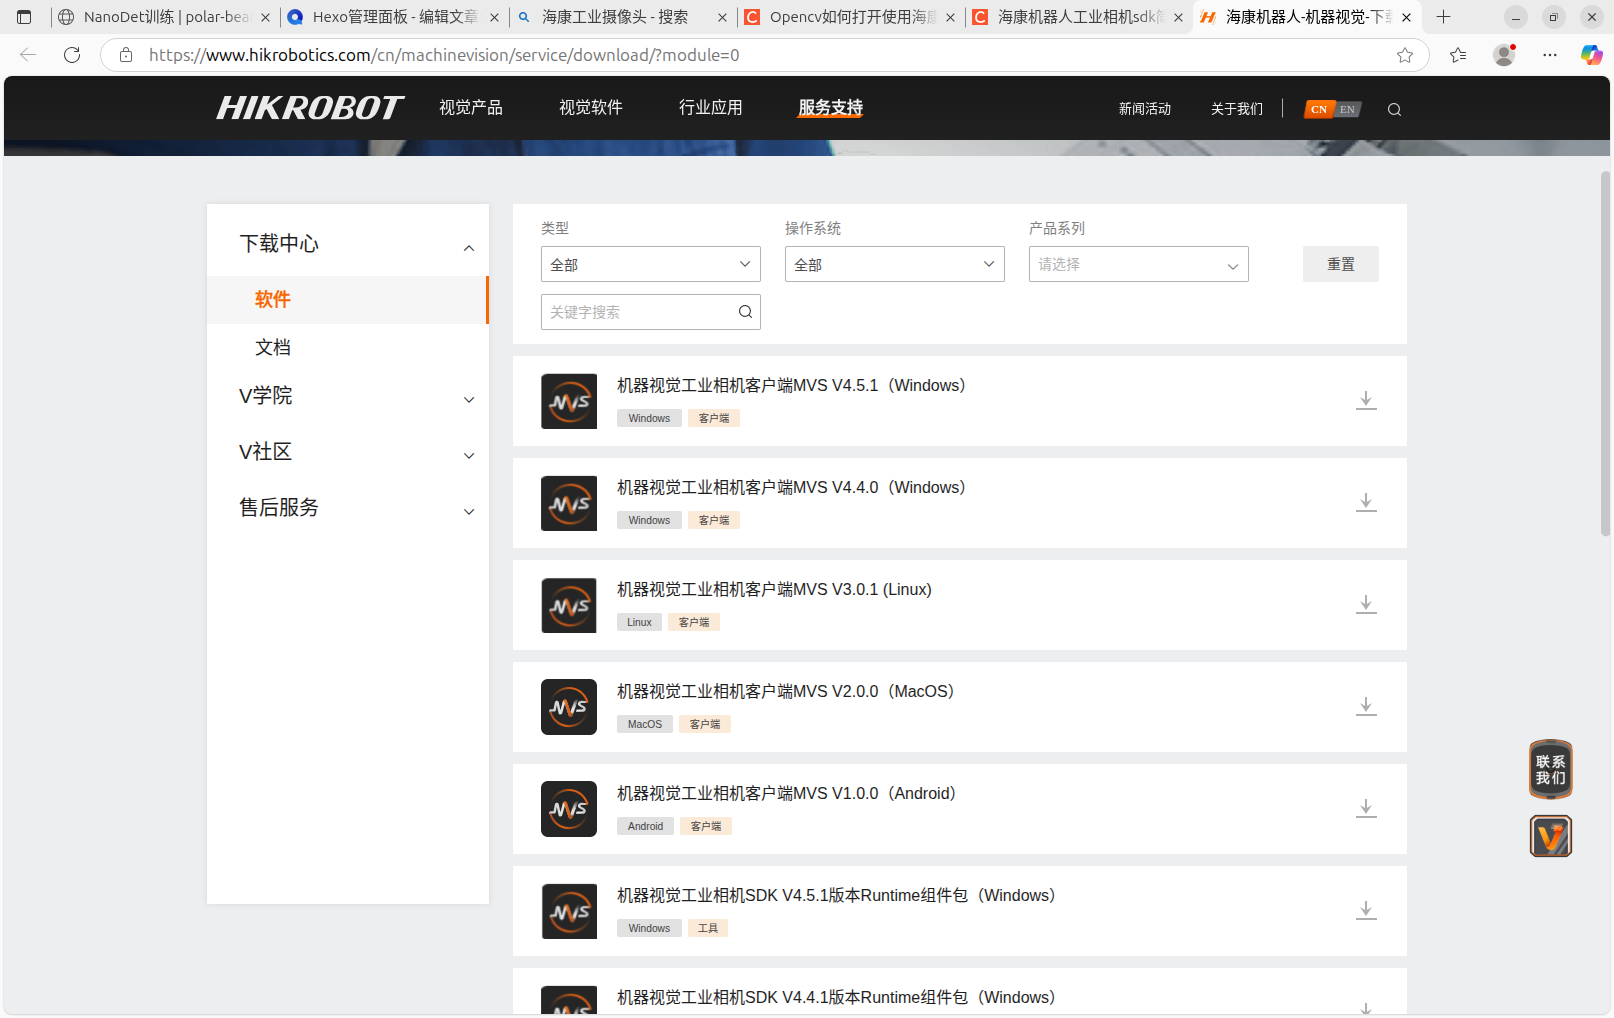
安装海康MVS
到下载页面下载:https://www.hikrobotics.com/cn/machinevision/service/download/?module=0
下载 机器视觉工业相机客户端MVS V3.0.1 (Linux)
下载的压缩包中含有不同架构的安装包
安装
sudo dpkg -i MVS-3.0.1_x86_64_20241128.deb
安装在/opt/MVS 目录下
运行/opt/MVS/bin/MVS.sh测试是否安装成功。
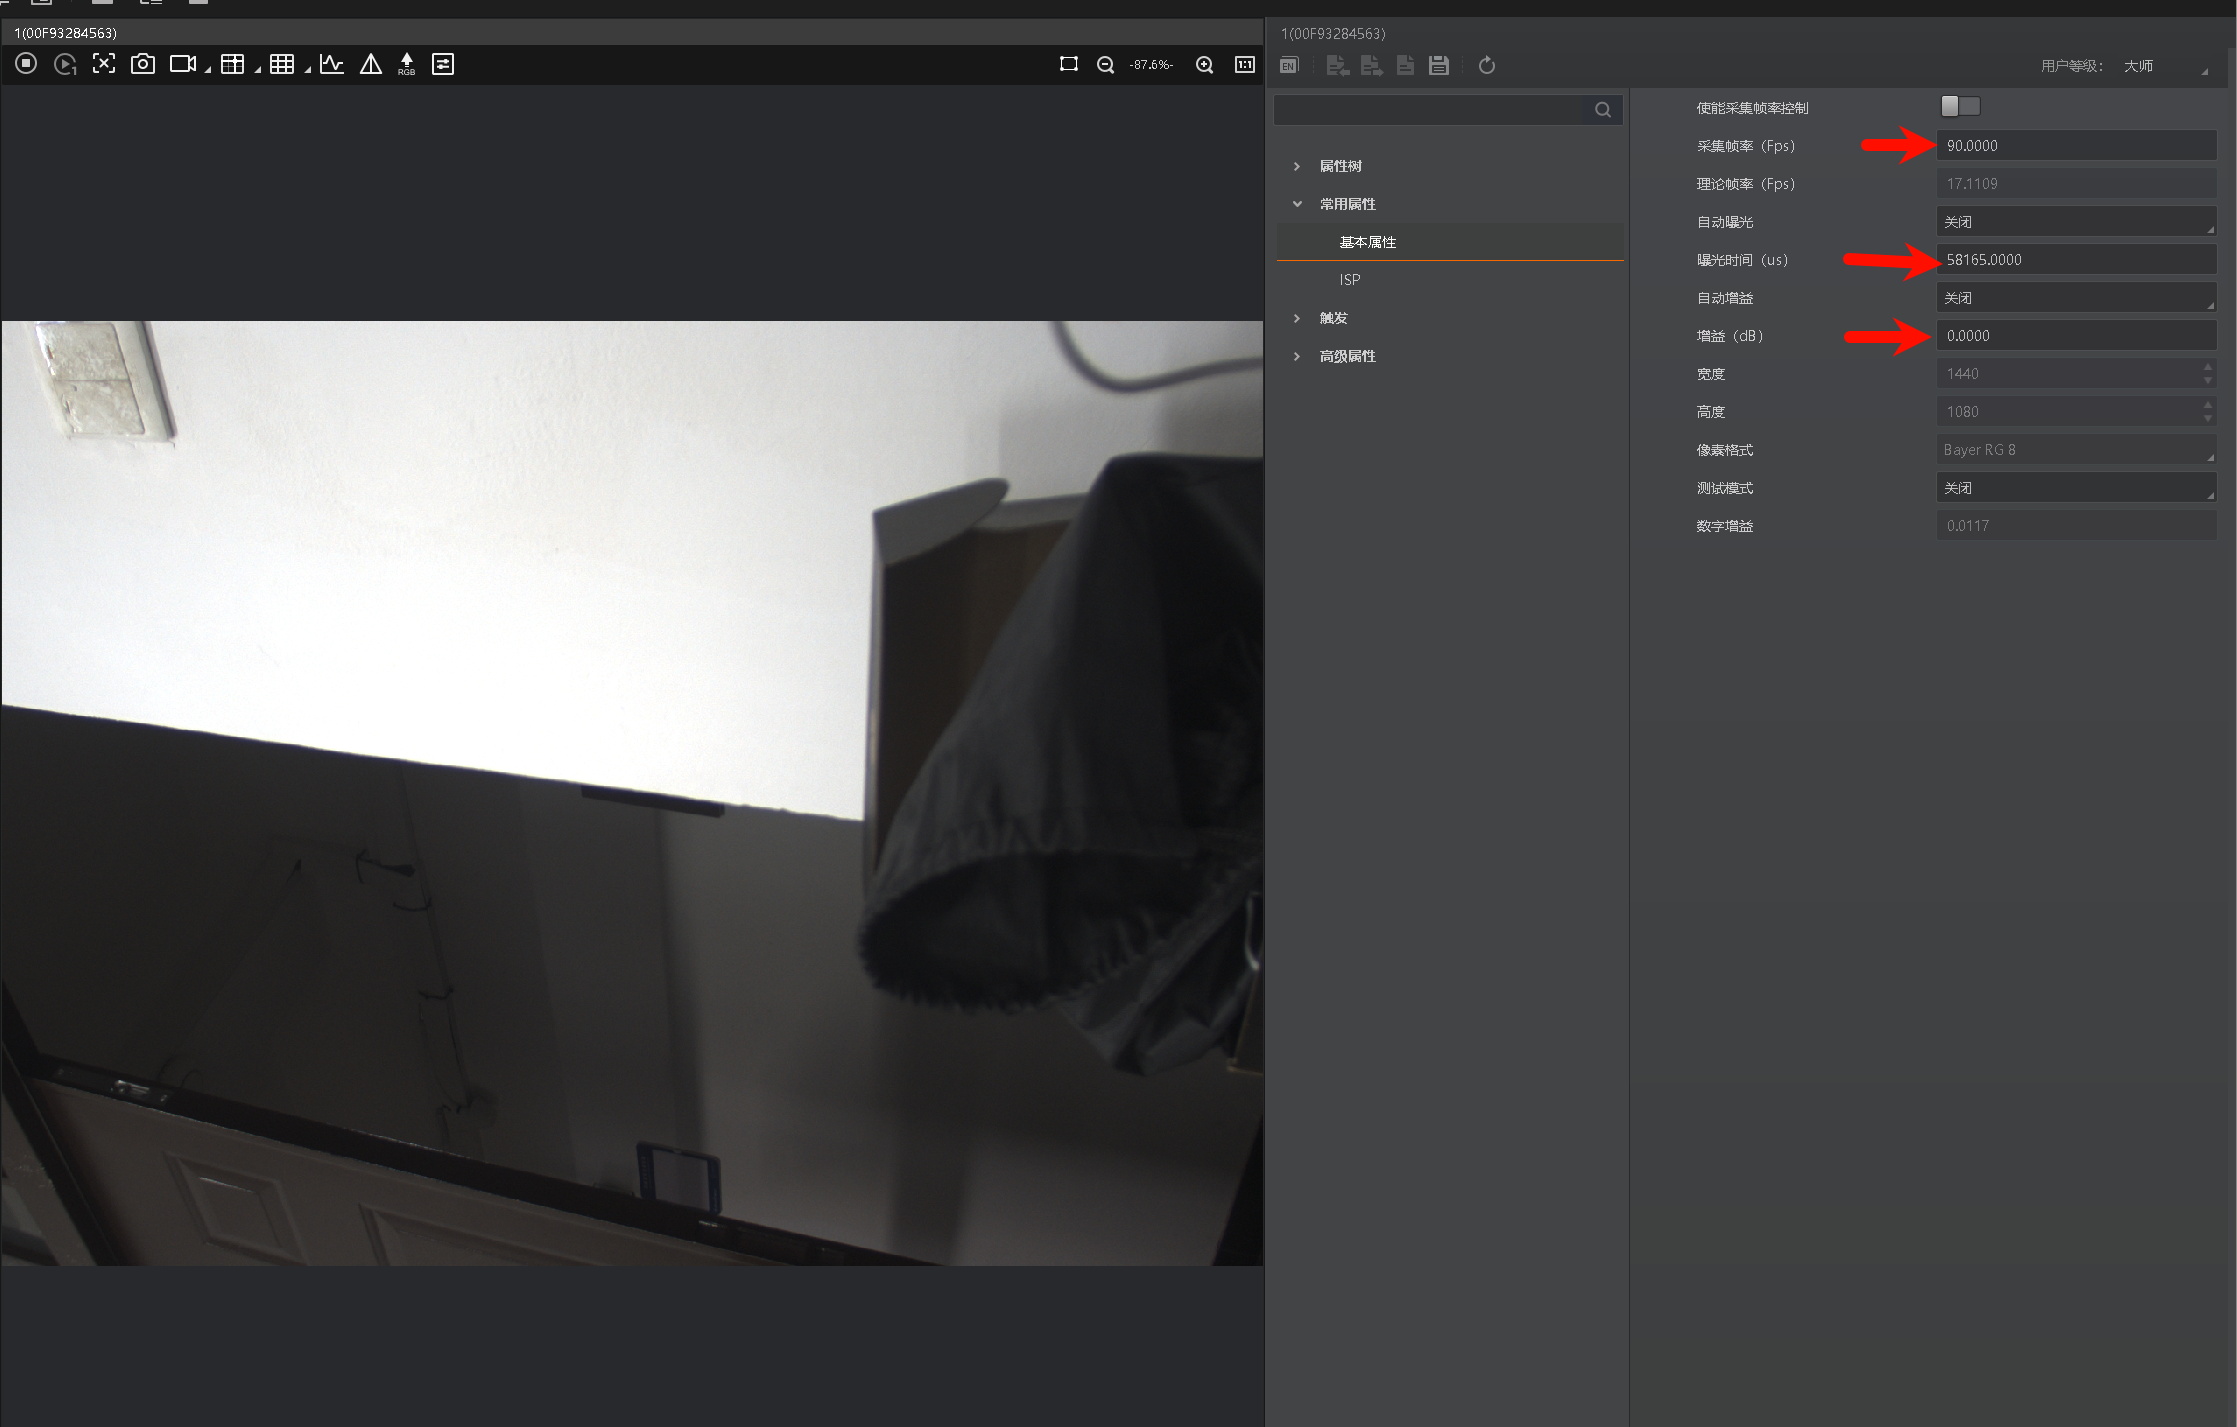
摄像头频闪
若遇到频闪,则调整曝光时间避开场地光源频率
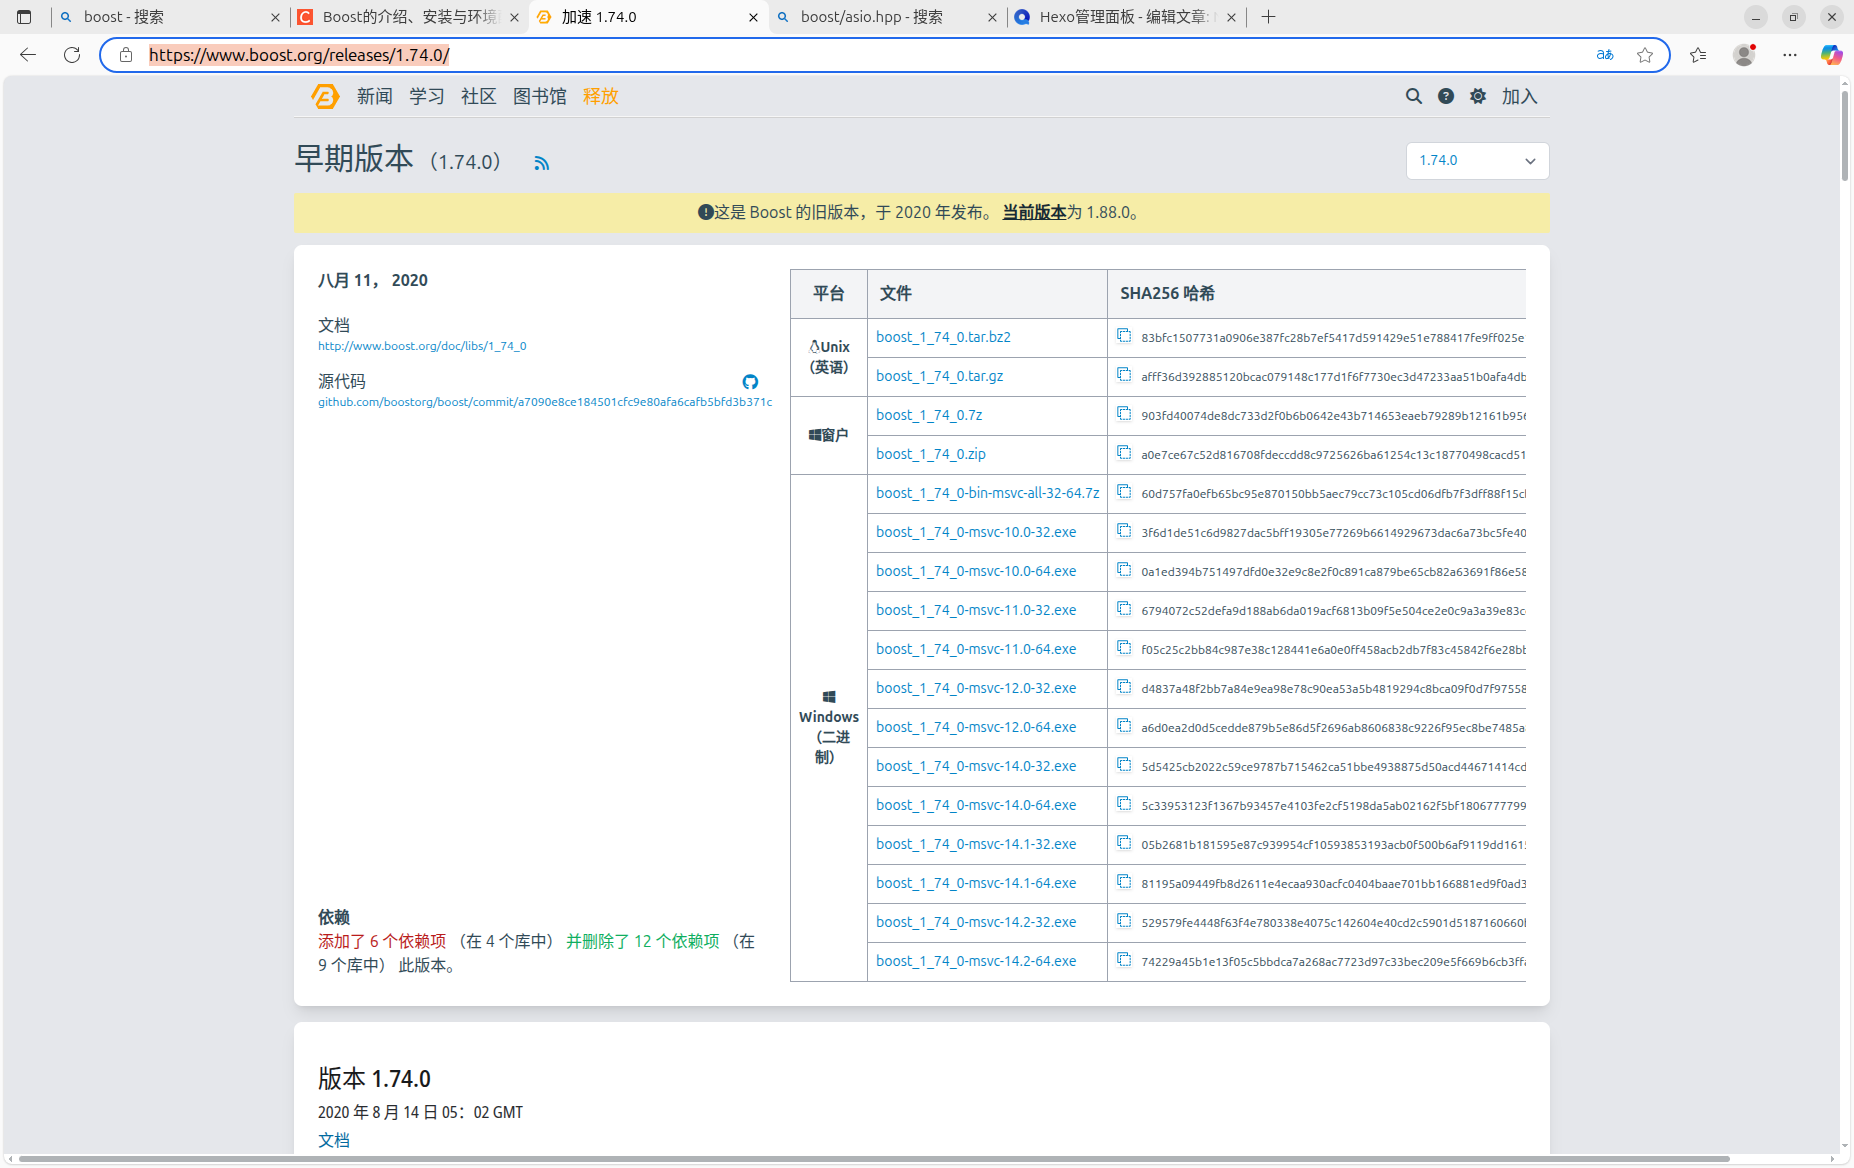
boost安装
前往官网下载:https://www.boost.org/releases/1.74.0/
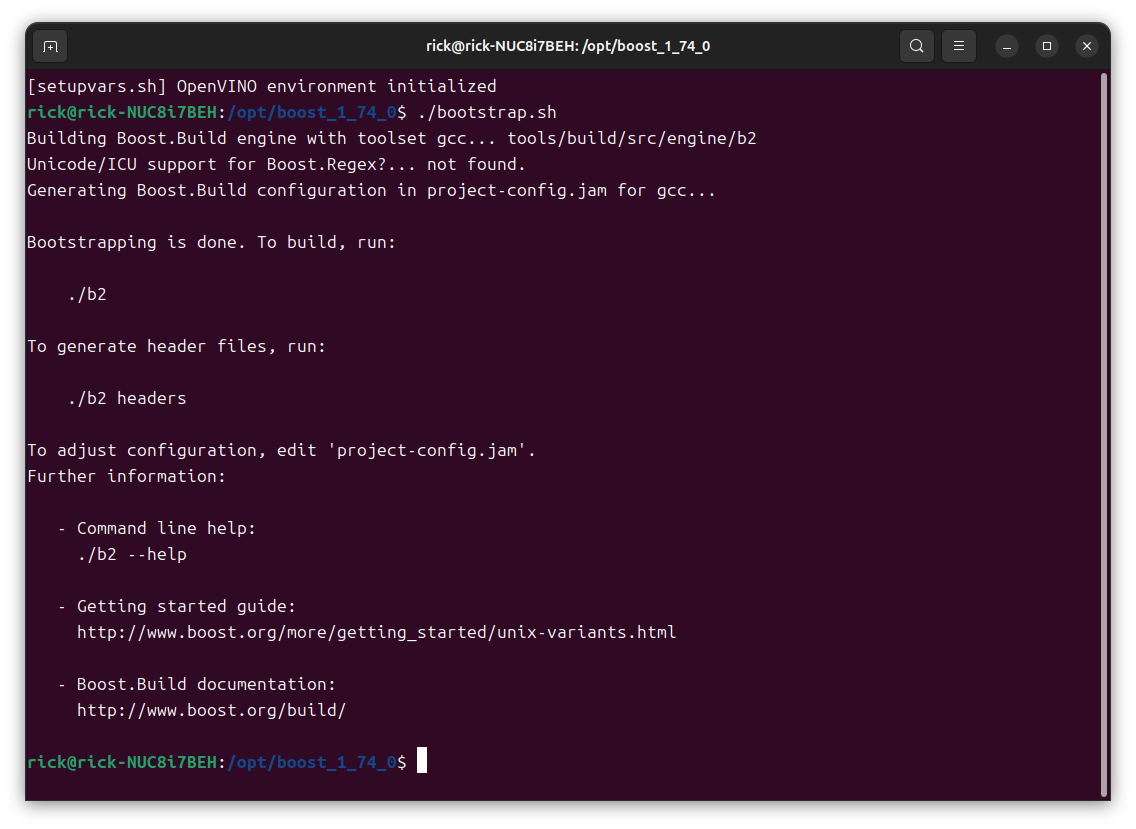
下载后解压到任意路径
1 sudo mv ./boost_1_74_0 /opt/boost_1_74_0
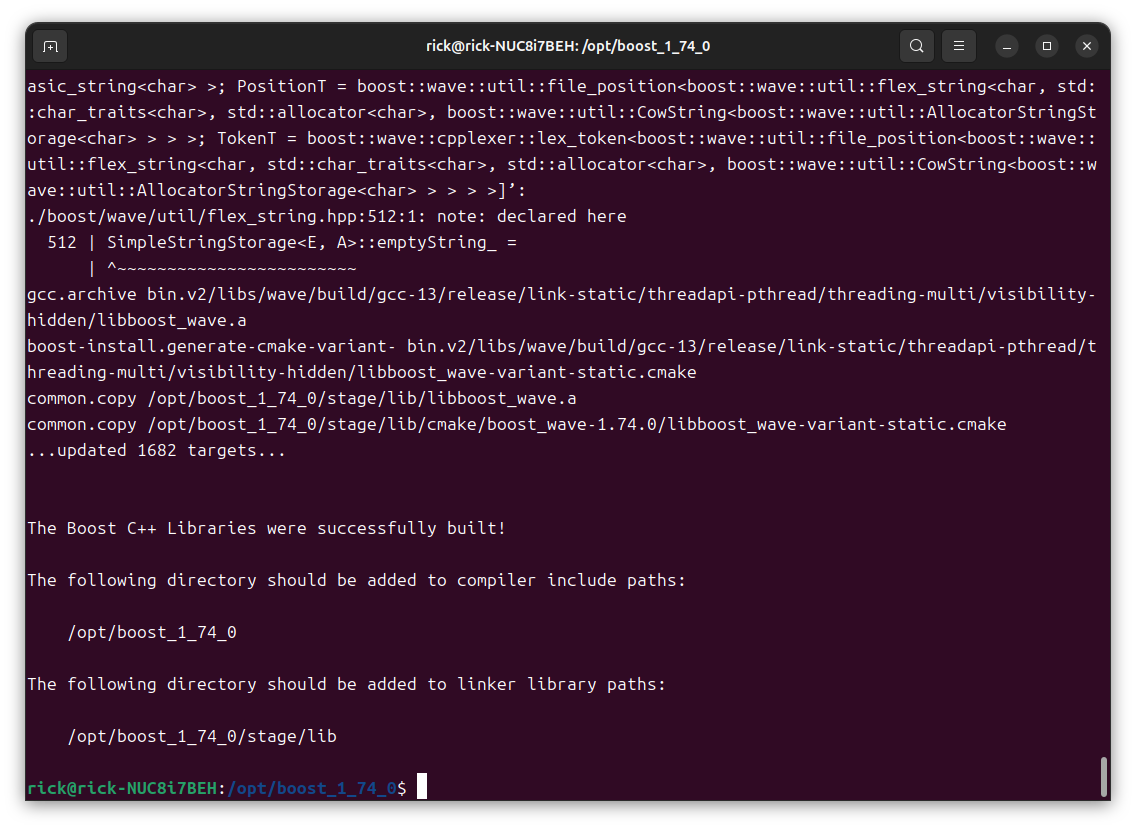
执行安装脚本
运行构建命令:./b2
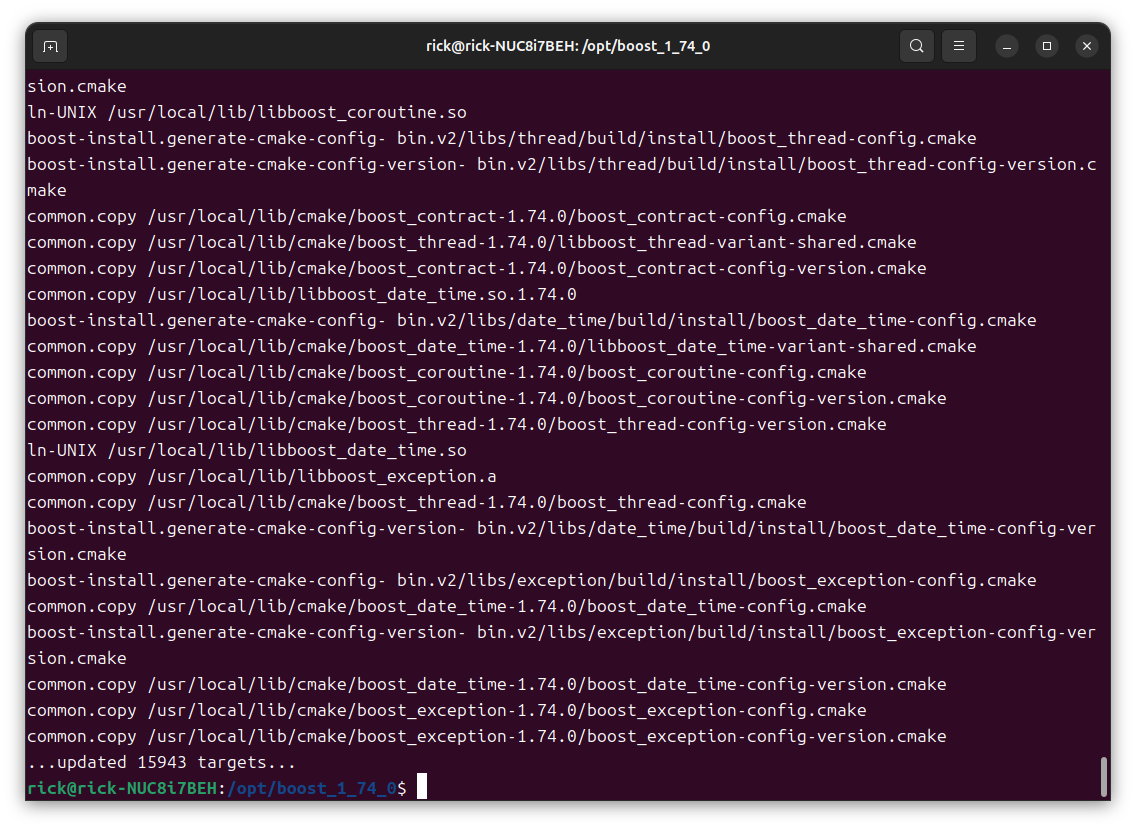
安装库文件:sudo ./b2 install


 wechat
 Alipay