
读《用 Django + Nuxt 实现美食分享网站》有记
读《用 Django + Nuxt 实现美食分享网站》有记
原文链接:[全栈“食”代:用 Django + Nuxt 实现美食分享网站(上) - 知乎 (zhihu.com)]
注意:此文章作者为知乎一只图雀 - 知乎 (zhihu.com),此处摘录为其文章全栈“食”代:用 Django + Nuxt 实现美食分享网站(上) - 知乎 (zhihu.com),本文仅对原文教程添加部分记录和摘要以及记录部分学习过程中的问题。请前往原文地址支持原作者🙂。
预备知识
本教程假定你已经知道了
- 基本的 Python 3 语言知识,包括使用 pip 安装包
- Django 框架的基础概念(MTV 架构),可参考这篇教程进行学习
- Vue 的基础概念,以及用 npm 工具链的使用,可参考这篇教程
- 前后端分离的基本概念,包括前端如何通过发起 HTTP(S) 请求从后端获取数据
学习目标
学完这篇教程后,你将:
- 了解用 pipenv 工具管理 Python 依赖
- 学会用 Django REST Framework 快速开发 REST API
- 学会用 Nuxt 框架快速开发 SPA(单页应用),能够从后端获取数据并渲染
用 pipenv 初始化 Python 环境
首先创建项目目录,并进入:
1 | $ mkdir recipes_app && cd recipes_app |
在这个项目中,我们用 pipenv 来管理 Python 项目的环境依赖。Pipenv 是 Python 社区偶像级大师 Kenneth Reitz 牵头开发的开发流程优化工具,立志集所有项目管理工具(Node 的 npm、Ruby 的 bundler、PHP 的 composer 等等)的优势为一体。我们通过下面的命令安装 pipenv,并创建项目的依赖环境:
1 | $ pip install pipenv |
此目录下即会创建虚拟环境,在虚拟环境下安装的包不会引起python其他环境的异常或者冲突,退出后在该目录再次输入pipenv shell以进入虚拟环境。
如果看到命令提示符前面出现 (recipes_app-nV3wuGJ1) 的提示(后面那串随机字符串可能不一样),就表明我们已经成功地创建了项目独有的虚拟环境!我们接着安装 Django “三件套”:
- Django: Django 框架本身,提供了丰富且强大的服务器开发组件;
- DRF (Django Rest Framework):Django 框架的超级搭档,大大方便了 REST API 的开发;
- Django CORS Headers:用于实现跨域资源请求(CORS)的 Django 中间件(如果你不了解 CORS,可以参考阮一峰的日志)。
安装命令如下
1 | (recipes_app-nV3wuGJ1) $ pipenv install django django-rest-framework django-cors-headers |
这时 pipenv 便产生了 Pipfile 文件,它的作用就类似 Node 项目中的 package.json 文件:
1 | [[source]] |
然后用 Django 脚手架创建服务器项目 api 的基本结构,并进入到 api创建一个子应用 core:
1 | (recipes_app-nV3wuGJ1) $ django-admin startproject api |
接着进行数据库迁移,并创建用于登录后台管理的超级用户:
python manage.py makemigrations:
- 该命令用于根据你的 Django 模型的变化创建新的数据库迁移文件。
python manage.py migrate:
- 该命令用于将数据库迁移应用到实际的数据库。
1 | (recipes_app-nV3wuGJ1) $ python manage.py migrate |
按照问题输入信息即可。要记住用户名和密码哦!然后运行开发服务器:
1 | (recipes_app-nV3wuGJ1) $ python manage.py runserver |
访问 http://localhost:8000/admin,可以看到后台管理的登录页面。输入刚才创建的超级用户的用户名和密码,就进入了后台管理系统,如下所示:
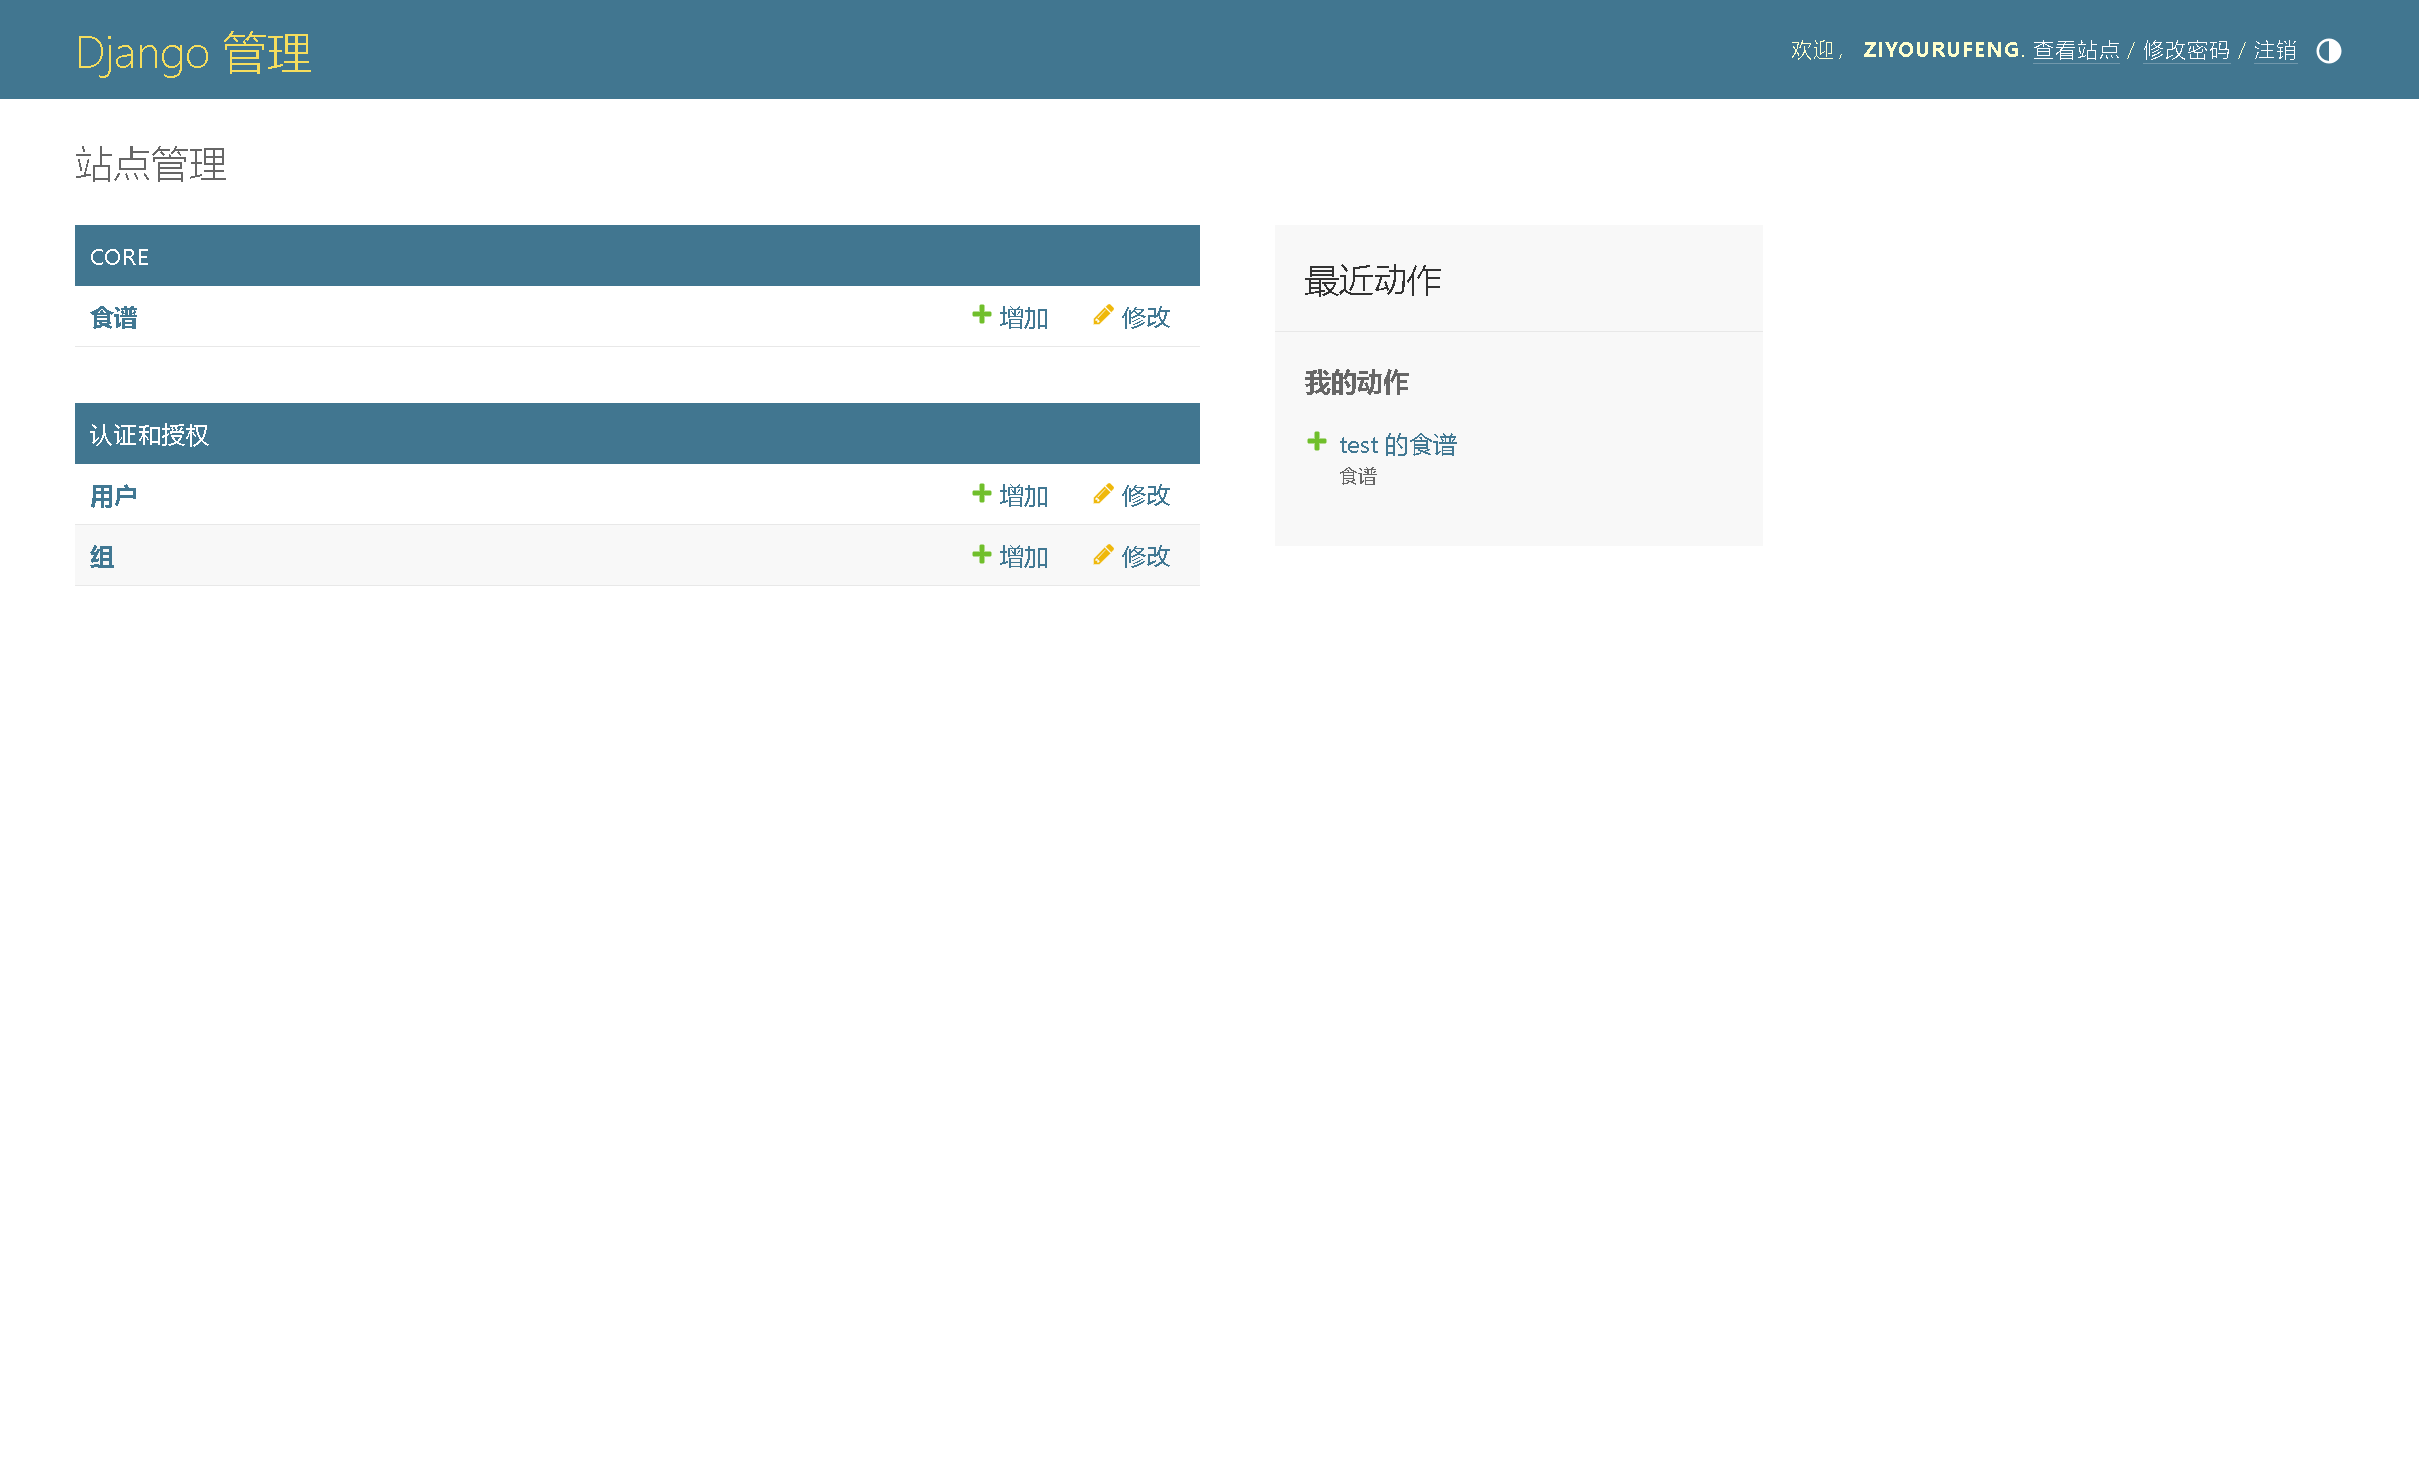
此处初始应该是英文的,后面会改。
连接外部数据库(补充)
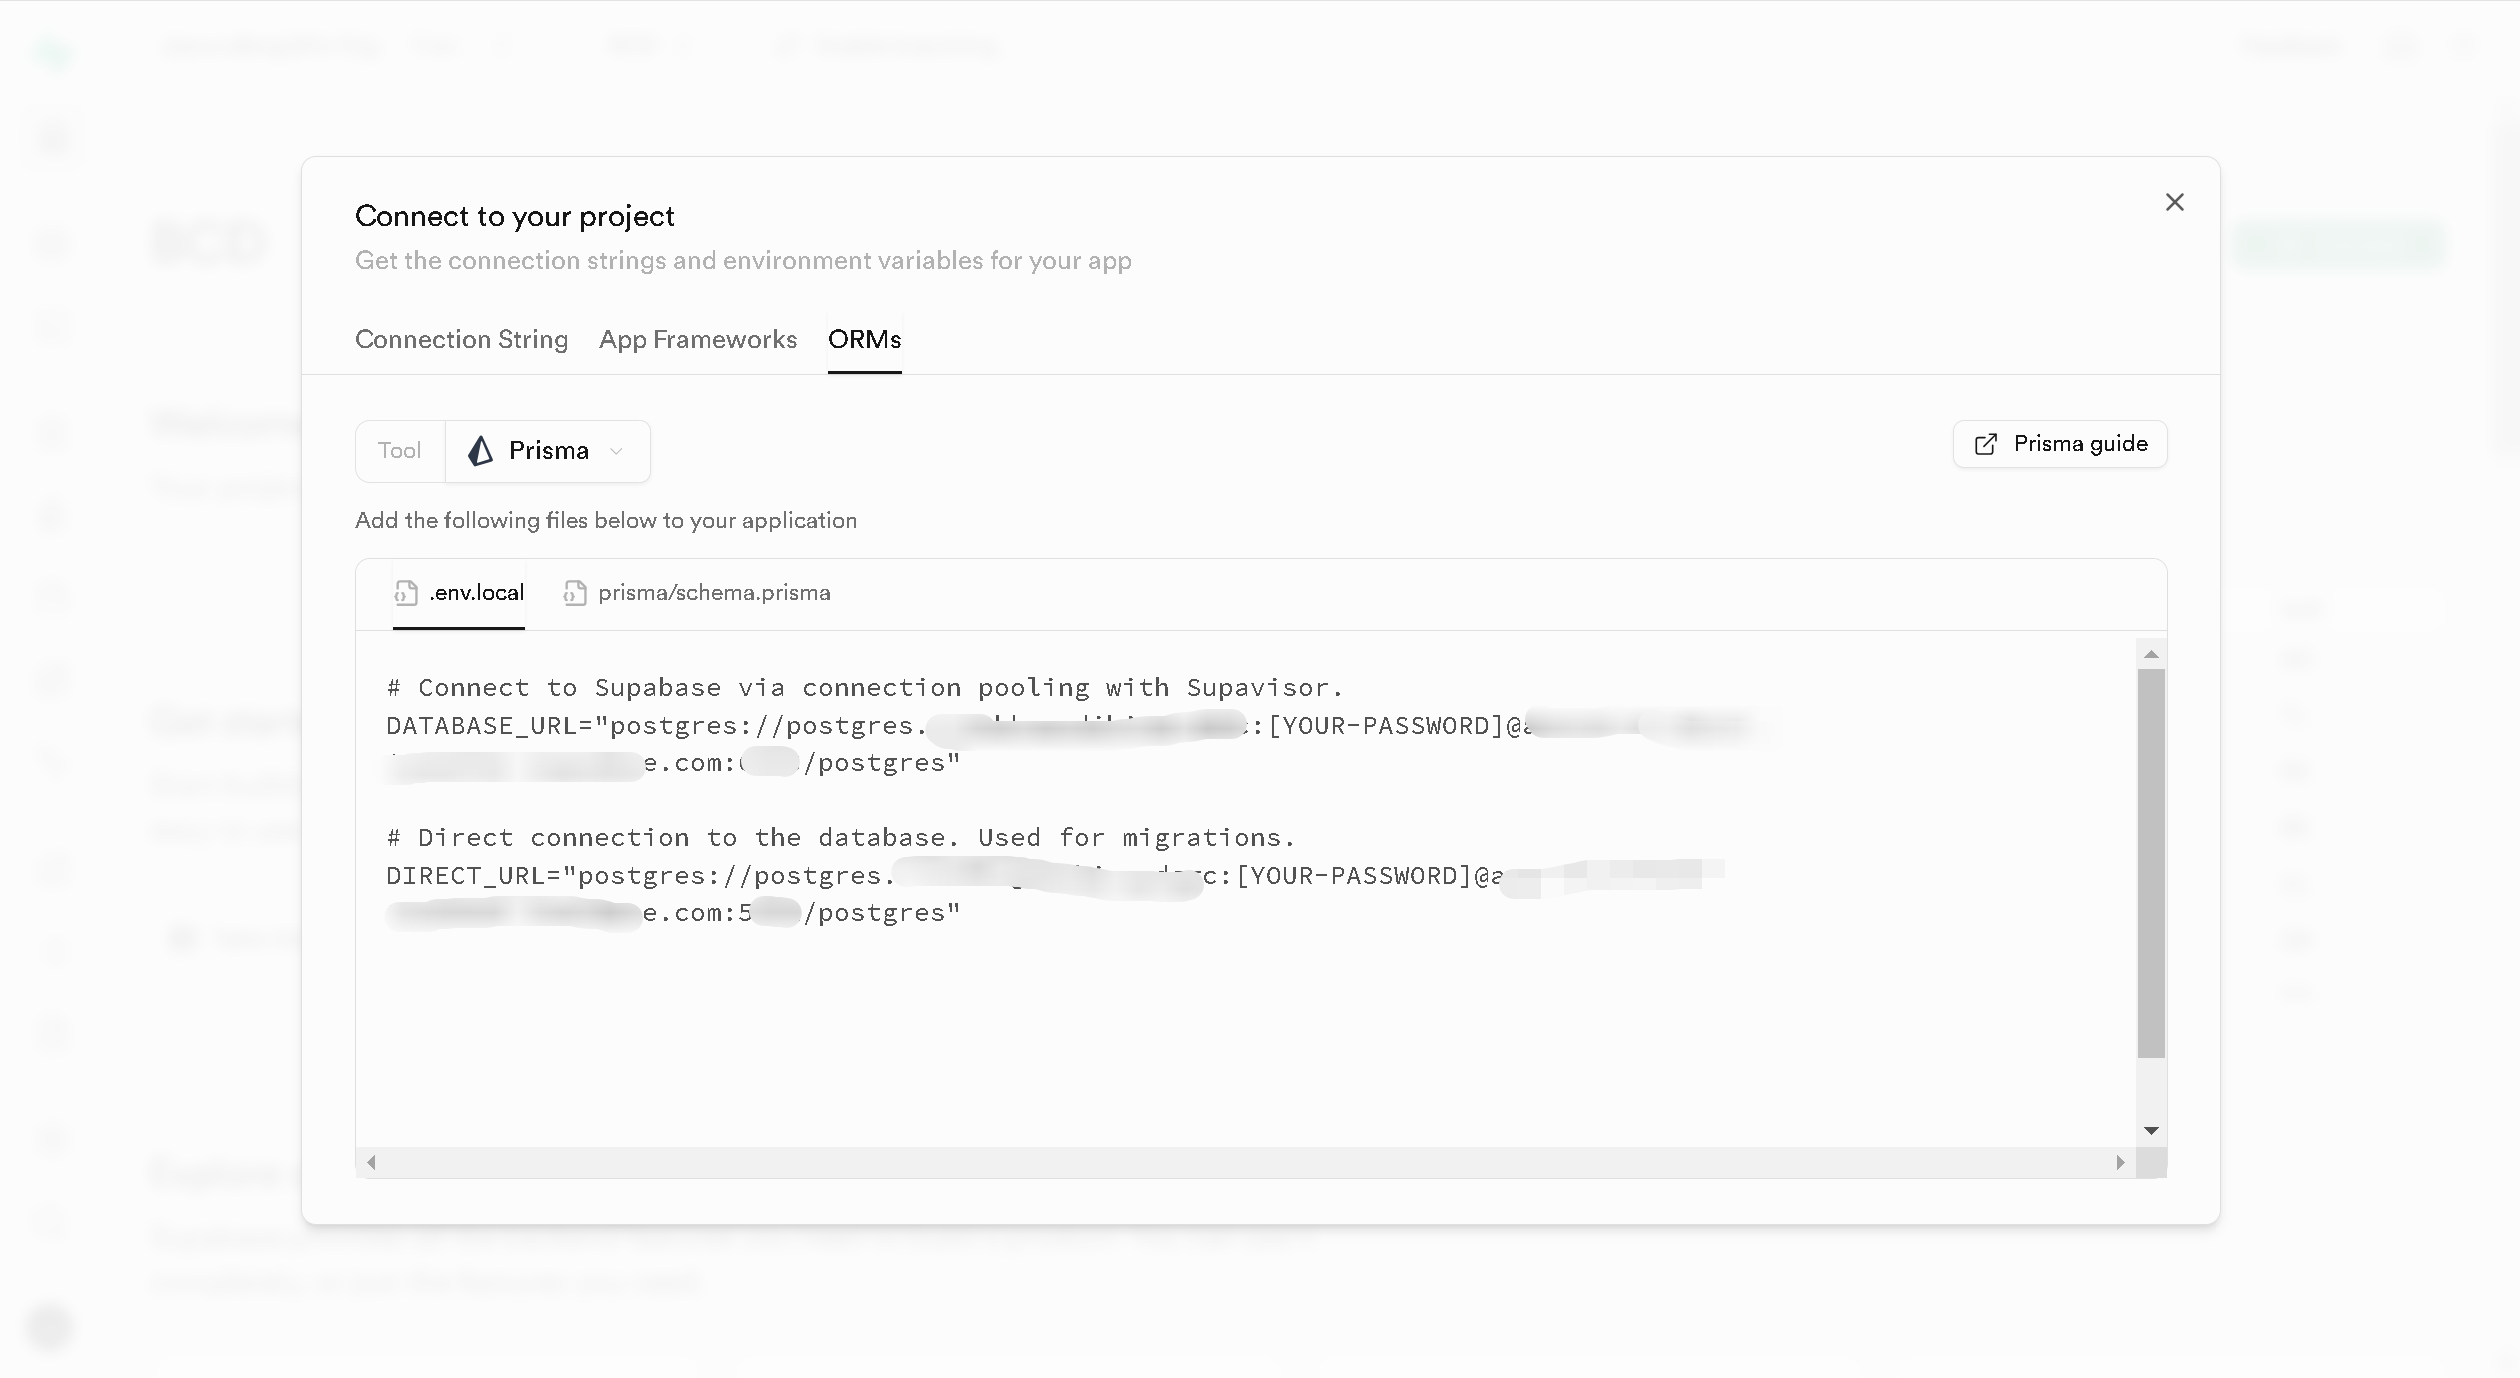
Django默认为本地数据库,但是有些场景下,我们需要连接外部数据库,这里以supabase为例,首先创建一个数据库,点击Connect,选择ORMs,找到对应的
- 数据库名称 (NAME)
- 用户名 (USER)
- 密码 (PASSWORD)
- 主机地址 (HOST)
- 端口号 (PORT)
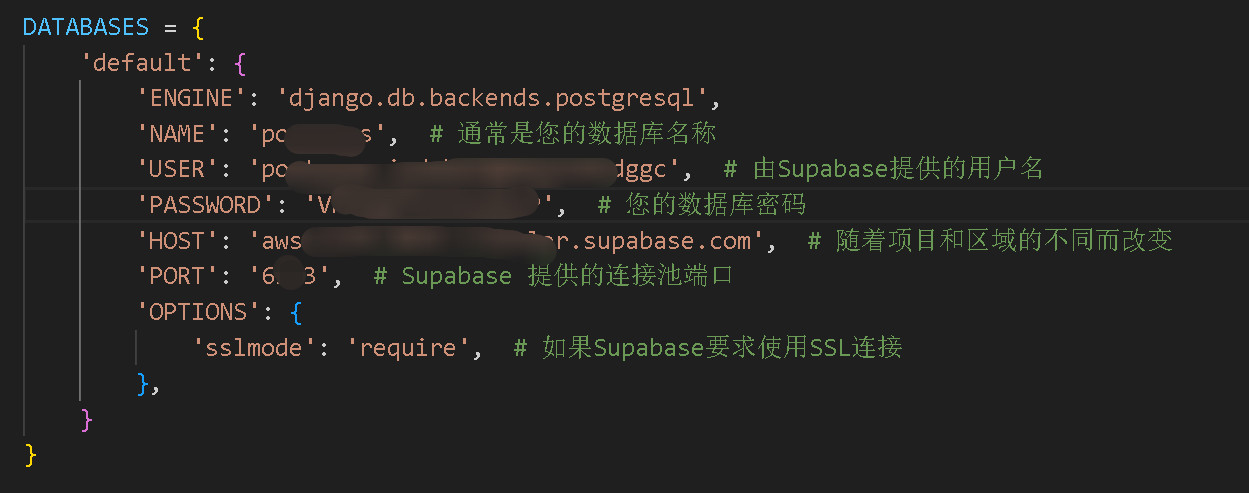
获取这些信息后,修改你的 Django 项目的 settings.py 文件以包含以下配置(使用你从 Supabase 获取的实际值):
1 | DATABASES = { |
在配置完数据库之后,你可以运行 Django 的数据库迁移来测试连接是否成功:
但是你可能会遇到以下错误。
1 | raise ImproperlyConfigured("Error loading psycopg2 or psycopg module") |
psycopg2 是 Python 中的 PostgreSQL 适配器,是 Django 用于连接 PostgreSQL 数据库的模块安装其即可。
1 | pip install psycopg2 |
在配置完数据库之后,你可以运行 Django 的数据库迁移来测试连接是否成功:
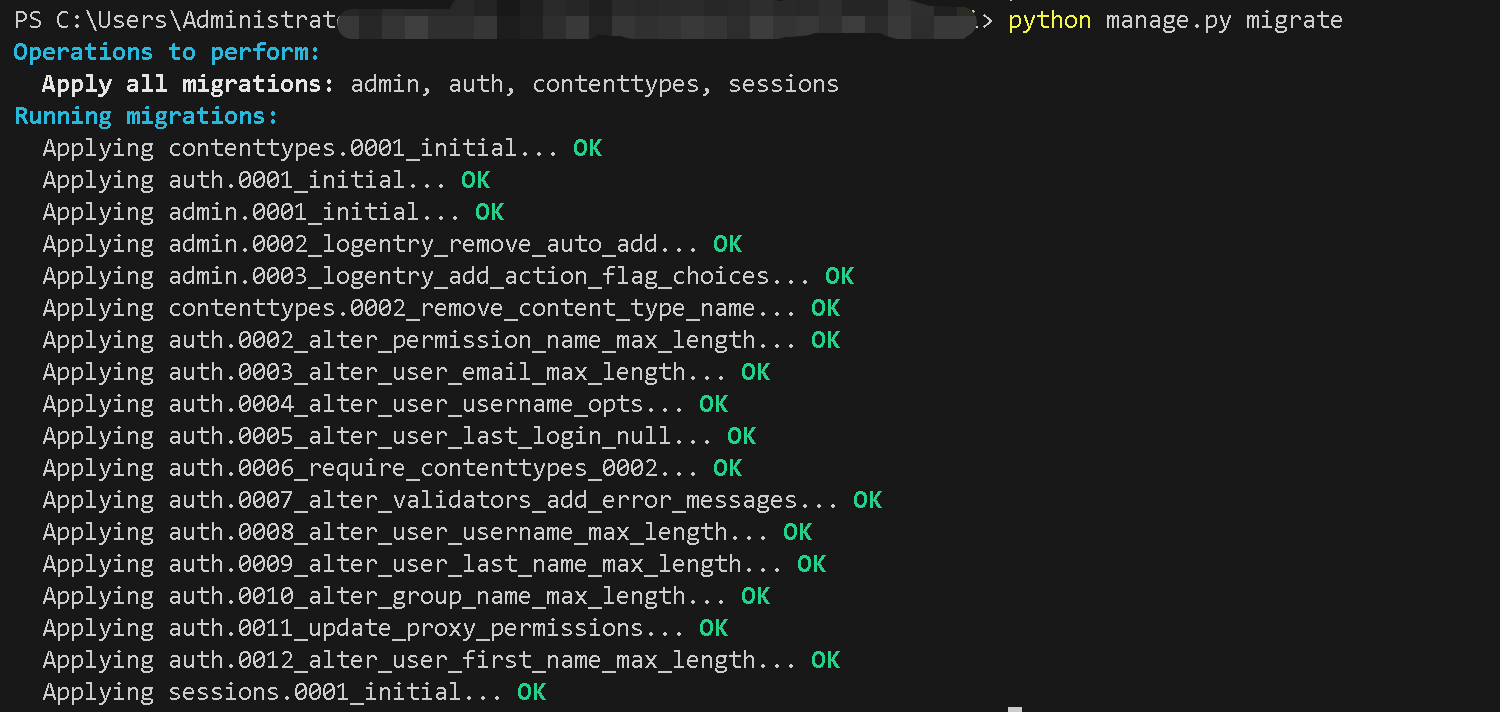
1 | python manage.py migrate |
这将应用所有数据库迁移。如果你的配置正确,它应该会成功连接到 Supabase 的 PostgreSQL 数据库,并执行迁移。
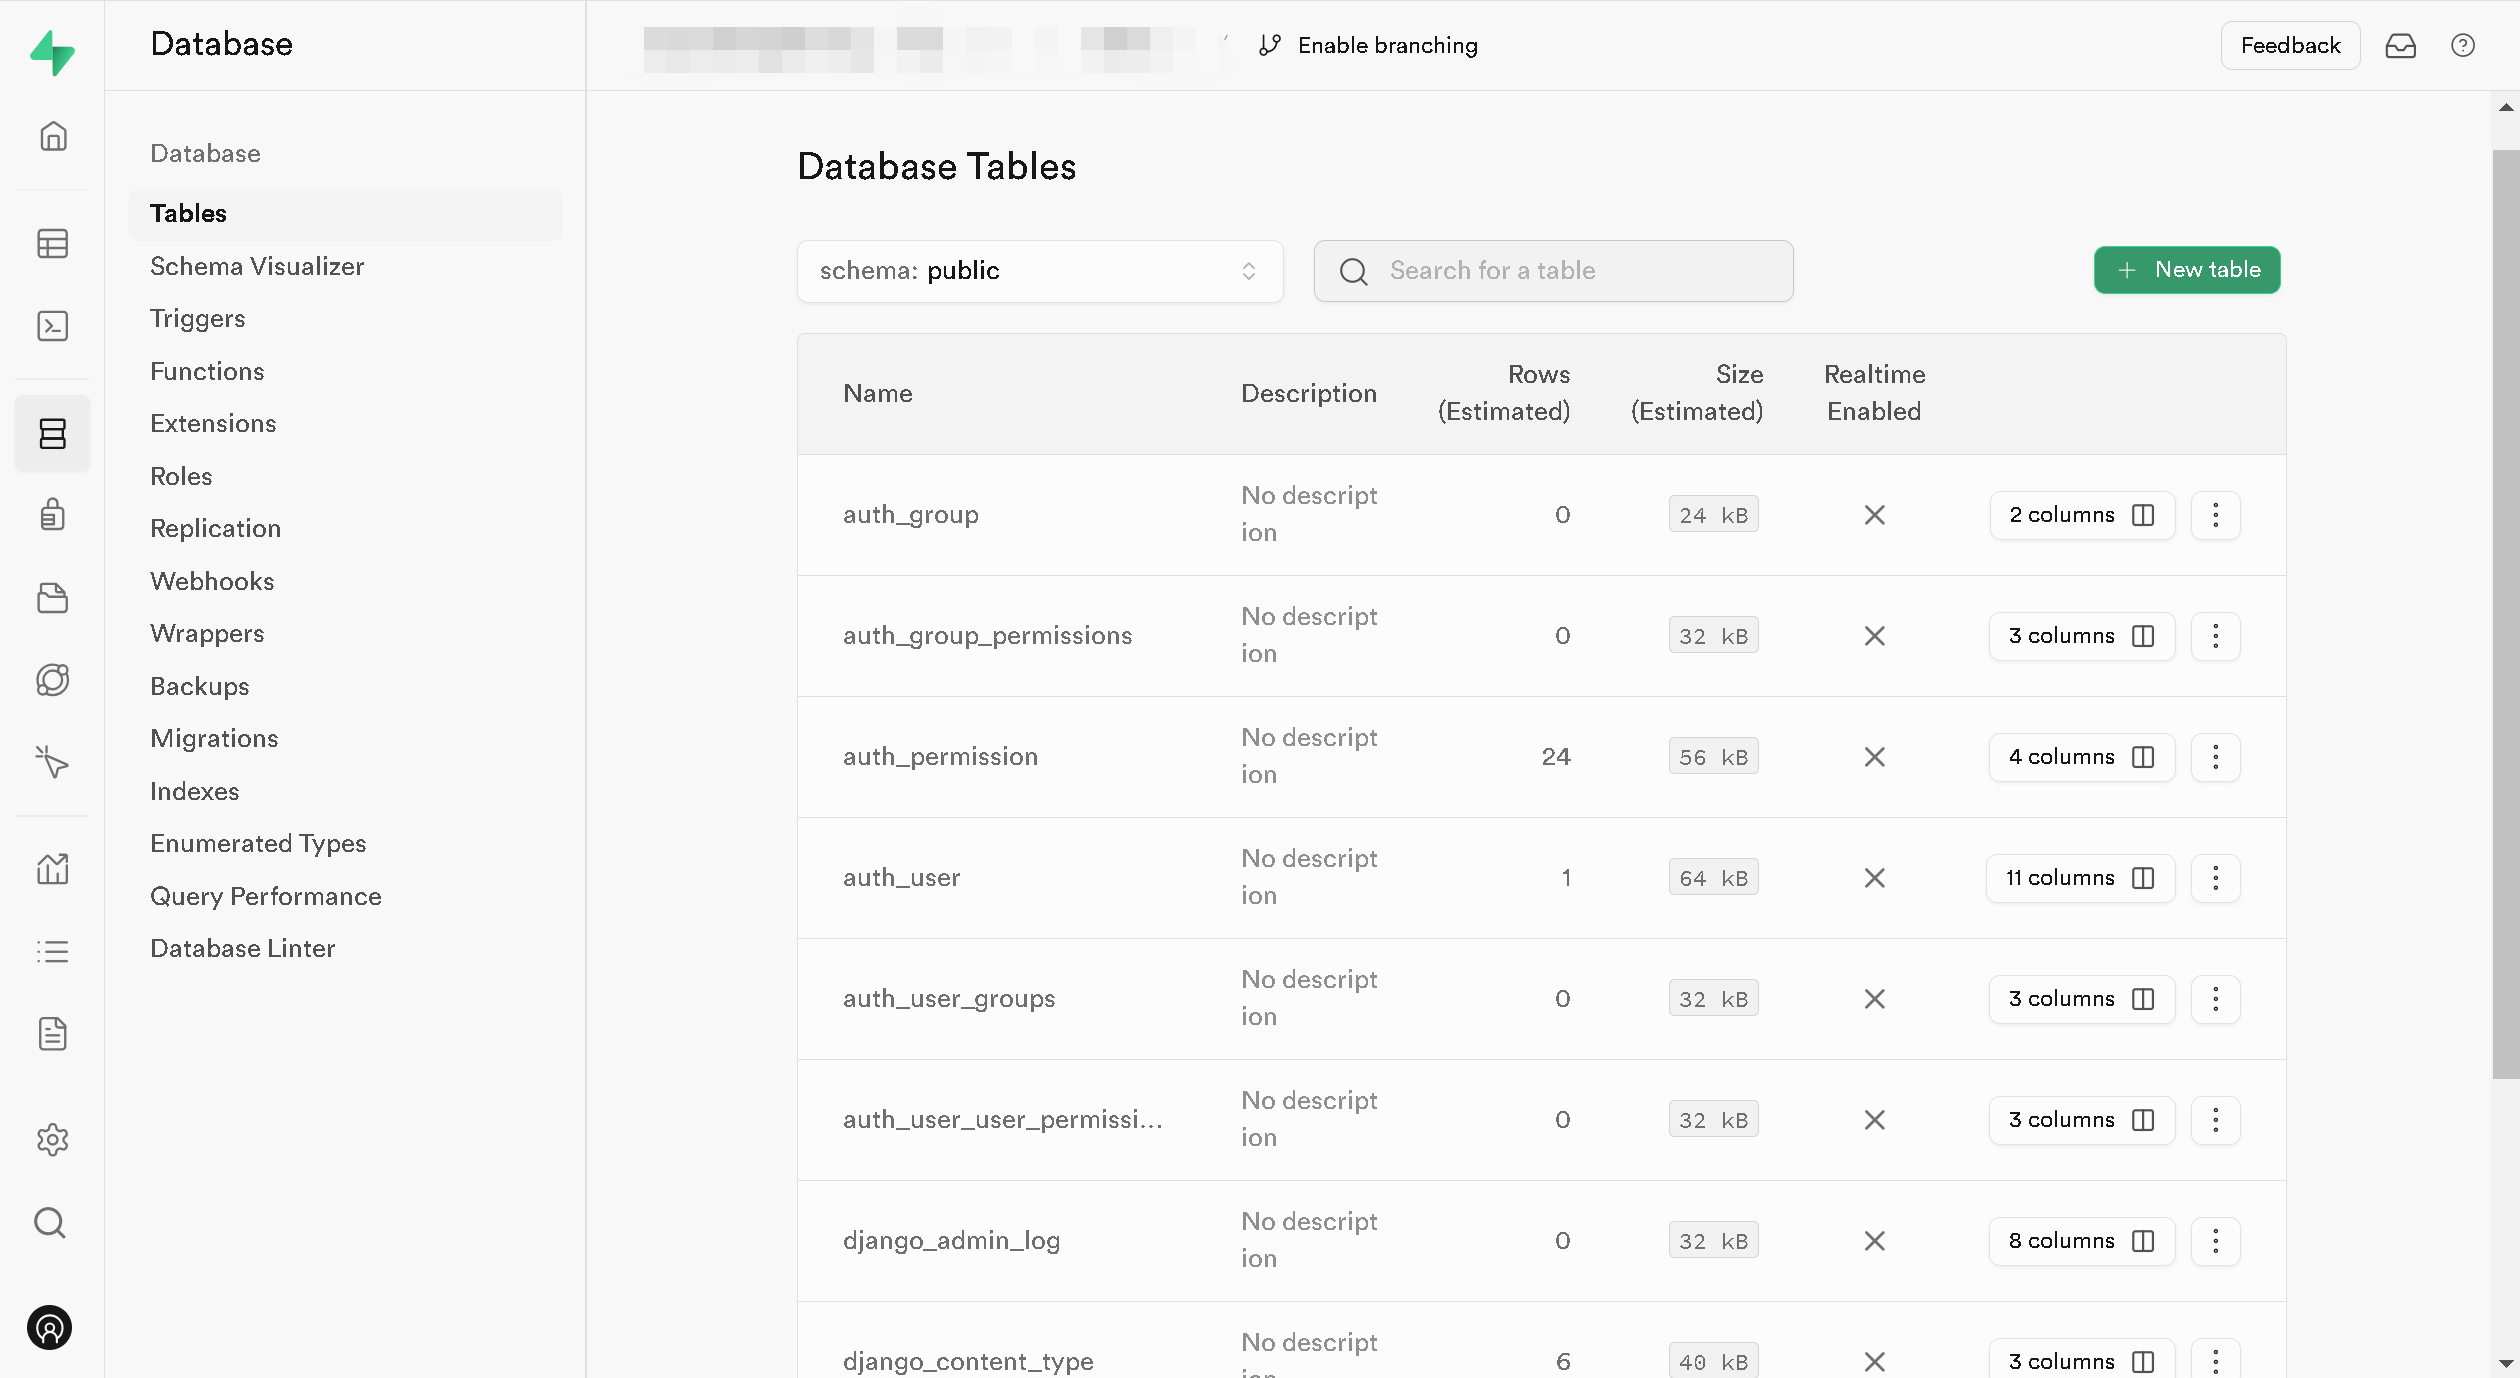
正常情况会看到以下信息
同时数据库会迁移入内容
创建管理员
1 | python manage.py createsuperuser |
然后接下来的步骤正常即可。
用 Django 实现 REST API
接下来我们将实现本项目所需要用的所有 API。对,你没有听错,我们会在这一步实现所有后端接口,大概只 10 分钟左右可以敲完!这就是 Django 的宣言:
The web framework for perfectionists with deadlines.
“为赶时间的完美主义者而生!”
全局配置
首先,在全局配置文件 settings.py 中做如下改动:
- 在
INSTALLED_APPS中添加rest_framework、corsheaders和core,前两个分别是 Django Rest Framework 和 Django CORS Headers 的应用,最后一个是我们网站的应用; - 在
MIDDLEWARE中添加corsheaders.middleware.CorsMiddleware,注册跨域请求中间件(注意一定要放在最前面!); - 设置
CORS_ORIGIN_WHITELIST,添加跨域请求白名单,这里我们先写上http://localhost:3000,后面开发前端时将用到; - 设置
LANGUAGE_CODE为zh-hans,可以将后台管理设置为中文,非常方便; - 设置
MEDIA_URL和MEDIA_ROOT,用于在开发中提供图片资源文件的访问。
具体代码如下:
1 | # ... |
实现 core 应用
接下来就是实现 core 这个 Django 应用。实现一个 Django 应用大致都是按照这样的流程:
- 定义数据模型(models.py),用于实现和数据库之间的绑定;
- 定义后台管理配置(admin.py),用于在后台管理系统中进行操作;
- 定义序列化器(serializers.py),仅当实现 REST API 时需要,用于提供数据模型的 JSON 序列化(或其他数据交换格式);
- 定义视图(views.py),用于实现具体的业务逻辑;
- 定义路由(urls.py)这个是在core目录下创建一个urls.py,用于定义路由规则,将其映射到相应的视图;
- 将应用路由接入全局路由文件(api/urls.py)中。
定义数据模型(models.py),我们从第一步开始,完成菜谱 Recipe 数据模型如下:
1 | from django.db import models |
其中,class Meta 定义了 Recipe 的元数据;__str__ 方法定义了一个菜谱对象转换为字符串时应该怎样显示。这些设置的作用在打开后台管理系统之后就会很清晰了。想要了解更多关于 Django 数据模型的知识,请参考相关中文文档。
第二步,定义后台管理配置(admin.py),为 core 子应用配置相应的后台管理功能。非常简单,只需注册定义好的 Recipe 模型:
1 | from django.contrib import admin |
第三步,定义序列化器 serializers.py(脚手架并不会自动创建,需要手动创建)。序列化器是 Django Rest Framework 提供的功能,能够非常方便地将 Django 数据模型序列化成相应的 JSON 数据格式。在这里,我们定义一个 RecipeSerializer,并在 class Meta 中指定对应的数据模型为刚才创建的 Recipe,并选择相应的字段展示:
1 | from rest_framework import serializers |
第四步,定义视图(views.py),实现视图。这里我们采用开挂模式,直接调用 Django Rest Framework 提供的模型视图集(ModelViewset)直接搞定数据模型的增删改查逻辑:
1 | from rest_framework import viewsets |
只需指定 serializer_class(序列器类)和 queryset(模型查询集),就自动定义好了模型的添加、删除、查询和修改!虽然视图集非常强大,但是如果要实现更加灵活的业务逻辑,那么还是要为每个接口定义单独的视图类才行。
第五步,定义路由(core/urls.py)(脚手架并不会自动创建,需要手动创建)实现路由。由于我们上一步使用了视图集,因此只需先调用 DefaultRouter 自动生成相关的路由,然后加入记录路由映射的列表 urlpatterns 中:
1 | from django.urls import path, include |
router 为我们自动生成以下路由:
/recipes/:创建食谱(POST 方法)或读取食谱列表(GET方法);/recipes/{id}:获取单个食谱(GET)、更新单个食谱(PUT)或删除食谱(DELETE)。
注意
在 Django 路由定义中不包括 HTTP 方法,具体的 HTTP 方法可以在视图中读取并判断。
最后一步,全局路由文件(api/urls.py),我们将 core 子应用中的路由接入全局路由:
1 | from django.contrib import admin |
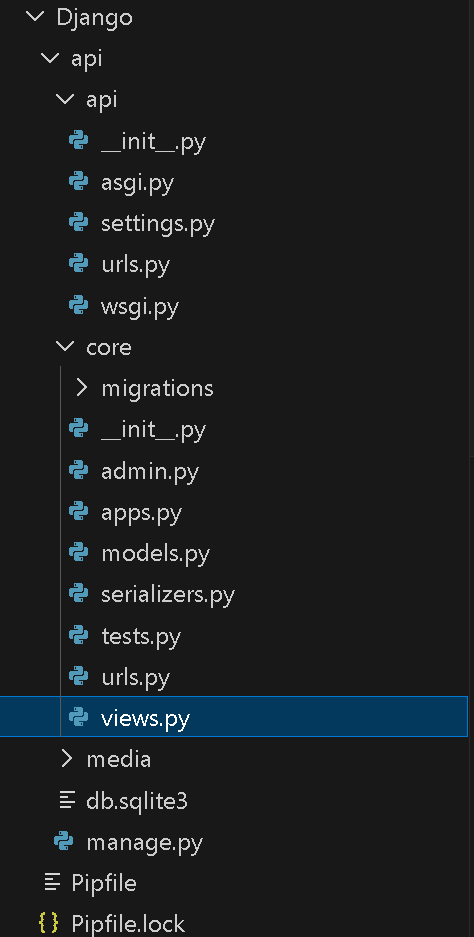
修改完成后这是我的文件树。
没错,关于食谱的增删改查的 API 我们全都实现了!不信?先运行开发服务器:
在此处我遇到了一个错误,按照以上构建后,访问localhost:8000/api/recipes时发送以下错误。
display
[16/Apr/2024 09:39:21] “GET /admin/ HTTP/1.1” 200 6146
[16/Apr/2024 09:39:21] “GET /static/admin/css/base.css HTTP/1.1” 304 0
[16/Apr/2024 09:39:21] “GET /static/admin/css/dark_mode.css HTTP/1.1” 304 0
[16/Apr/2024 09:39:21] “GET /static/admin/css/nav_sidebar.css HTTP/1.1” 304 0
[16/Apr/2024 09:39:21] “GET /static/admin/css/dashboard.css HTTP/1.1” 304 0
[16/Apr/2024 09:39:21] “GET /static/admin/css/responsive.css HTTP/1.1” 304 0
[16/Apr/2024 09:39:22] “GET /static/admin/js/theme.js HTTP/1.1” 304 0
[16/Apr/2024 09:39:22] “GET /static/admin/js/nav_sidebar.js HTTP/1.1” 304 0
[16/Apr/2024 09:39:22] “GET /static/admin/img/icon-addlink.svg HTTP/1.1” 304 0
[16/Apr/2024 09:39:22] “GET /static/admin/img/icon-changelink.svg HTTP/1.1” 304 0
[16/Apr/2024 09:39:26] “GET /admin/core/recipe/add/ HTTP/1.1” 200 11529
[16/Apr/2024 09:39:26] “GET /admin/jsi18n/ HTTP/1.1” 200 9327
[16/Apr/2024 09:39:26] “GET /static/admin/js/vendor/jquery/jquery.js HTTP/1.1” 200 285314
[16/Apr/2024 09:39:26] “GET /static/admin/js/urlify.js HTTP/1.1” 200 7887
[16/Apr/2024 09:39:26] “GET /static/admin/js/prepopulate.js HTTP/1.1” 200 1531
[16/Apr/2024 09:39:26] “GET /static/admin/js/vendor/xregexp/xregexp.js HTTP/1.1” 200 325171
[16/Apr/2024 09:39:26] “GET /static/admin/js/prepopulate_init.js HTTP/1.1” 200 586
[16/Apr/2024 09:39:26] “GET /static/admin/js/actions.js HTTP/1.1” 200 8067
[16/Apr/2024 09:39:26] “GET /static/admin/js/jquery.init.js HTTP/1.1” 200 347
[16/Apr/2024 09:39:26] “GET /static/admin/css/forms.css HTTP/1.1” 200 9090
[16/Apr/2024 09:39:26] “GET /static/admin/js/admin/RelatedObjectLookups.js HTTP/1.1” 200 9042
[16/Apr/2024 09:39:26] “GET /static/admin/js/core.js HTTP/1.1” 200 6208
[16/Apr/2024 09:39:26] “GET /static/admin/css/widgets.css HTTP/1.1” 200 11800
[16/Apr/2024 09:39:26] “GET /static/admin/js/change_form.js HTTP/1.1” 200 606
[16/Apr/2024 09:39:55] “POST /admin/core/recipe/add/ HTTP/1.1” 200 11726
[16/Apr/2024 09:39:55] “GET /admin/jsi18n/ HTTP/1.1” 200 9327
Internal Server Error: /admin/core/recipe/add/
Traceback (most recent call last):
File “C:\Users\Administrator.virtualenvs\Django-h2POR4_7\Lib\site-packages\django\db\backends\utils.py”, line 105, in _execute
return self.cursor.execute(sql, params)
^^^^^^^^^^^^^^^^^^^^^^^^^^^^^^^^
File “C:\Users\Administrator.virtualenvs\Django-h2POR4_7\Lib\site-packages\django\db\backends\sqlite3\base.py”, line 329, in execute
return super().execute(query, params)
^^^^^^^^^^^^^^^^^^^^^^^^^^^^^^
sqlite3.OperationalError: no such table: core_recipe
The above exception was the direct cause of the following exception:
Traceback (most recent call last):
File “C:\Users\Administrator.virtualenvs\Django-h2POR4_7\Lib\site-packages\django\core\handlers\exception.py”, line 55, in inner
response = get_response(request)
^^^^^^^^^^^^^^^^^^^^^
File “C:\Users\Administrator.virtualenvs\Django-h2POR4_7\Lib\site-packages\django\core\handlers\base.py”, line 197, in _get_response
response = wrapped_callback(request, *callback_args, **callback_kwargs)
^^^^^^^^^^^^^^^^^^^^^^^^^^^^^^^^^^^^^^^^^^^^^^^^^^^^^^^^^^^^
File “C:\Users\Administrator.virtualenvs\Django-h2POR4_7\Lib\site-packages\django\contrib\admin\options.py”, line 716, in wrapper
return self.admin_site.admin_view(view)(*args, **kwargs)
^^^^^^^^^^^^^^^^^^^^^^^^^^^^^^^^^^^^^^^^^^^^^^^^^
File “C:\Users\Administrator.virtualenvs\Django-h2POR4_7\Lib\site-packages\django\utils\decorators.py”, line 188, in _view_wrapper result = _process_exception(request, e)
^^^^^^^^^^^^^^^^^^^^^^^^^^^^^^
File “C:\Users\Administrator.virtualenvs\Django-h2POR4_7\Lib\site-packages\django\utils\decorators.py”, line 186, in _view_wrapper response = view_func(request, *args, **kwargs)
^^^^^^^^^^^^^^^^^^^^^^^^^^^^^^^^^^^
File “C:\Users\Administrator.virtualenvs\Django-h2POR4_7\Lib\site-packages\django\views\decorators\cache.py”, line 80, in _view_wrapper
response = view_func(request, *args, **kwargs)
^^^^^^^^^^^^^^^^^^^^^^^^^^^^^^^^^^^
File “C:\Users\Administrator.virtualenvs\Django-h2POR4_7\Lib\site-packages\django\contrib\admin\sites.py”, line 240, in inner
return view(request, *args, **kwargs)
^^^^^^^^^^^^^^^^^^^^^^^^^^^^^^
File “C:\Users\Administrator.virtualenvs\Django-h2POR4_7\Lib\site-packages\django\contrib\admin\options.py”, line 1945, in add_view
return self.changeform_view(request, None, form_url, extra_context)
^^^^^^^^^^^^^^^^^^^^^^^^^^^^^^^^^^^^^^^^^^^^^^^^^^^^^^^^^^^^
File “C:\Users\Administrator.virtualenvs\Django-h2POR4_7\Lib\site-packages\django\utils\decorators.py”, line 48, in _wrapper
return bound_method(*args, **kwargs)
^^^^^^^^^^^^^^^^^^^^^^^^^^^^^
File “C:\Users\Administrator.virtualenvs\Django-h2POR4_7\Lib\site-packages\django\utils\decorators.py”, line 188, in _view_wrapper result = _process_exception(request, e)
^^^^^^^^^^^^^^^^^^^^^^^^^^^^^^
File “C:\Users\Administrator.virtualenvs\Django-h2POR4_7\Lib\site-packages\django\utils\decorators.py”, line 186, in _view_wrapper response = view_func(request, *args, **kwargs)
^^^^^^^^^^^^^^^^^^^^^^^^^^^^^^^^^^^
File “C:\Users\Administrator.virtualenvs\Django-h2POR4_7\Lib\site-packages\django\contrib\admin\options.py”, line 1804, in changeform_view
return self._changeform_view(request, object_id, form_url, extra_context)
^^^^^^^^^^^^^^^^^^^^^^^^^^^^^^^^^^^^^^^^^^^^^^^^^^^^^^^^^^^^^^^^^^
File “C:\Users\Administrator.virtualenvs\Django-h2POR4_7\Lib\site-packages\django\contrib\admin\options.py”, line 1855, in _changeform_view
self.save_model(request, new_object, form, not add)
File “C:\Users\Administrator.virtualenvs\Django-h2POR4_7\Lib\site-packages\django\contrib\admin\options.py”, line 1259, in save_model
obj.save()
File “C:\Users\Administrator.virtualenvs\Django-h2POR4_7\Lib\site-packages\django\db\models\base.py”, line 822, in save
self.save_base(
File “C:\Users\Administrator.virtualenvs\Django-h2POR4_7\Lib\site-packages\django\db\models\base.py”, line 909, in save_base
updated = self._save_table(
^^^^^^^^^^^^^^^^^
File “C:\Users\Administrator.virtualenvs\Django-h2POR4_7\Lib\site-packages\django\db\models\base.py”, line 1067, in _save_table
results = self._do_insert(
^^^^^^^^^^^^^^^^
File “C:\Users\Administrator.virtualenvs\Django-h2POR4_7\Lib\site-packages\django\db\models\base.py”, line 1108, in _do_insert
return manager._insert(
^^^^^^^^^^^^^^^^
File “C:\Users\Administrator.virtualenvs\Django-h2POR4_7\Lib\site-packages\django\db\models\manager.py”, line 87, in manager_method
return getattr(self.get_queryset(), name)(*args, **kwargs)
^^^^^^^^^^^^^^^^^^^^^^^^^^^^^^^^^^^^^^^^^^^^^^^^^^^
File “C:\Users\Administrator.virtualenvs\Django-h2POR4_7\Lib\site-packages\django\db\models\query.py”, line 1847, in _insert
return query.get_compiler(using=using).execute_sql(returning_fields)
^^^^^^^^^^^^^^^^^^^^^^^^^^^^^^^^^^^^^^^^^^^^^^^^^^^^^^^^^^^^^
File “C:\Users\Administrator.virtualenvs\Django-h2POR4_7\Lib\site-packages\django\db\models\sql\compiler.py”, line 1823, in execute_sql
cursor.execute(sql, params)
File “C:\Users\Administrator.virtualenvs\Django-h2POR4_7\Lib\site-packages\django\db\backends\utils.py”, line 122, in execute
return super().execute(sql, params)
^^^^^^^^^^^^^^^^^^^^^^^^^^^^
File “C:\Users\Administrator.virtualenvs\Django-h2POR4_7\Lib\site-packages\django\db\backends\utils.py”, line 79, in execute
return self._execute_with_wrappers(
^^^^^^^^^^^^^^^^^^^^^^^^^^^^
File “C:\Users\Administrator.virtualenvs\Django-h2POR4_7\Lib\site-packages\django\db\backends\utils.py”, line 92, in _execute_with_wrappers
return executor(sql, params, many, context)
^^^^^^^^^^^^^^^^^^^^^^^^^^^^^^^^^^^^
File “C:\Users\Administrator.virtualenvs\Django-h2POR4_7\Lib\site-packages\django\db\backends\utils.py”, line 100, in _execute
with self.db.wrap_database_errors:
File “C:\Users\Administrator.virtualenvs\Django-h2POR4_7\Lib\site-packages\django\db\utils.py”, line 91, in exit
raise dj_exc_value.with_traceback(traceback) from exc_value
File “C:\Users\Administrator.virtualenvs\Django-h2POR4_7\Lib\site-packages\django\db\backends\utils.py”, line 105, in _execute
return self.cursor.execute(sql, params)
^^^^^^^^^^^^^^^^^^^^^^^^^^^^^^^^
File “C:\Users\Administrator.virtualenvs\Django-h2POR4_7\Lib\site-packages\django\db\backends\sqlite3\base.py”, line 329, in execute
return super().execute(query, params)
^^^^^^^^^^^^^^^^^^^^^^^^^^^^^^
django.db.utils.OperationalError: no such table: core_recipe
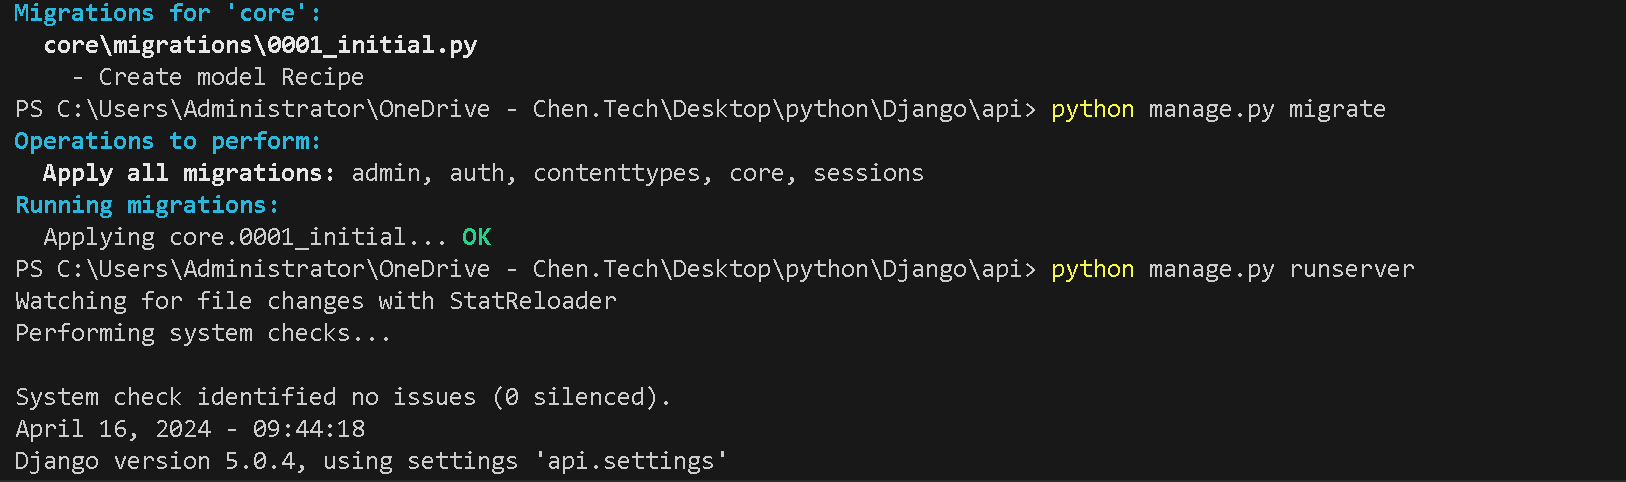
我觉得大概原因是因为创建一个新的模型或者更改现有模型后,没有进行相应的数据库迁移。导致访问相关api时无法读取对应数据。
运行:
1 | python manage.py makemigrations |
创建新的迁移文件
1 | python manage.py migrate |
应用迁移
即可解决上述问题。
没错,关于食谱的增删改查的 API 我们全都实现了!不信?先运行开发服务器:
1 | (recipes_app-nV3wuGJ1) $ python manage.py runserver |
由于 Django REST Framework 为我们提供了测试 API 的 Web 界面,因此这里就不用 Postman 等工具进行测试了。用浏览器访问 localhost:8000/api/recipes,就进入了如下所示的 API 测试页面:
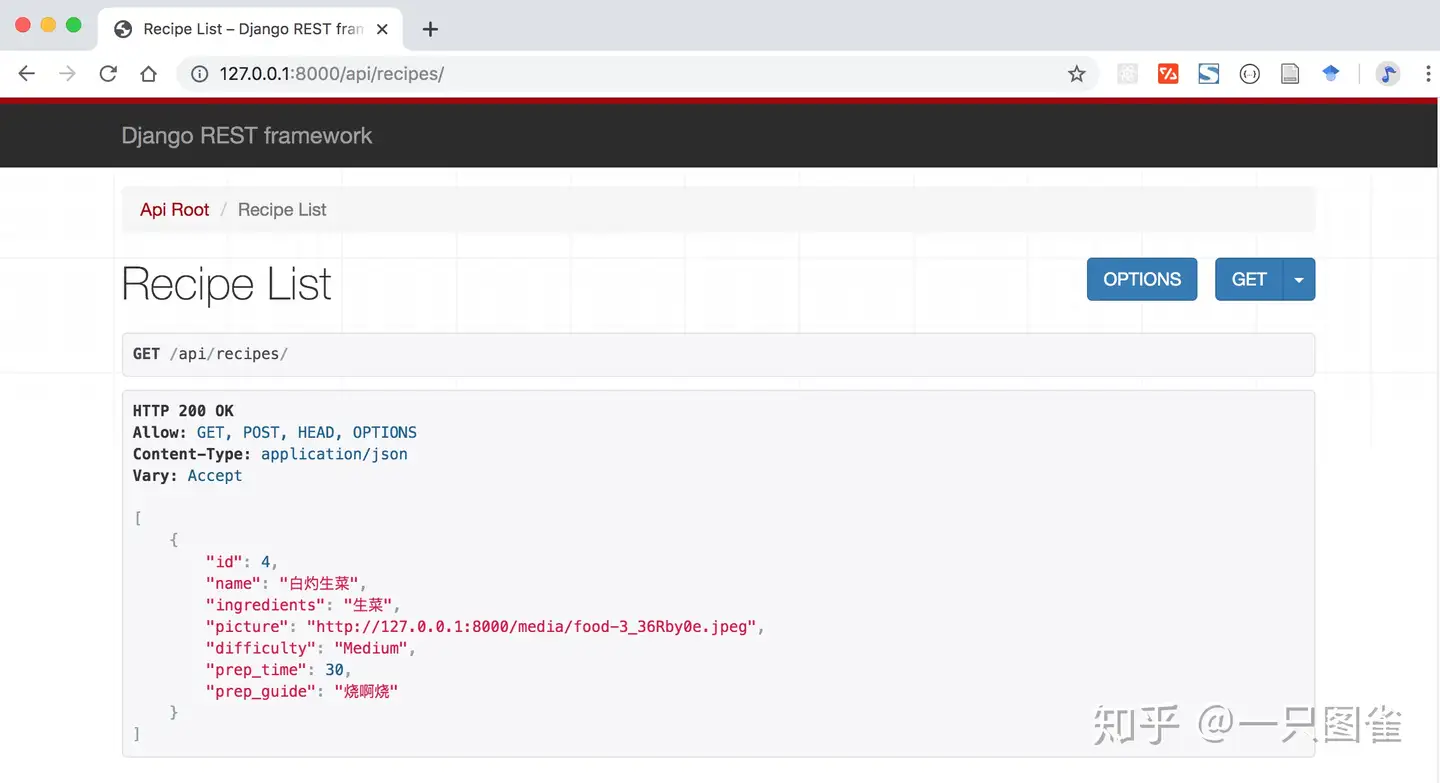
这个页面的下方还有添加数据(发起 POST 请求)的表单,我们填一些数据,然后点击 POST 按钮:
然后再次访问食谱列表页面,就有我们刚刚添加的食谱了!此外,你还可以尝试访问单个食谱的详情页面(例如 localhost:8000/api/recipes/1),并且可以通过 Web 页面直接修改或删除哦!
用 Nuxt.js 实现网站首页
Django 的 MTV 架构固然优秀,但是随着现在的业务逻辑越来越多地向前端倾斜(也就是现在流行的富前端应用),其中的 T(Template)需要更强大的武器来解决,这里就是我们的第二位主角 Nuxt。
用脚手架初始化 Nuxt 项目
我们将把所有的前端代码放到 client 目录中,不过无需自己创建,我们调用 nuxt 的脚手架来创建前端应用:
1 | $ npx create-nuxt-app client |
之后脚手架应用会询问一系列问题,按下面的截图进行选择
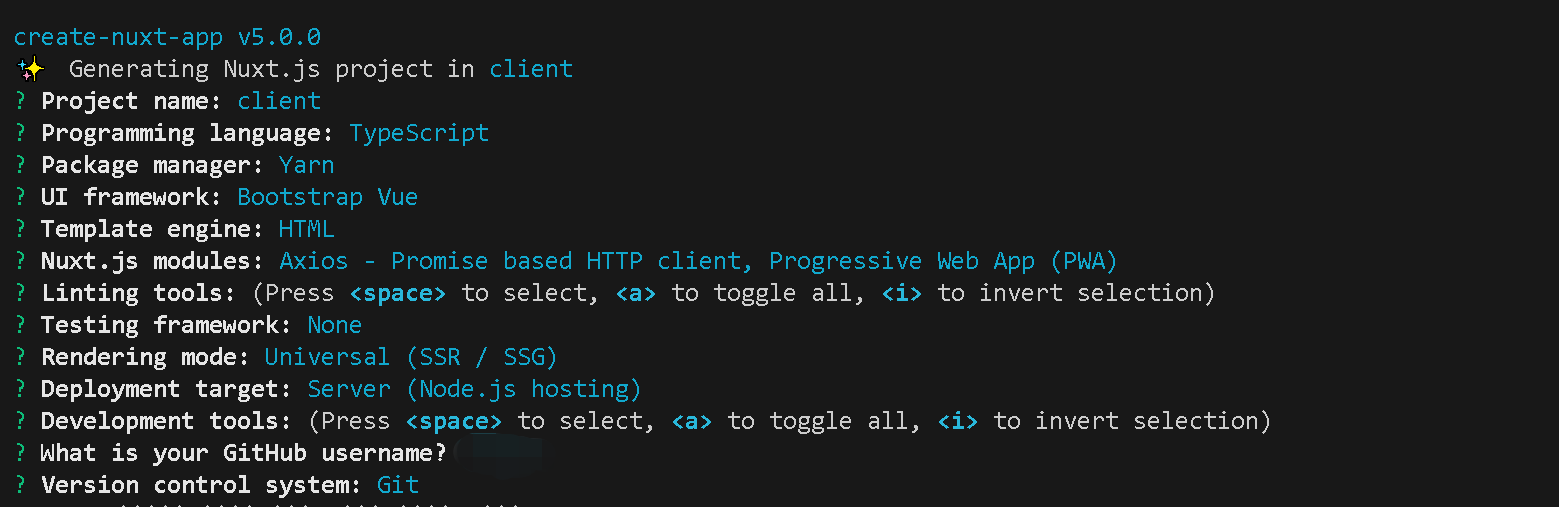
我们对 Nuxt 脚手架生成的目录结构稍作讲解。可以看到 client 目录下有以下子目录:
- assets:存放图片、CSS、JS 等原始资源文件
- components:存放 Vue 组件
- layouts:存放应用布局文件,布局可在多个页面中使用
- middleware:存放应用的中间件。Nuxt 中的中间件指页面渲染前执行的自定义函数(本教程中不需要)
- pages:应用的视图和路由。Nuxt 会根据此目录中的
.vue文件自动创建应用的路由 - plugins: 存放 JavaScript 插件,用于在应用启动前加载(本教程中不需要)
- static:存放通常不会改变的静态文件,并且将直接映射到路由(即可通过
/static/picture.png访问) - store:存放 Vuex Store 文件(本教程中不需要)
本项目所用到的图片资源请访问我们的 GitHub 仓库,并下载到对应的目录中。
编写前端首页
我们在 client/pages 中创建 index.vue 文件,并在其中实现我们的前端首页:
1 | <template> |
模板(Template)+ 脚本(Script)+ 样式(Style),经典的 Vue.js 组件。
我们刚刚创建了 pages 目录下的 index.vue 文件,这意味着当访问根路由 / 时,这个文件将被访问到。(需要删除components/Tutorial.vue),通过 npm run dev运行我们的前端页面(记得在 client 子目录下运行!),可以看到:
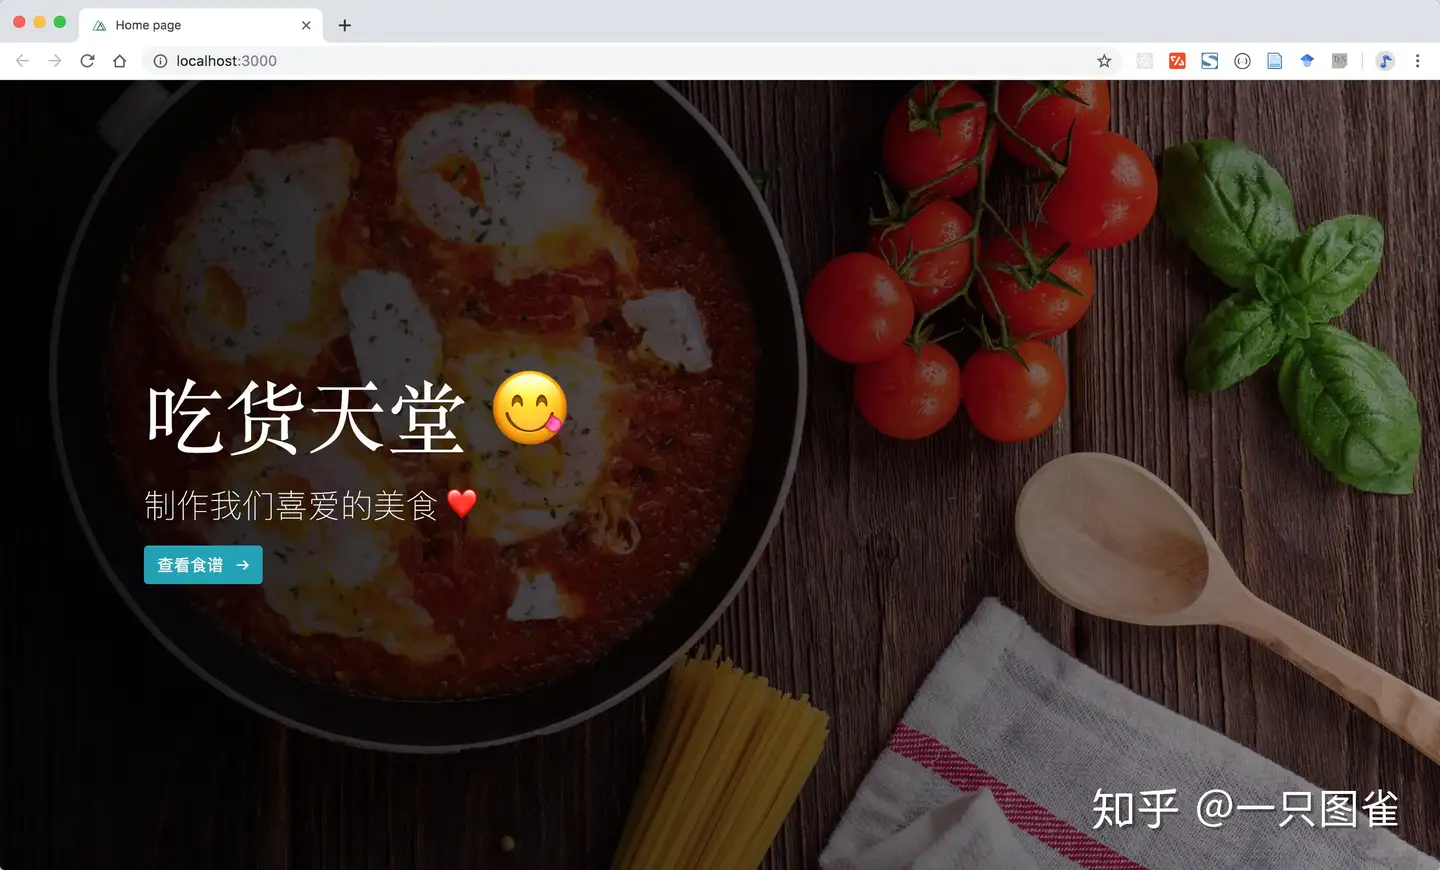
真是让人食欲大开!
数据展示:实现食谱列表
接下来我们将演示如何展示数据,并实现食谱列表页面。
实现 RecipeCard 组件
首先,创建client/components/RecipeCard.vue实现将会在多个页面中反复使用的食谱卡片组件 RecipeCard 如下:
1 | <template> |
在这个组件中,我们定义了两个 props,分别是 recipe(代表食谱对象)和 onDelete(删除时的回调函数),并在模板中使用这两个成员。
了解 Nuxt 的路由功能
在实现第二个页面之前,我们有必要先了解一下 Nuxt 的路由功能——通过 pages 目录下的文档结构,就可以自动生成 vue-router 的路由器配置!
例如我们这样安排 pages 下面的目录结构 :
1 | pages |
_id 目录(或者其他以单下划线开头的目录或 .vue 文件)被称作是动态路由(Dynamic Routing),可以接受参数作为 URL 的一部分。上面的 pages 目录自动生成下面的 router:
1 | router: { |
提示
如果想要更深入地了解 Nuxt 的路由功能,请参考官方文档。
实现食谱列表页面
创建食谱列表页面 pages/recipes/index.vue(先使用假数据填充),代码如下:
1 | <template> |
打开前端网站,可以看到我们刚才实现的食谱列表页面:
到这儿,我们分别实现了这个全栈食谱网站的前端和后端应用,这篇教程的第一部分也就结束了。在接下来的教程中,我们将实现前后端之间的通信,并进一步实现食谱的详情及添加页面,不见不散!
从服务器获取数据
在这一部分,我们将真正实现一个全栈应用——让前端能够向后端发起请求,从而获取想要的数据。
配置 Django 的静态文件服务
首先我们要配置一下 Django 服务器,使前端能够访问其静态文件。调整 api/api/urls.py 文件如下:
1 | # ... |
注意
这样配置静态文件路由的方式仅应当在开发环境下使用。在生产环境下(settings.py 中的DEBUG设为False时),静态文件路由将自动失效(因为 Django 并不适合作为静态文件服务器,应该选用类似 Nginx 之类的服务器,在后续教程中我们将更深入地讨论)。
实现前端的数据请求功能
在客户端,我们先要对 Nuxt 进行全局配置。Nuxt 包括 axios 包,这是一个非常出色的基于 Promise 的 HTTP 请求库。在 nuxt.config.js 中的 axios 一项中添加 Django 服务器的 URL:
1 | export default { |
将食谱列表页面中暂时填充的假数据删去,通过 asyncData 方法获取数据。由于我们之前配置好了 axios,所以 asyncData 函数可以获取到 $axios 对象用于发起 HTTP 请求。我们实现页面加载的数据获取以及 deleteRecipe 事件,代码如下:
1 | <template> |
实现食谱详情页面
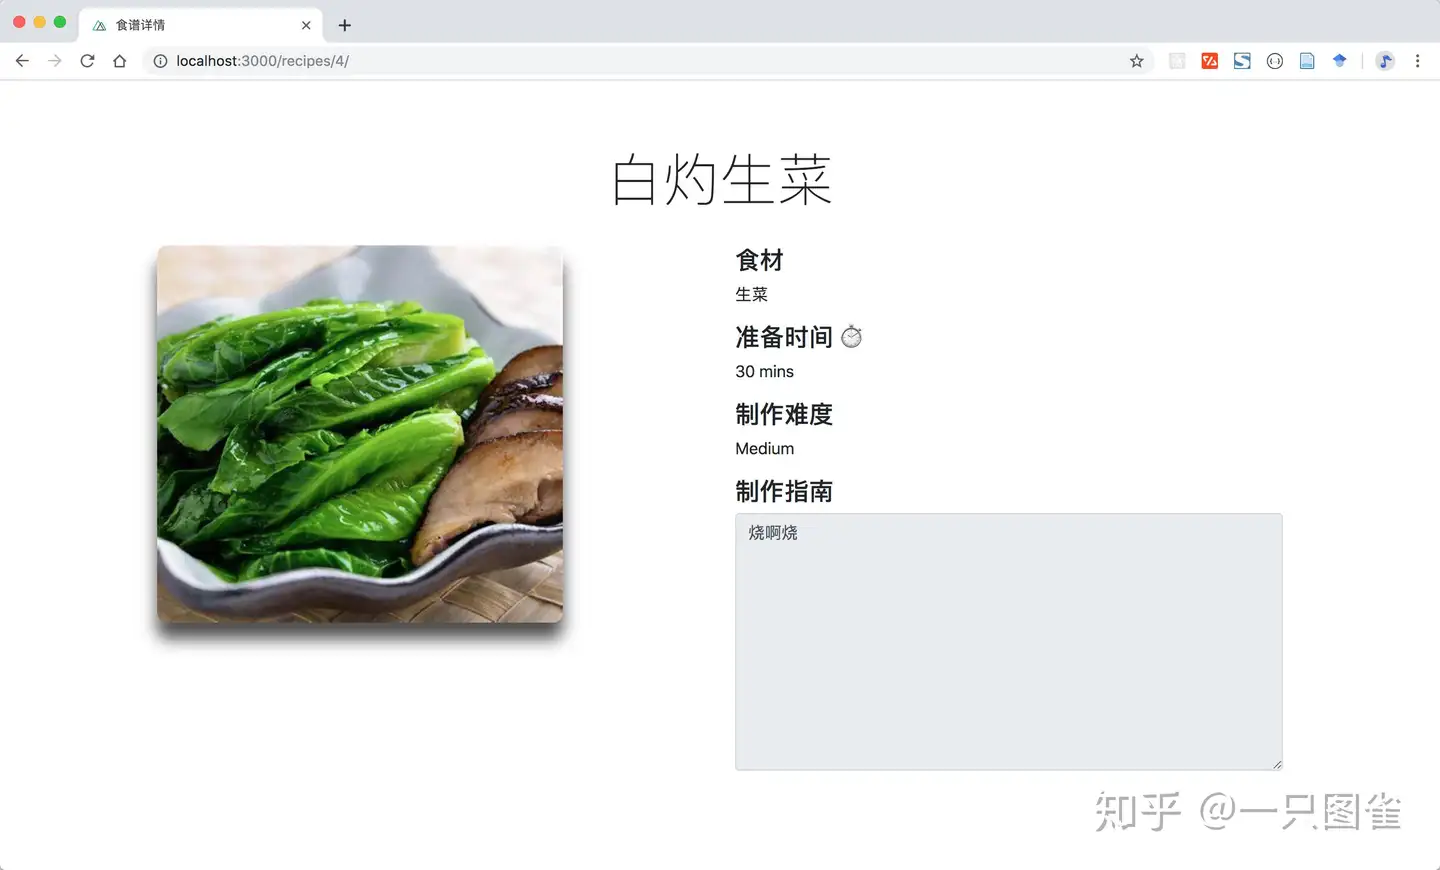
我们进一步实现食谱详情页面。在 pages/recipes 目录中创建 _id 目录,在其中添加 index.vue 文件,代码如下:
1 | <template> |
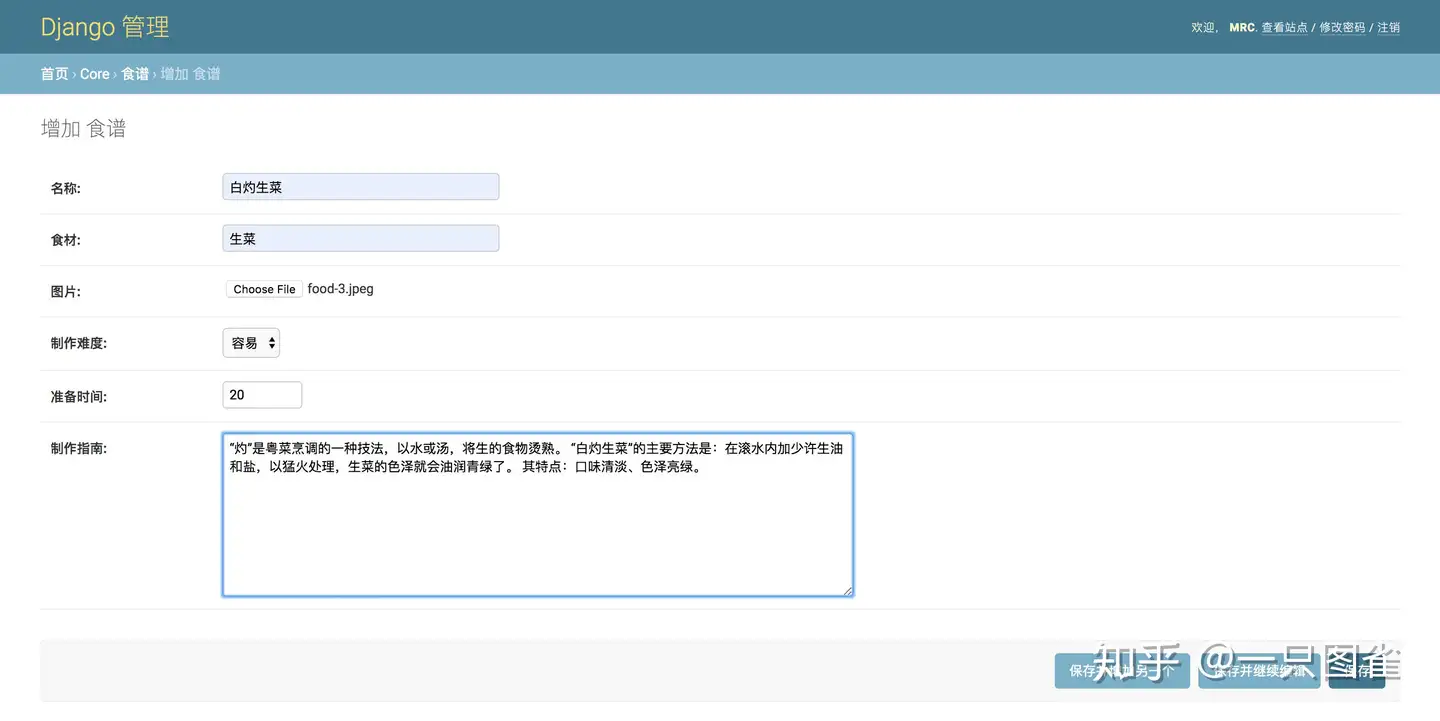
为了测试前端页面能否真正从后端获取数据,我们先要在后端数据库中添加一些数据,而这对 Django 来说就非常方便了。进入 api 目录,运行 python manage.py runserver 打开服务器,然后进入后台管理页面(http://localhost:8000/admin),添加一些数据:
http://localhost:8000/adminlocalhost:8000/admin
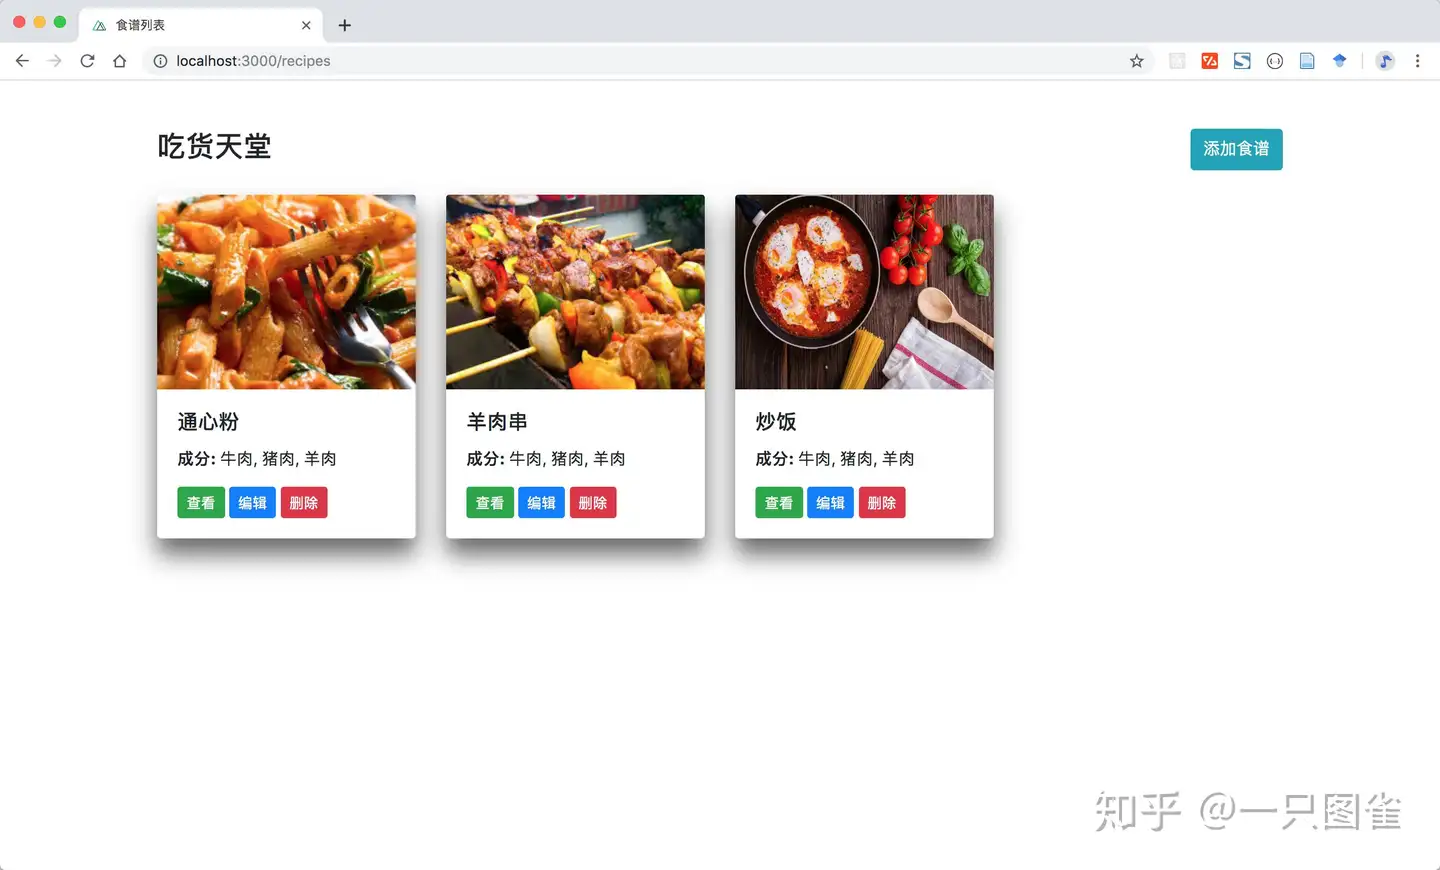
再运行前端页面,可以看到我们刚刚在 Django 后台管理中添加的项目:

实现食谱的编辑和创建页面
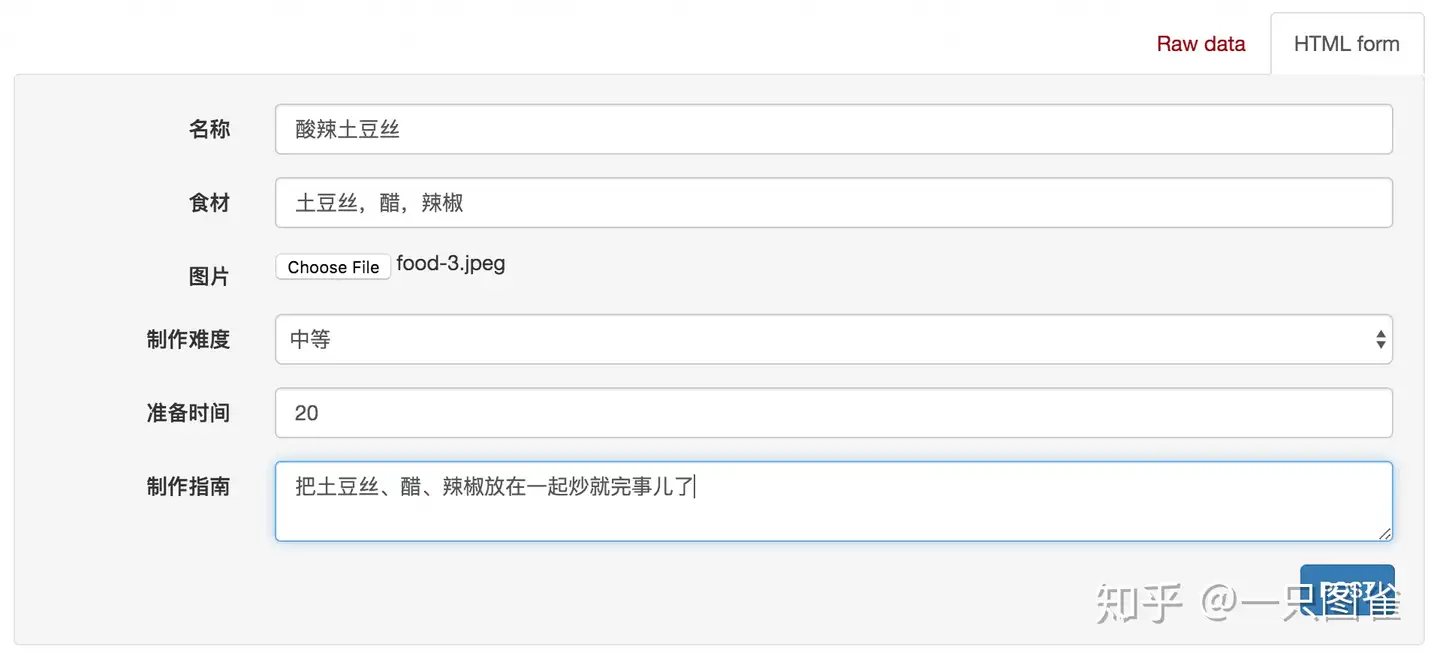
有了前面的铺垫,实现食谱的添加和删除也基本上是按部就班了。我们在 pages/recipes/_id 中实现 edit.vue(食谱编辑页面),代码如下:
1 | <template> |
实现之后的页面如下:
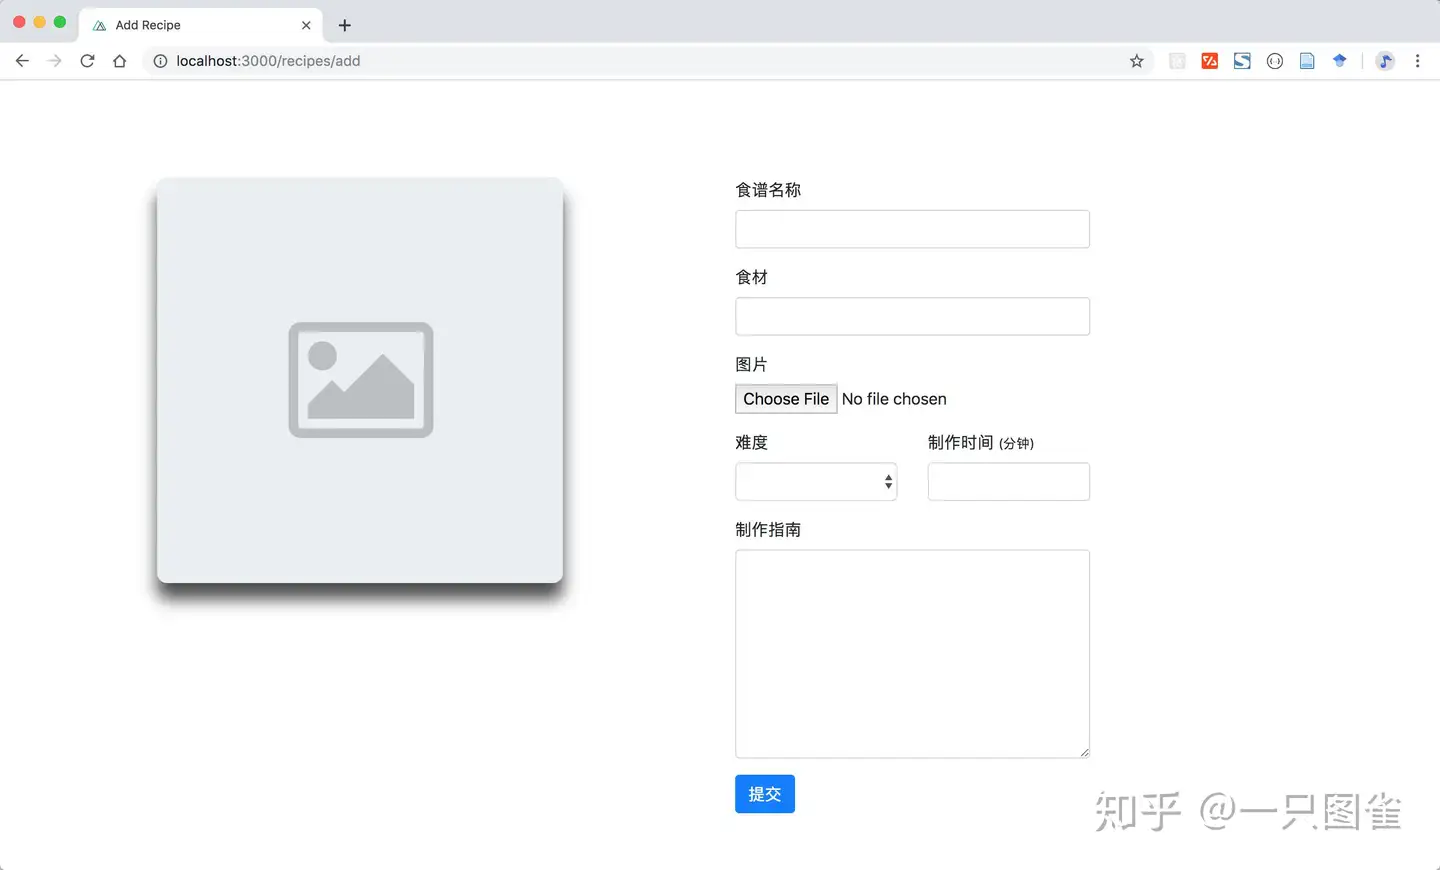
继续在 pages/recipes/_id 中实现 add.vue (创建食谱页面)如下:
1 | <template> |
实现的页面如下:
一点强迫症:全局页面跳转效果
在这一节中,我们将演示如何在 Nuxt 中添加全局样式文件,来实现前端页面之间的跳转效果。
首先在 assets 目录中创建 css 目录,并在其中添加 transition.css 文件,代码如下:
1 | .page-enter-active, |
在 Nuxt 配置文件中将刚才写的 transition.css 中添加到全局 CSS 中:
1 | export default { |
欧耶,一个具有完整增删改查功能、实现了前后端分离的美食分享网站就完成了!
 wechat
 Alipay